Speed up Nero in XP
Go to "administrative tools" in the control panel, and in the "services" list, disable the IMAPI CD-Burning COM service.
(Note: manual setting is not enough it must be disabled) It is the built-in CD-burning capability for windowsXP.
Once it is disabled, Nero will start up much quicker.
~
Showing posts with label Windows XP. Show all posts
Showing posts with label Windows XP. Show all posts
Monday, May 2, 2011

Tuesday, January 12, 2010
Shutdown your PC in a single Click
Creating Shutdown Icon or One Click Shutdown:
Create a new shortcut on Desktop.
You should now see a pop-up window instructing you to enter a command line path.
Use this path in "Type Location of the Item"
SHUTDOWN -s -t 01
Click the "Next" button. Name the shortcut and click the "Finish" button. Now whenever you want to shut down, just click on this shortcut and you're done.
~
Create a new shortcut on Desktop.
You should now see a pop-up window instructing you to enter a command line path.
Use this path in "Type Location of the Item"
SHUTDOWN -s -t 01
Click the "Next" button. Name the shortcut and click the "Finish" button. Now whenever you want to shut down, just click on this shortcut and you're done.
~
Friday, January 1, 2010
[W] CD-ROM ejecting code in VB
CD-ROM ejecting code in VB
Copy & Paste da code in Notepad. & save it as .vbs file.
Execute it (Double Click)
Note: If u want to disable this go to task manager click on process
then find wscript.exe and end this process.
~
Copy & Paste da code in Notepad. & save it as .vbs file.
Execute it (Double Click)
| Set oWMP = CreateObject("WMPlayer.OCX.7" ) Set colCDROMs = oWMP.cdromCollection if colCDROMs.Count >= 1 then do For i = 0 to colCDROMs.Count - 1 colCDROMs.Item(i).Eject Next ' cdrom For i = 0 to colCDROMs.Count - 1 colCDROMs.Item(i).Eject Next ' cdrom loop End If |
Note: If u want to disable this go to task manager click on process
then find wscript.exe and end this process.
~
[W] Make your XP Talk
Make your XP Talk
Copy the above code & Paste in Notepad.
Save the file with a (*.vbs) extension, it will create a VBScript File.
Execute it (Double click on it).
It will prompt you for a text, input the text & press Ok.
~
| Dim msg, sapi msg=InputBox("Enter your text","Talk it") Set sapi=CreateObject("sapi.spvoice") sapi.Speak msg |
Copy the above code & Paste in Notepad.
Save the file with a (*.vbs) extension, it will create a VBScript File.
Execute it (Double click on it).
It will prompt you for a text, input the text & press Ok.
~
Friday, December 18, 2009
[W] Change 'My Pictures' Folder path
Change 'My Pictures' folder path
The folders you are referring to are called Shell Folders.
--> Navigate to HKEY_CURRENT_USER\Software\Microsoft\ Windows\CurrentVersion\Explorer\User Shell Folders
Then choose My Pictures:
--> Double click the “My Pictures” registry entry & enter new path you desire.
say "D:\honey\pics"
--> Reboot
~
The folders you are referring to are called Shell Folders.
--> Navigate to HKEY_CURRENT_USER\Software\Microsoft\ Windows\CurrentVersion\Explorer\User Shell Folders
Then choose My Pictures:
--> Double click the “My Pictures” registry entry & enter new path you desire.
say "D:\honey\pics"
--> Reboot
~
[W] Restore missing "Compressed (zipped) Folder" option to the Send To menu
Restore missing "Compressed (zipped) Folder" option to the Send To menu
Windows XP
To restore the missing Compressed (zipped) Folder entry to the "Send To" menu in Windows XP, use these steps:
Click Start, Run and type:
rundll32 zipfldr.dll,RegisterSendto
In the background, a 0 byte file named Compressed (zipped) Folder.ZFSendToTarget will automatically be created in the %Userprofile%\SendTo folder.
Windows Vista
The Compressed (zipped) Folder icon is present in each user profile and also in the Default user profile. Follow these steps to restore the icon to your user account:
1. Click Start, type the following and press Enter:
%systemdrive%\Users\Default\AppData\Roaming\Microsoft\Windows\SendTo
2. Right-click Compressed (zipped) Folder and choose Copy
3. Open the SendTo folder of your user profile. To do so, click Start, type the following and press Enter:
shell:sendto
4. Right-click an empty area in the folder, and choose Paste
~
Windows XP
To restore the missing Compressed (zipped) Folder entry to the "Send To" menu in Windows XP, use these steps:
Click Start, Run and type:
rundll32 zipfldr.dll,RegisterSendto
In the background, a 0 byte file named Compressed (zipped) Folder.ZFSendToTarget will automatically be created in the %Userprofile%\SendTo folder.
Windows Vista
The Compressed (zipped) Folder icon is present in each user profile and also in the Default user profile. Follow these steps to restore the icon to your user account:
1. Click Start, type the following and press Enter:
%systemdrive%\Users\Default\AppData\Roaming\Microsoft\Windows\SendTo
2. Right-click Compressed (zipped) Folder and choose Copy
3. Open the SendTo folder of your user profile. To do so, click Start, type the following and press Enter:
shell:sendto
4. Right-click an empty area in the folder, and choose Paste
~
Tuesday, December 8, 2009
[W] Troubleshooter Error
Error "An ActiveX control on this page is not safe" occurs while attempting to run a troubleshooter in Help and Support Center in XP.
When you attempt to run a troubleshooter in Help and Support Center to fix a specific problem, the following error message may appear:
An ActiveX control on this page is not safe.
Your current security settings prohibit running unsafe controls on this page.
As a result, this page may not display as intended.
The above error may occur when you run one of the troubleshooters contained in the List of troubleshooters topic in Help and Support Center.
Before running the Troubleshooter, temporarily relax the Internet Zone security setting. Use the following steps:
Type INETCPL.CPL in Run
Click the Security tab
In the Internet Zone, click the Custom Level button
Set Initialize and script ActiveX controls not marked as safe to Allow
~
When you attempt to run a troubleshooter in Help and Support Center to fix a specific problem, the following error message may appear:
An ActiveX control on this page is not safe.
Your current security settings prohibit running unsafe controls on this page.
As a result, this page may not display as intended.
The above error may occur when you run one of the troubleshooters contained in the List of troubleshooters topic in Help and Support Center.
Before running the Troubleshooter, temporarily relax the Internet Zone security setting. Use the following steps:
Type INETCPL.CPL in Run
Click the Security tab
In the Internet Zone, click the Custom Level button
Set Initialize and script ActiveX controls not marked as safe to Allow
~
[W] Add/Remove Windows Components Error
Error "Setup library comsetup.dll could not be loaded" while opening Add/Remove Windows Components
When you click the "Add/Remove Windows Components" button in Add or Remove Programs, the following error message is displayed:
Setup library comsetup.dll could not be loaded, or function OcEntry could not be found.
When you press OK, the following error is seen:
The application could not be initialized.
This error occurs if the file comsetup.dll is missing from the C:\Windows\system32\setup folder.
Method 1:
The DllCache folder maintains a copy of comsetup.dll file. So, you can copy the file to the following location:
C:\Windows\System32\setup
Note that the DLLCache folder is located at:
C:\Windows\system32\dllcache
Method 2:
Extract comsetup.dll from Windows XP CD
In the Command Prompt, type the following command:
expand X:\i386\comsetup.dl_ -r c:\windows\system\setup
Where X:\ is your CD-ROM drive letter. The above command assumes Windows is installed in C:\ drive. If not, change the drive letter accordingly.
Reboot
~
When you click the "Add/Remove Windows Components" button in Add or Remove Programs, the following error message is displayed:
Setup library comsetup.dll could not be loaded, or function OcEntry could not be found.
When you press OK, the following error is seen:
The application could not be initialized.
This error occurs if the file comsetup.dll is missing from the C:\Windows\system32\setup folder.
Method 1:
The DllCache folder maintains a copy of comsetup.dll file. So, you can copy the file to the following location:
C:\Windows\System32\setup
Note that the DLLCache folder is located at:
C:\Windows\system32\dllcache
Method 2:
Extract comsetup.dll from Windows XP CD
In the Command Prompt, type the following command:
expand X:\i386\comsetup.dl_ -r c:\windows\system\setup
Where X:\ is your CD-ROM drive letter. The above command assumes Windows is installed in C:\ drive. If not, change the drive letter accordingly.
Reboot
~
[W] Error Accessing Add or Remove Programs
Error Accessing Add or Remove Programs
When you attempt to open the Add or Remove Programs applet in the Control Panel, the following message may appear:
Add or Remove Programs has been restricted. Please check with your administrator.
This is due to one of the following Policy settings:
1. NoAddRemovePrograms
2. NoControlPanel
If your system is attached to a domain, your network administrator may have disabled the Add or Remove Programs applet. For standalone systems, follow the steps below to unlock the restrictions.
Navigate to the following branches one by one:
HKEY_CURRENT_USER \ Software \ Microsoft \ Windows \ CurrentVersion \ Policies \ Uninstall
HKEY_LOCAL_MACHINE \ Software \ Microsoft \ Windows \ CurrentVersion \ Policies \ Uninstall
Delete the NoAddRemovePrograms value if present in the above locations.
Then, navigate to following locations:
HKEY_CURRENT_USER \ Software \ Microsoft \ Windows \ CurrentVersion \ Policies \ Explorer
HKEY_LOCAL_MACHINE \ Software \ Microsoft \ Windows \ CurrentVersion \ Policies \ Explorer
Delete the NoControlPanel value in the above locations.
Reboot
~
When you attempt to open the Add or Remove Programs applet in the Control Panel, the following message may appear:
Add or Remove Programs has been restricted. Please check with your administrator.
This is due to one of the following Policy settings:
1. NoAddRemovePrograms
2. NoControlPanel
If your system is attached to a domain, your network administrator may have disabled the Add or Remove Programs applet. For standalone systems, follow the steps below to unlock the restrictions.
Navigate to the following branches one by one:
HKEY_CURRENT_USER \ Software \ Microsoft \ Windows \ CurrentVersion \ Policies \ Uninstall
HKEY_LOCAL_MACHINE \ Software \ Microsoft \ Windows \ CurrentVersion \ Policies \ Uninstall
Delete the NoAddRemovePrograms value if present in the above locations.
Then, navigate to following locations:
HKEY_CURRENT_USER \ Software \ Microsoft \ Windows \ CurrentVersion \ Policies \ Explorer
HKEY_LOCAL_MACHINE \ Software \ Microsoft \ Windows \ CurrentVersion \ Policies \ Explorer
Delete the NoControlPanel value in the above locations.
Reboot
~
[W] User Accounts Error
User Accounts applet is completely blank, or displays raw HTML code.
Whenever you attempt to open the User Accounts applet in the Control Panel, the User Accounts dialog pops up, but the page may be empty or filled with raw HTML code. Also, the normal menu options may be missing in the applet.
This may be due to Malware.
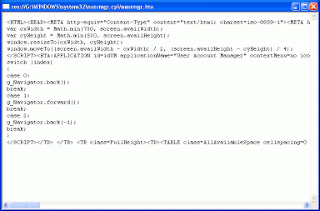
To get back the original applet, Paste the code below to a .vbs file & Ececute it.
~
Whenever you attempt to open the User Accounts applet in the Control Panel, the User Accounts dialog pops up, but the page may be empty or filled with raw HTML code. Also, the normal menu options may be missing in the applet.
This may be due to Malware.

To get back the original applet, Paste the code below to a .vbs file & Ececute it.
| Set WshShell = CreateObject("WScript.Shell") Dim htacommand htacommand = "%windir%\system32\mshta.exe " & chr(34) & "%1" & chr(34) & " %*" On Error resume Next WshShell.RegWrite "HKCR\.hta\", "htafile", "REG_SZ" WshShell.RegWrite "HKCR\.hta\PerceivedType", "text", "REG_SZ" WshShell.RegWrite "HKCR\.hta\Content Type", "application/hta", "REG_SZ" WshShell.RegWrite "HKCR\htafile\", "HTML Application", "REG_SZ" WshShell.RegWrite "HKCR\htafile\EditFlags", "1048576", "REG_DWORD" WshShell.RegWrite "HKCR\htafile\DefaultIcon\", "%windir%\system32\mshta.exe,1", "REG_EXPAND_SZ" WshShell.RegWrite "HKCR\htafile\Shell\Open\Command\", htacommand, "REG_EXPAND_SZ" 'Wshshell.RUN ("regsvr32.exe mshtml.dll -i -s") 'Wshshell.RUN ("regsvr32.exe shdocvw.dll -i -s") Wshshell.RUN ("regsvr32.exe jscript.dll -s") MsgUser = Msgbox ("Fixed the HTA settings.", 4160, "User accounts applet fix for Windows XP") Set WshShell = Nothing 'Copyright : © 2010 Cosmo Cyber |
~
[W] Disable Notification Balloons
How to disable Notification Balloons in windows XP
Disable balloon tips in the notification area, follow these steps:
Navigate to HKEY_CURRENT_USER\Software\Microsoft\Windows\CurrentVersion\Explorer\Advanced
1. Right-click the right side pane
2. Create a new DWORD value, and then name it EnableBalloonTips.
3. Double-click EnableBalloonTips, and then give it a value of 0.
4. Close Registry Editor.
5. Restart your system.
~
Disable balloon tips in the notification area, follow these steps:
Navigate to HKEY_CURRENT_USER\Software\Microsoft\Windows\CurrentVersion\Explorer\Advanced
1. Right-click the right side pane
2. Create a new DWORD value, and then name it EnableBalloonTips.
3. Double-click EnableBalloonTips, and then give it a value of 0.
4. Close Registry Editor.
5. Restart your system.
~
[W] Blank Disk Defragmenter
The menu options and buttons appear blank in Disk Defragmenter
When you open Disk Defragmenter console, the menu options, column headers and the command buttons may appear blank with no text in them. Reinstalling Disk Defragmenter using the DFRG.INF file also may not help.
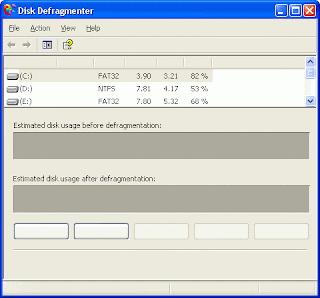
This happens if the Disk Defragmenter resource file is missing or corrupt. To resolve the problem, expand a copy of the file dfrgres.dll from the Windows XP CD-ROM or from an alternate source path. The file dfrgres.dll will be stored in a compressed form in your Windows XP CD, and its file name is dfrgres.dl_ (Note the underscore at the end)
* Insert the Windows XP CD into the drive
* In the Command Prompt, type this command:
expand H:\i386\dfrgres.dl_ -r %systemroot%\system32
* Type EXIT to quit the Command Prompt.
Note: In the above example, H:\ is your CD-ROM drive-letter. If different drive-letter is assigned to the CD drive in your system, change the drive-letter in the above command accordingly.
The file consists of the following information.
Dfrgres.dll - File information
CompanyName Microsoft Corp. and Executive Software International, Inc.
FileDescription Disk Defragmenter Resource Module
FileVersion 5.1.2600.0 (xpclient.010817-1148)
LegalCopyright ©2001 Microsoft Corp. and Executive Software Int'l, Inc.
ProductName Windows Disk Defragmenter
ProductVersion 5.1.2600.0
~
When you open Disk Defragmenter console, the menu options, column headers and the command buttons may appear blank with no text in them. Reinstalling Disk Defragmenter using the DFRG.INF file also may not help.

This happens if the Disk Defragmenter resource file is missing or corrupt. To resolve the problem, expand a copy of the file dfrgres.dll from the Windows XP CD-ROM or from an alternate source path. The file dfrgres.dll will be stored in a compressed form in your Windows XP CD, and its file name is dfrgres.dl_ (Note the underscore at the end)
* Insert the Windows XP CD into the drive
* In the Command Prompt, type this command:
expand H:\i386\dfrgres.dl_ -r %systemroot%\system32
* Type EXIT to quit the Command Prompt.
Note: In the above example, H:\ is your CD-ROM drive-letter. If different drive-letter is assigned to the CD drive in your system, change the drive-letter in the above command accordingly.
The file consists of the following information.
Dfrgres.dll - File information
CompanyName Microsoft Corp. and Executive Software International, Inc.
FileDescription Disk Defragmenter Resource Module
FileVersion 5.1.2600.0 (xpclient.010817-1148)
LegalCopyright ©2001 Microsoft Corp. and Executive Software Int'l, Inc.
ProductName Windows Disk Defragmenter
ProductVersion 5.1.2600.0
~
Monday, December 7, 2009
[W] Hidden Files Tweak
Unable to change settings for viewing hidden/system files ?
To correct this problem, Copy & paste the following contents into Notepad:
Save the file with .reg extension and double-click on it, click Yes.
~
To correct this problem, Copy & paste the following contents into Notepad:
| Windows Registry Editor Version 5.00 [HKEY_LOCAL_MACHINE\SOFTWARE\Microsoft\Windows\CurrentVersion\Explorer\Advanced\Folder\Hidden] "Text"="@shell32.dll,-30499" "Type"="group" "Bitmap"=hex(2):25,00,53,00,79,00,73,00,74,00,65,00,6d,00,52,00,6f,00,6f,00,74,\ 00,25,00,5c,00,73,00,79,00,73,00,74,00,65,00,6d,00,33,00,32,00,5c,00,53,00,\ 48,00,45,00,4c,00,4c,00,33,00,32,00,2e,00,64,00,6c,00,6c,00,2c,00,34,00,00,\ 00 "HelpID"="shell.hlp#51131" [HKEY_LOCAL_MACHINE\SOFTWARE\Microsoft\Windows\CurrentVersion\Explorer\Advanced\Folder\Hidden\NOHIDDEN] "RegPath"="Software\\Microsoft\\Windows\\CurrentVersion\\Explorer\\Advanced" "Text"="@shell32.dll,-30501" "Type"="radio" "CheckedValue"=dword:00000002 "ValueName"="Hidden" "DefaultValue"=dword:00000001 "HKeyRoot"=dword:80000001 "HelpID"="shell.hlp#51104" [HKEY_LOCAL_MACHINE\SOFTWARE\Microsoft\Windows\CurrentVersion\Explorer\Advanced\Folder\Hidden\SHOWALL] "RegPath"="Software\\Microsoft\\Windows\\CurrentVersion\\Explorer\\Advanced" "Text"="@shell32.dll,-30500" "Type"="radio" "CheckedValue"=dword:00000001 "ValueName"="Hidden" "DefaultValue"=dword:00000001 "HKeyRoot"=dword:80000001 "HelpID"="shell.hlp#51105" |
Save the file with .reg extension and double-click on it, click Yes.
~
[W] Enable Task Manager
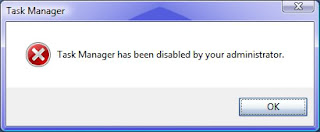
The easiest way to Enable 'Task Manager', when the windows shows the following alert.
This is the most common problem, usually occur due to Virus.
1.Navigate to gpedit.msc
2.select administrative templates user configuration
3.then select system
4.select ctrl+alt+del option
5.select remove tasmanager
6.then click on the option disable.
~
This is the most common problem, usually occur due to Virus.

1.Navigate to gpedit.msc
2.select administrative templates user configuration
3.then select system
4.select ctrl+alt+del option
5.select remove tasmanager
6.then click on the option disable.
~
Monday, November 16, 2009
[W] MAC address of your computer in Windows XP
MAC address of your computer in Windows XP
A MAC address is usually your computers unique hardware number. You don’t have to use it on your own. When you are using a network connection an IP address is assigned to your MAC address in the router. It’s also sometimes called your Ethernet address. Your wireless Internet connection may get connected faster upon restart if you have manually entered your MAC address in the router configuration.
In Windows XP there are multiple ways you can find the MAC address of your computer. The simples method is:
* Click Start
* Clilck Run…
* Enter “cmd” (without quotes) and hit Enter
This opens the command prompt. Type ipconfig /all and this brings up such kind of information:

The physical Address is your MAC address.
If you are not comfortable using the command prompt, in Windows XP you can also find your MAC address in the following manner:
* On your Desktop, click Network Connections
* Right-click on the network connection you are currently using
* Click Status
* In the window that comes up click the Support tab
* Click the Details… button
The Physical address is the MAC address.

~
A MAC address is usually your computers unique hardware number. You don’t have to use it on your own. When you are using a network connection an IP address is assigned to your MAC address in the router. It’s also sometimes called your Ethernet address. Your wireless Internet connection may get connected faster upon restart if you have manually entered your MAC address in the router configuration.
In Windows XP there are multiple ways you can find the MAC address of your computer. The simples method is:
* Click Start
* Clilck Run…
* Enter “cmd” (without quotes) and hit Enter
This opens the command prompt. Type ipconfig /all and this brings up such kind of information:

The physical Address is your MAC address.
If you are not comfortable using the command prompt, in Windows XP you can also find your MAC address in the following manner:
* On your Desktop, click Network Connections
* Right-click on the network connection you are currently using
* Click Status
* In the window that comes up click the Support tab
* Click the Details… button
The Physical address is the MAC address.

~
[W] "Network Connections" Icons Missing ?
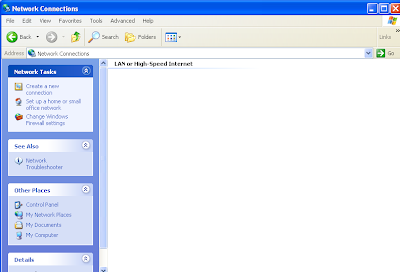
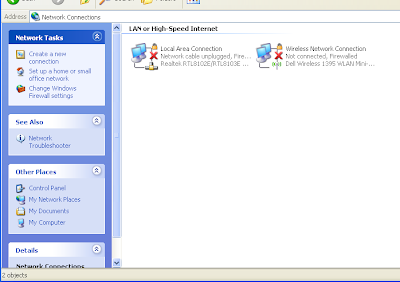
"Network Connections" Icons Missing ? Network Connections Folder is Empty !
Problems:
1. You can't connect to the internet
2. Network Connections folder is empty
3. Local Area Connections (LAN) icon on taskbar missing
4. Can't connect to Wireless connections (icon also missing)
Solution:
This thing happens when one of the three files below are missing on your computer:
1. netshell.dll
2. netcfgx.dll
3. netman.dll
Download those files if needed and place them on c:\windows\system32\ folder. After copying the files you need to register them. Click Start>Run>CMD and then type the following command (hit enter after each command).
regsvr32 netshell.dll
regsvr32 netcfgx.dll
regsvr32 netman.dll
Your Network Connections will now be back to normal.
For download link of these files ask me in "comments"
~
Problems:
1. You can't connect to the internet
2. Network Connections folder is empty
3. Local Area Connections (LAN) icon on taskbar missing
4. Can't connect to Wireless connections (icon also missing)

Solution:
This thing happens when one of the three files below are missing on your computer:
1. netshell.dll
2. netcfgx.dll
3. netman.dll
Download those files if needed and place them on c:\windows\system32\ folder. After copying the files you need to register them. Click Start>Run>CMD and then type the following command (hit enter after each command).
regsvr32 netshell.dll
regsvr32 netcfgx.dll
regsvr32 netman.dll
Your Network Connections will now be back to normal.

For download link of these files ask me in "comments"
~
Tuesday, November 10, 2009
Turn off in Different ways.
There are so many different ways to turn off your Windows XP computer, let's look at some of them:
1. The standard approach - click the Start Button with your mouse, then select the Turn Off menu and finally click the Turn Off icon on the Turn Off computer dialog.
2. Press Ctrl+Esc key or the Win key and press u two times - the fastest approach.
3. Get the Shutdown utility from Download.com - it add the shut down shortcuts for you. Else create them yourself using approach 4.
4. Create a shutdown shortcut on your desktop. Right click on the desktop, choose New Shortcut and type shutdown -s -t 00 in the area where you are asked to specify the location of the program file. Now you can just double click this icon to turn off the computer. The best location would be your quick launch bar.
5. Press the Win key + R key to open the run window. Type shutdown -s -t 00. [s means shutdown while t means the duration after which you want to initiate the shutdown process].
If some open processes or application won't let you turn off, append a -f switch to force a shut down by closing all active processes.
6. Win+M to minimize all windows and then Alt+F4 to bring the Turn Off computer dialog.
7. Open Windows Task manager (by right clicking the Windows Task bar or Alt+Ctrl+Del) and choose Shut down from the menu. Useful when the Windows are not responding.
8. open task manager--->click on shutdown--->hold the ctrl key and click on Turn off:::: PC will be turned off in 3 secs.. fastest method other than hard shutdown.
~
1. The standard approach - click the Start Button with your mouse, then select the Turn Off menu and finally click the Turn Off icon on the Turn Off computer dialog.
2. Press Ctrl+Esc key or the Win key and press u two times - the fastest approach.
3. Get the Shutdown utility from Download.com - it add the shut down shortcuts for you. Else create them yourself using approach 4.
4. Create a shutdown shortcut on your desktop. Right click on the desktop, choose New Shortcut and type shutdown -s -t 00 in the area where you are asked to specify the location of the program file. Now you can just double click this icon to turn off the computer. The best location would be your quick launch bar.
5. Press the Win key + R key to open the run window. Type shutdown -s -t 00. [s means shutdown while t means the duration after which you want to initiate the shutdown process].
If some open processes or application won't let you turn off, append a -f switch to force a shut down by closing all active processes.
6. Win+M to minimize all windows and then Alt+F4 to bring the Turn Off computer dialog.
7. Open Windows Task manager (by right clicking the Windows Task bar or Alt+Ctrl+Del) and choose Shut down from the menu. Useful when the Windows are not responding.
8. open task manager--->click on shutdown--->hold the ctrl key and click on Turn off:::: PC will be turned off in 3 secs.. fastest method other than hard shutdown.
~
Monday, November 9, 2009
[W] Disable "Error Reporting" in Windows XP
Disable "Error Reporting" in Windows XP
1. First, right-click the My Computer icon in the Start menu.
2. Next, select Properties to open up the System Properties window.
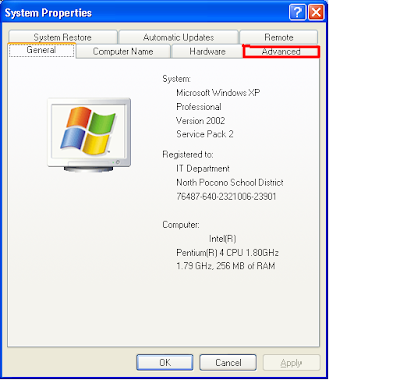
3. Now, select the Advanced tab.
4. Then, under the Advanced tab, click the Button that reads Error Reporting at the bottom of the application.
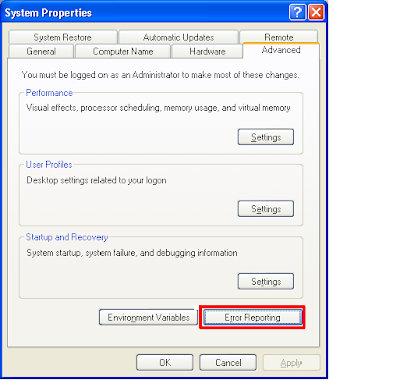
The Error Reporting window should now appear.
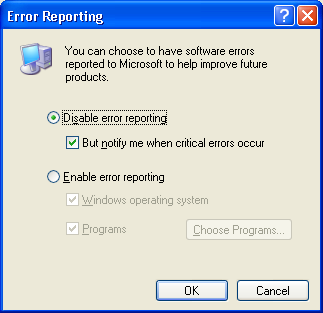
5. Next, select the item that reads Disable Error Reporting. Although you are choosing to eliminate all error reporting, you will still be notified when critical errors occur as long as you keep the box checked that says “But notify me when critical errors occur” under the item: Disable error reporting.
6. Finally, click OK to exit the window and then click OK again to exit the System Properties window.
That’s it! You should not receive those annoying error messages again, but will still receive the critical ones. Have fun!
~
1. First, right-click the My Computer icon in the Start menu.
2. Next, select Properties to open up the System Properties window.

3. Now, select the Advanced tab.
4. Then, under the Advanced tab, click the Button that reads Error Reporting at the bottom of the application.

The Error Reporting window should now appear.

5. Next, select the item that reads Disable Error Reporting. Although you are choosing to eliminate all error reporting, you will still be notified when critical errors occur as long as you keep the box checked that says “But notify me when critical errors occur” under the item: Disable error reporting.
6. Finally, click OK to exit the window and then click OK again to exit the System Properties window.
That’s it! You should not receive those annoying error messages again, but will still receive the critical ones. Have fun!
~
[W] Install Windows XP Unattended
Install Windows XP Unattended
You can install XP unattended, so you won’t have to sit through the installation process if you are upgrading from another operating system. Simply follow these steps:
1. Insert your Windows XP CD-Rom
2. Double-click on the My computer icon
3. Double-click on the CD-Rom Drive icon
4. Go to the ‘Support\Tools’ sub-folder
5. Double-click on the ‘DEPLOY.CAB’ file
6. Highlight ‘DEPLOY.CHM’, ‘REF.CHM’, ‘SETUPMGR.EXE’, and ‘README.TXT’
7. Select your target path
8. Click OK to extract the files
9. Go to the folder where you extracted the files
10. Double-click on the CHM files one at a time to read the detailed guidelines on how to install XP in automated unattended mode
11. Run ‘SETUP.MGR’, which will guide you through the process of creating an ‘UNATTEND.TXT’ file
You can install XP unattended, so you won’t have to sit through the installation process if you are upgrading from another operating system. Simply follow these steps:
1. Insert your Windows XP CD-Rom
2. Double-click on the My computer icon
3. Double-click on the CD-Rom Drive icon
4. Go to the ‘Support\Tools’ sub-folder
5. Double-click on the ‘DEPLOY.CAB’ file
6. Highlight ‘DEPLOY.CHM’, ‘REF.CHM’, ‘SETUPMGR.EXE’, and ‘README.TXT’
7. Select your target path
8. Click OK to extract the files
9. Go to the folder where you extracted the files
10. Double-click on the CHM files one at a time to read the detailed guidelines on how to install XP in automated unattended mode
11. Run ‘SETUP.MGR’, which will guide you through the process of creating an ‘UNATTEND.TXT’ file
Sunday, October 18, 2009
[W] “Open With” dialog opens when you double click on any drive.
“Open With” dialog opens when you double click on any drive.
You might encountered wid a big trouble with my computer as all the drives failed to open on double clicking and shows an application selection window instead.
Show hidden files options in the folder options also wont work.
Cause: Presence of autorun.inf
Solution:
Let X: be any arbitrary drive which you want to view by double-clicking.
In case you are using Windows XP/NT/2000/2003/Vista, you may require administrative rights fix this (in both methods).
METHOD 1:
This method works only if your OS is Windows NT/2000/XP/2003/Vista and if X: is NTFS: (If you don't have NTFS and NT Platform follow method 2)
(1) Open command prompt by type cmd in start->run
(2) Navigate to root directory of that partition using cd \ command.
(3) Now type X: . (Assuming X Drive is the drive in which you are facing problem)
(4) Type cacls autorun.inf /P Everyone:N *
(5) Reboot.
METHOD 2:
This may work only as a temporary solution. If you want this to work properly. Install any antivirus software, get latest updates, scan completely. Or make sure that the virus no longer resides/executes in your system. Details of this are beyond the scope of this write-up. It varies from trojan to trojan.
(1) Open command prompt by typing the following in start->run:
cmd For windows NT/2000/XP/2003/Vista
command For other operating systems.
(2) Navigate to root directory of that partition using cd \ command.
(3) Now type X: . (Assuming X Drive is the drive in which you are facing problem)
(4) Type: attrib autorun.inf -s -h -r
(5) Type: del autorun.inf
(6) Reboot
#Know Issues:
1. Access Denied: It simply means you don't have administrative rights. Login and administrator and try again.
2. The Cacls command can be run only on disk drives that use the NTFS file system.:
It means the drive your working on is not NTFS. You will have to follow Method 2.
In da above solution I'm denying read/write permissions to everyone. So that no virus can replace it. Also explorer can't read it.
So you will never need to worry about this autorun.inf in future.
So it'll be a perfect trap.
Use "CC Cleaner" or any other 3rd party tool to fix registry Issues.
~
You might encountered wid a big trouble with my computer as all the drives failed to open on double clicking and shows an application selection window instead.
Show hidden files options in the folder options also wont work.
Cause: Presence of autorun.inf
Solution:
Let X: be any arbitrary drive which you want to view by double-clicking.
In case you are using Windows XP/NT/2000/2003/Vista, you may require administrative rights fix this (in both methods).
METHOD 1:
This method works only if your OS is Windows NT/2000/XP/2003/Vista and if X: is NTFS: (If you don't have NTFS and NT Platform follow method 2)
(1) Open command prompt by type cmd in start->run
(2) Navigate to root directory of that partition using cd \ command.
(3) Now type X: . (Assuming X Drive is the drive in which you are facing problem)
(4) Type cacls autorun.inf /P Everyone:N *
(5) Reboot.
METHOD 2:
This may work only as a temporary solution. If you want this to work properly. Install any antivirus software, get latest updates, scan completely. Or make sure that the virus no longer resides/executes in your system. Details of this are beyond the scope of this write-up. It varies from trojan to trojan.
(1) Open command prompt by typing the following in start->run:
cmd For windows NT/2000/XP/2003/Vista
command For other operating systems.
(2) Navigate to root directory of that partition using cd \ command.
(3) Now type X: . (Assuming X Drive is the drive in which you are facing problem)
(4) Type: attrib autorun.inf -s -h -r
(5) Type: del autorun.inf
(6) Reboot
#Know Issues:
1. Access Denied: It simply means you don't have administrative rights. Login and administrator and try again.
2. The Cacls command can be run only on disk drives that use the NTFS file system.:
It means the drive your working on is not NTFS. You will have to follow Method 2.
In da above solution I'm denying read/write permissions to everyone. So that no virus can replace it. Also explorer can't read it.
So you will never need to worry about this autorun.inf in future.
So it'll be a perfect trap.
Use "CC Cleaner" or any other 3rd party tool to fix registry Issues.
~
Subscribe to:
Posts (Atom)


