Make Your Linux Boot Faster
Steps that can make your Linux system boot faster.
Step 1 :
Decide on the unnecessary services and stop them. Try to stop them using the following commands :
chkconfig ip6tables off
chkconfig setroubleshoot off
chkconfig vmware off
chkconfig bluetooth off
chkconfig sendmail off
chkconfig yum-updatesd off
Step 2 :
If the loop-back device is not needed, stop it to save 1 second . Add
ONBOOT=no in its ifcfg file.
Step 3 :
* Kill all splash screens,
* Grub splash (the line that has 'splash image' should be commented in grub.conf),
* Boot splash (edit/ etc/ sysconfig/ init and say No color there) and
* KDE splash (goto the control center and stop it ).
Normally kernel has lots of unnecessary modules that get loaded when the machine starts. Even if you use only the Ethernet, but still the kernel loads the wireless, Blue tooth and router related modules. Disable them or recompile the kernel.
This should save you more than 30 seconds each time u boot your machine. You can tweak your system as per your requirements & save some boot time.
Note: This is configured for PC which has 512 RAM , an Intel dual core processor with RHEL5.1. but holds good for all most all configurations. - Admin (CosmoCyber)
~
Showing posts with label Ubuntu. Show all posts
Showing posts with label Ubuntu. Show all posts
Monday, January 17, 2011

Thursday, March 11, 2010
Moving Outlook Accounts on XP to Thunderbird/Kmail/etc on Ubuntu
Moving Outlook Accounts on XP to Thunderbird/Kmail/etc on Ubuntu
Use this for a perfect account-migration from XP to Ubuntu. You might be required to re-enter a users mail password for most programs, otherwise, all their messages/accounts/mailbox settings will be migrated.
1. Install Thunderbird on XP
2. Use the ThunderBird to import the Outlook profiles.
Thunderbird and most open-source mail applications use or recognise a standard arrangement of folder/files, importing to Thunderbird sets this up for you.
3. Copy all the files in %AppData%\Thunderbird\Profiles\xxxxxxxx.default\
Where %AppData% can be found by typing %AppData% into the windows command-line. Usually AppData can be found in the desired users "Documents and Settings" folder, then "Application Data" or "Roaming" folders. xxxxxxxxx is a string of random characters.
4. Paste these files into a removable drive, or somewhere you can find when you reboot into *buntu. Additionally, if you can find this folder in *buntu, then you don't need to copy it, just open it in *buntu.
5. Install Thunderbird in *buntu if not already installed.
6. Find the ~/.thunderbird/xxxxxxxx.default/ folder.
Where ~ is your own home folder, most file-managers such as Dolphin or Nautilus have dedicated home buttons. You might need to find the setting to show hidden files, as .thunderbird is hidden. You may also type it into the navigation bar. xxxxxxxxx is again, random characters.
7. Copy the folder, and paste it in the same folder, name the new folder xxxxxxxx.default.bk
This is just a backup folder, in case anything goes horribly wrong, just delete xxxxxxx.default and then remove the ".bk" from the folder you just made if things don't work.
8. Find the previous files you copied/located. Copy everything from the original xxxxxxx.default folder into the new xxxxxxx.default folder, if asked, overwrite everything.
9. Open Thunderbird, it should now have all your messages and account settings! You might be asked for your mail password when you first open Thunderbird.
10. If you prefer other programs, open the program you prefer to use, and find the import features to import your account settings (very much like we imported the outlook account into thunderbird); importing to Kmail is under the "Import Messages" option.
~
Use this for a perfect account-migration from XP to Ubuntu. You might be required to re-enter a users mail password for most programs, otherwise, all their messages/accounts/mailbox settings will be migrated.
1. Install Thunderbird on XP
2. Use the ThunderBird to import the Outlook profiles.
Thunderbird and most open-source mail applications use or recognise a standard arrangement of folder/files, importing to Thunderbird sets this up for you.
3. Copy all the files in %AppData%\Thunderbird\Profiles\xxxxxxxx.default\
Where %AppData% can be found by typing %AppData% into the windows command-line. Usually AppData can be found in the desired users "Documents and Settings" folder, then "Application Data" or "Roaming" folders. xxxxxxxxx is a string of random characters.
4. Paste these files into a removable drive, or somewhere you can find when you reboot into *buntu. Additionally, if you can find this folder in *buntu, then you don't need to copy it, just open it in *buntu.
5. Install Thunderbird in *buntu if not already installed.
6. Find the ~/.thunderbird/xxxxxxxx.default/ folder.
Where ~ is your own home folder, most file-managers such as Dolphin or Nautilus have dedicated home buttons. You might need to find the setting to show hidden files, as .thunderbird is hidden. You may also type it into the navigation bar. xxxxxxxxx is again, random characters.
7. Copy the folder, and paste it in the same folder, name the new folder xxxxxxxx.default.bk
This is just a backup folder, in case anything goes horribly wrong, just delete xxxxxxx.default and then remove the ".bk" from the folder you just made if things don't work.
8. Find the previous files you copied/located. Copy everything from the original xxxxxxx.default folder into the new xxxxxxx.default folder, if asked, overwrite everything.
9. Open Thunderbird, it should now have all your messages and account settings! You might be asked for your mail password when you first open Thunderbird.
10. If you prefer other programs, open the program you prefer to use, and find the import features to import your account settings (very much like we imported the outlook account into thunderbird); importing to Kmail is under the "Import Messages" option.
~
Tuesday, January 12, 2010
Setting up Ubuntu Software Centre/Center on Ubuntu
Setting up Ubuntu Software Centre/Center on !Ubuntu
Ubuntu software-centre/center is the successor to various tools used to manage repositories and programs. On Ubuntu this program comes standard, however it is a must-have for other distros aswell should it be for new users. Power-users can more quickly use the Terminal.
1. Open a Terminal Application
Under Kubuntu it's found in Applications>System>Terminal
enter
2. Enter
sudo apt-get install software-store
3. Type your password if requested.
4. It is now under Applications>System>Software Centre/Center
~
Ubuntu software-centre/center is the successor to various tools used to manage repositories and programs. On Ubuntu this program comes standard, however it is a must-have for other distros aswell should it be for new users. Power-users can more quickly use the Terminal.
1. Open a Terminal Application
Under Kubuntu it's found in Applications>System>Terminal
enter
2. Enter
sudo apt-get install software-store
3. Type your password if requested.
4. It is now under Applications>System>Software Centre/Center
~
Migrating bookmarks from XP to FireFox Ubuntu
Migrating bookmarks from XP to FireFox Ubuntu
There are 3 methods to get your bookmarks, if you already have firefox on Windows, if you do not, and if you want to use Xmarks.
If there is no Firefox on XP, then Install Firefox on XP.
Use Firefox to import bookmarks, it might do this on first run.
Via Xmarks
Xmarks is a convenient way to synchronise bookmrks and setting across multiple firefox installations. While very convenient, it will embed itself into some pages such as Google (this can be disabled), and requires an account. Also, if privacy is a concern, I don't recommend Xmarks, as your information will be uploaded to Xmarks servers. There is no cost to use Xmarks.
1. (on XP) from Firefox, install the Xmarks addon
2. Restart firefox, Xmarks will pop up. Follow the prompts to set up Xmarks. Ensure you sync your bookmarks to the server.
3. (on Ubuntu) from Firefox, install the Xmarks addon
4.Restart firefox, Xmarks will pop up. Follow the prompts to set up Xmarks. Ensure you sync your bookmarks FROM the server, and delete the bookmarks on the computer.
~
There are 3 methods to get your bookmarks, if you already have firefox on Windows, if you do not, and if you want to use Xmarks.
If there is no Firefox on XP, then Install Firefox on XP.
Use Firefox to import bookmarks, it might do this on first run.
Via Xmarks
Xmarks is a convenient way to synchronise bookmrks and setting across multiple firefox installations. While very convenient, it will embed itself into some pages such as Google (this can be disabled), and requires an account. Also, if privacy is a concern, I don't recommend Xmarks, as your information will be uploaded to Xmarks servers. There is no cost to use Xmarks.
1. (on XP) from Firefox, install the Xmarks addon
2. Restart firefox, Xmarks will pop up. Follow the prompts to set up Xmarks. Ensure you sync your bookmarks to the server.
3. (on Ubuntu) from Firefox, install the Xmarks addon
4.Restart firefox, Xmarks will pop up. Follow the prompts to set up Xmarks. Ensure you sync your bookmarks FROM the server, and delete the bookmarks on the computer.
~
Monday, January 4, 2010
[W] Ubuntu Tweak
Ubuntu Tweak
This tool is for ubuntu which makes it easy to change hidden system and desktop settings.Ubuntu Tweak is only for GNOME desktop environment.This is still under heavy development and very good utility for ubuntu users.
Ubuntu Tweak Features:
GNOME Session Control
Show/Hide and Change Splash screen
Show/Hide desktop icons or Mounted Volumes.
Show/Hide/Rename Computer, Home, Trash icon or Network icon
Use Home Directory as Desktop
Compiz Fusion settings, Screen Edge Settings, Window Effects Settings.
GNOME Panel Settings.
Nautilus Settings.
Advanced Power Management Settings.
System Security Settings.
Install Ubuntu Tweak
First you need to download ubuntu tweak from the following options
for i386 users download from here
For AMD64 users download from here
Download ubuntu tweak using the following command
wget http://ubuntu-tweak.googlecode.com/files/ubuntu-tweak_0.2.6-1~ppa1_all.deb
Now you have .deb package install this package using the following command
sudo dpkg -i ubuntu-tweak_0.2.6-1~ppa1_all.deb
Install from repository for Gutsy
No matter which Ubuntu do you use, open your terminal, type the command to run gedit(or other editor in your opinion) to modify the sources.list
sudo gedit /etc/apt/sources.list
And put the two line into it
deb http://ppa.launchpad.net/tualatrix/ubuntu gutsy main
deb-src http://ppa.launchpad.net/tualatrix/ubuntu gutsy main
Then update the source and install or upgrade Ubuntu Tweak
sudo apt-get update
sudo apt-get install ubuntu-tweak
This will complete the installation
Using Ubuntu Tweak
If you want to open Ubuntu Tweak go to Applications--->System Tools--->Ubuntu Tweak
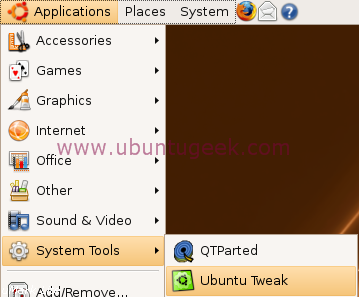
Once it opens you should see similar to the following screen
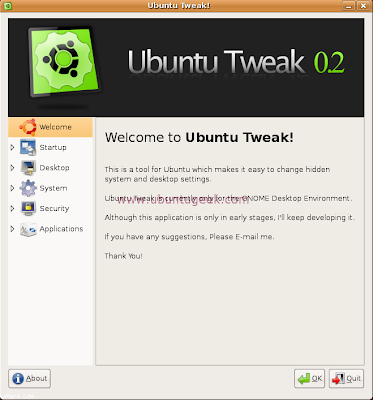
Now we will see one by one option
Startup Configuration
Here you can set session settings,change the splash screen
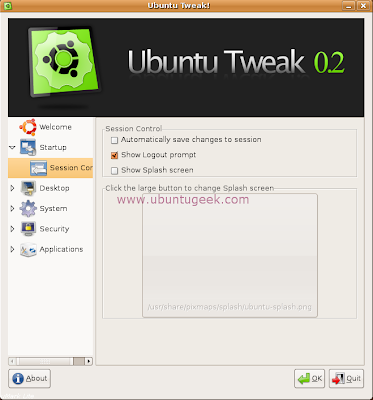
Desktop Configuration
Here you can change the desktop icons and other options relationg to the desktop
Desktop Icons
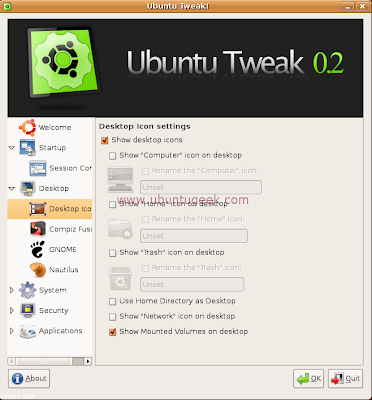
Compiz Fusion
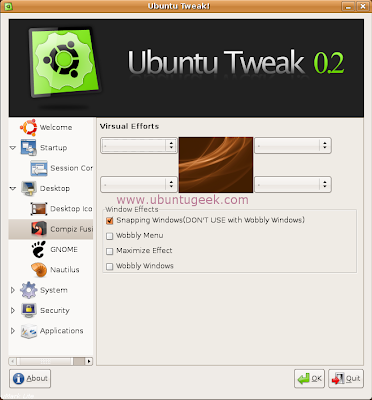
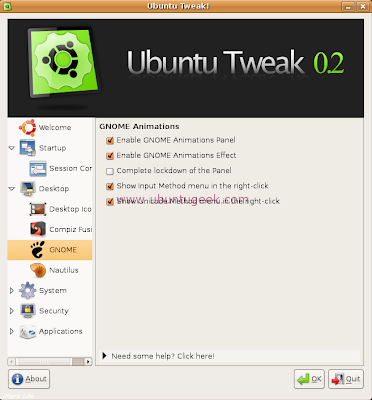
GNOME
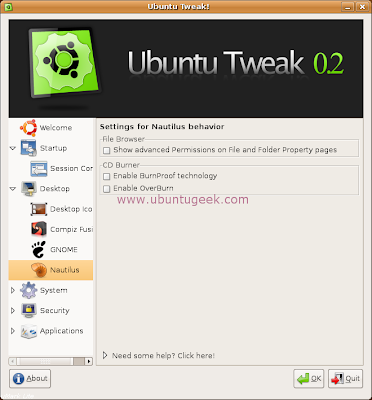
Nautilus
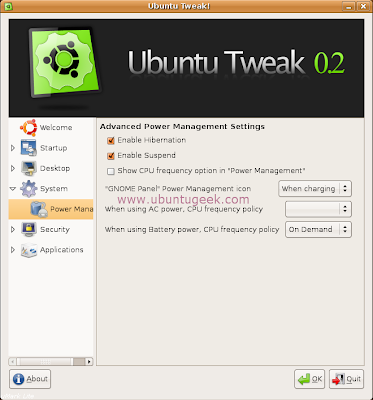
System Configuration
Here you can configure power management and other hardware settings
Security Configuration
Here you can configure the system security options
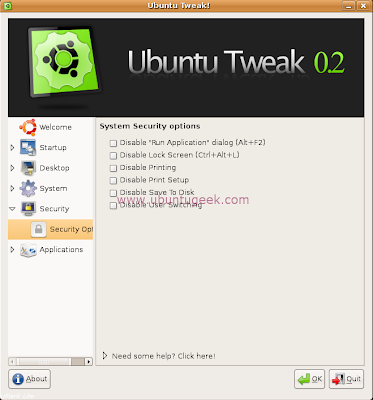
Applications configuration
Here you can configure commonly used applications
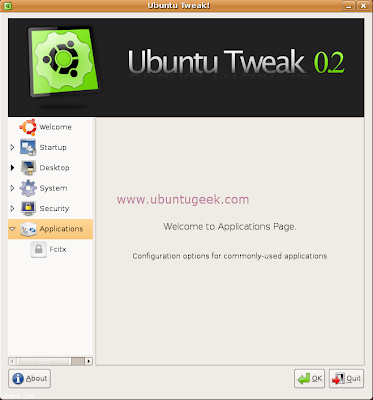
Home Page of Ubuntu Tweak
~
This tool is for ubuntu which makes it easy to change hidden system and desktop settings.Ubuntu Tweak is only for GNOME desktop environment.This is still under heavy development and very good utility for ubuntu users.
Ubuntu Tweak Features:
GNOME Session Control
Show/Hide and Change Splash screen
Show/Hide desktop icons or Mounted Volumes.
Show/Hide/Rename Computer, Home, Trash icon or Network icon
Use Home Directory as Desktop
Compiz Fusion settings, Screen Edge Settings, Window Effects Settings.
GNOME Panel Settings.
Nautilus Settings.
Advanced Power Management Settings.
System Security Settings.
Install Ubuntu Tweak
First you need to download ubuntu tweak from the following options
for i386 users download from here
For AMD64 users download from here
Download ubuntu tweak using the following command
wget http://ubuntu-tweak.googlecode.com/files/ubuntu-tweak_0.2.6-1~ppa1_all.deb
Now you have .deb package install this package using the following command
sudo dpkg -i ubuntu-tweak_0.2.6-1~ppa1_all.deb
Install from repository for Gutsy
No matter which Ubuntu do you use, open your terminal, type the command to run gedit(or other editor in your opinion) to modify the sources.list
sudo gedit /etc/apt/sources.list
And put the two line into it
deb http://ppa.launchpad.net/tualatrix/ubuntu gutsy main
deb-src http://ppa.launchpad.net/tualatrix/ubuntu gutsy main
Then update the source and install or upgrade Ubuntu Tweak
sudo apt-get update
sudo apt-get install ubuntu-tweak
This will complete the installation
Using Ubuntu Tweak
If you want to open Ubuntu Tweak go to Applications--->System Tools--->Ubuntu Tweak

Once it opens you should see similar to the following screen

Now we will see one by one option
Startup Configuration
Here you can set session settings,change the splash screen

Desktop Configuration
Here you can change the desktop icons and other options relationg to the desktop
Desktop Icons

Compiz Fusion

GNOME

Nautilus

System Configuration
Here you can configure power management and other hardware settings

Security Configuration
Here you can configure the system security options

Applications configuration
Here you can configure commonly used applications

Home Page of Ubuntu Tweak
~
[T] Fix right Alt key in Ubuntu
Fix your right Alt key in Ubuntu
There is a way you can get the right Alt key behave like the left Alt key
You need to select System and Preference and then Keyboard.

Under Layout Options tab, open the third level choosers branch and re assign the third level chooser to any another key.

~
There is a way you can get the right Alt key behave like the left Alt key
You need to select System and Preference and then Keyboard.

Under Layout Options tab, open the third level choosers branch and re assign the third level chooser to any another key.

~
[W] Install Avast 4 for Ubuntu 8.10 [64-bit]
Install Avast 4 for Ubuntu 8.10 [64-bit]
Avast.com currently offers a free Avast download for Ubuntu. Unfortunately they only provide a deb package for 32-bit systems. Avast actually runs quite well on a 64-bit system, but the installation requires a few extra steps. This guide will walk you through the process of installing Avast on a 64-bit system.
1. Install the ia32-libs package if it's not already installed.
sudo apt-get install ia32-libs
The ia32-libs package must be >= 2.2ubuntu18.
2. Download the Avast debian package here and save it to your desktop. The instructions below assume that the avast package can be found on your desktop so it's important that you choose your desktop as the download location.
3. After it's downloaded change to your desktop folder.
cd /home/YourUserName/Desktop
4. Install the avast deb package.
sudo dpkg --force-architecture -i avast4workstation_1.3.0-2_i386.deb
5. You need to make sure that all of the required libraries can be found in your /usr/lib32 folder. To help simplify this task I've created a libs package for avast and attached it to this post. Simply download the attachment and then type the following:
sudo dpkg -i ia32-avast-libs.deb
6. After the packages are installed make sure that all of the required libraries can be found. Type the following:
ldd /usr/lib/avast4workstation/bin/avastgui
ldd /usr/lib/avast4workstation/bin/avast
7. Scroll through both lists and make sure that none of them say 'Not found'. As long as you didn't find any libraries listed as 'not found' then you should now be able to run Avast from your Applications menu.
Library Not Found
If any say not found then you may need to install additional packages or as a last resort manually extract the libraries from a package into your /usr/lib32 folder. You can do a package contents search here. Just enter the name of the missing library and search for a package that contains it. Once you've found the package download the i386 version and use file-roller to extract the missing library into your /usr/lib32 folder.
To uninstall this package simply type the following:
sudo apt-get remove avast4workstation
~
Avast.com currently offers a free Avast download for Ubuntu. Unfortunately they only provide a deb package for 32-bit systems. Avast actually runs quite well on a 64-bit system, but the installation requires a few extra steps. This guide will walk you through the process of installing Avast on a 64-bit system.
1. Install the ia32-libs package if it's not already installed.
sudo apt-get install ia32-libs
The ia32-libs package must be >= 2.2ubuntu18.
2. Download the Avast debian package here and save it to your desktop. The instructions below assume that the avast package can be found on your desktop so it's important that you choose your desktop as the download location.
3. After it's downloaded change to your desktop folder.
cd /home/YourUserName/Desktop
4. Install the avast deb package.
sudo dpkg --force-architecture -i avast4workstation_1.3.0-2_i386.deb
5. You need to make sure that all of the required libraries can be found in your /usr/lib32 folder. To help simplify this task I've created a libs package for avast and attached it to this post. Simply download the attachment and then type the following:
sudo dpkg -i ia32-avast-libs.deb
6. After the packages are installed make sure that all of the required libraries can be found. Type the following:
ldd /usr/lib/avast4workstation/bin/avastgui
ldd /usr/lib/avast4workstation/bin/avast
7. Scroll through both lists and make sure that none of them say 'Not found'. As long as you didn't find any libraries listed as 'not found' then you should now be able to run Avast from your Applications menu.
Library Not Found
If any say not found then you may need to install additional packages or as a last resort manually extract the libraries from a package into your /usr/lib32 folder. You can do a package contents search here. Just enter the name of the missing library and search for a package that contains it. Once you've found the package download the i386 version and use file-roller to extract the missing library into your /usr/lib32 folder.
To uninstall this package simply type the following:
sudo apt-get remove avast4workstation
~
[W] Install Wink for Ubuntu 8.10 [64-bit]
Install Wink for Ubuntu 8.10 [64-bit]
Wink Version: 1.5.1060
Wink is a great program for creating video tutorials through the use of flash animation. You can take screen captures with Wink either on-demand or on a time-delay basis and then compile those screenshots into a swf file for use in a web page. You can also add explanation boxes, buttons and titles to your presentations. If you're looking for an easy way to create a video tutorial on how to use certain software applications or perhaps even a website then you definitely want to check out Wink. Unfortunately the wink package available in the Ubuntu repository is only available for the 32-bit architecture so this guide will walk you through installing it on the 64-bit version of Ubuntu.
1.First off you'll need to install the following package.
sudo apt-get install ia32-libs
2.The next step is to download the Wink package. Click here for a list of download locations.. Select one of the listed mirrors and save the file to your desktop.
3.Open your terminal and type the following:
cd /home/[YourUserName]/Desktop
dpkg-deb --extract wink_1.5.1060-6_i386.deb wink
dpkg-deb --control wink_1.5.1060-6_i386.deb wink/DEBIAN
gedit ./wink/DEBIAN/control
4.Find the line that begins with "Architecture:" and replace the "i386" with "all"
Architecture: all
5.Delete the line that begins with "Original-Maintainer: Daniel Baumann". This step isn't mandatory but it will prevent an error from being displayed when the package is built.
6.Click Save and close gedit.
7.Type the following:
gedit ./wink/usr/share/applications/wink.desktop
8.Find the line that begins with "Icon=" and replace "wink" with "/usr/share/pixmaps/wink.xpm". This step ensures that the correct icon will appear on your Applications > Graphics menu.
Icon=/usr/share/pixmaps/wink.xpm
9.Click Save and close gedit
10.The wink package requires that the libexpat.so.0 file be installed in your /usr/lib32 folder. Type the following.
mkdir -p ./wink/usr/lib32
sudo ln -s /usr/lib32/libexpat.so.1 ./wink/usr/lib32/libexpat.so.0
11.Type the following to build the package.
dpkg-deb --build wink
12.Click on the new wink.deb package to install it or type the following.
sudo dpkg -i ./wink.deb
13.Before running the program for the first time you need to make sure that all required libraries are installed. After you install the newly created package type the following:
ldd /usr/lib/wink/wink
14.If none of the libraries say "not found" then you should now be able to open wink from the Applications > Graphics menu.
Note: If any libraries are listed as not found then you may need to install additional packages or as a last resort manually extract the files from a package into your /usr/lib32 directory. You can search the Ubuntu repository for the name of the missing library. Click here to use the "Package Contents" search.. Enter the name of the library you are missing and search for a package that contains it. When you've found the correct package download the i386 version and extract the missing library into your /usr/lib32 folder.
To uninstall type the following:
sudo apt-get remove wink
Wink Version: 1.5.1060
Wink is a great program for creating video tutorials through the use of flash animation. You can take screen captures with Wink either on-demand or on a time-delay basis and then compile those screenshots into a swf file for use in a web page. You can also add explanation boxes, buttons and titles to your presentations. If you're looking for an easy way to create a video tutorial on how to use certain software applications or perhaps even a website then you definitely want to check out Wink. Unfortunately the wink package available in the Ubuntu repository is only available for the 32-bit architecture so this guide will walk you through installing it on the 64-bit version of Ubuntu.
1.First off you'll need to install the following package.
sudo apt-get install ia32-libs
2.The next step is to download the Wink package. Click here for a list of download locations.. Select one of the listed mirrors and save the file to your desktop.
3.Open your terminal and type the following:
cd /home/[YourUserName]/Desktop
dpkg-deb --extract wink_1.5.1060-6_i386.deb wink
dpkg-deb --control wink_1.5.1060-6_i386.deb wink/DEBIAN
gedit ./wink/DEBIAN/control
4.Find the line that begins with "Architecture:" and replace the "i386" with "all"
Architecture: all
5.Delete the line that begins with "Original-Maintainer: Daniel Baumann
6.Click Save and close gedit.
7.Type the following:
gedit ./wink/usr/share/applications/wink.desktop
8.Find the line that begins with "Icon=" and replace "wink" with "/usr/share/pixmaps/wink.xpm". This step ensures that the correct icon will appear on your Applications > Graphics menu.
Icon=/usr/share/pixmaps/wink.xpm
9.Click Save and close gedit
10.The wink package requires that the libexpat.so.0 file be installed in your /usr/lib32 folder. Type the following.
mkdir -p ./wink/usr/lib32
sudo ln -s /usr/lib32/libexpat.so.1 ./wink/usr/lib32/libexpat.so.0
11.Type the following to build the package.
dpkg-deb --build wink
12.Click on the new wink.deb package to install it or type the following.
sudo dpkg -i ./wink.deb
13.Before running the program for the first time you need to make sure that all required libraries are installed. After you install the newly created package type the following:
ldd /usr/lib/wink/wink
14.If none of the libraries say "not found" then you should now be able to open wink from the Applications > Graphics menu.
Note: If any libraries are listed as not found then you may need to install additional packages or as a last resort manually extract the files from a package into your /usr/lib32 directory. You can search the Ubuntu repository for the name of the missing library. Click here to use the "Package Contents" search.. Enter the name of the library you are missing and search for a package that contains it. When you've found the correct package download the i386 version and extract the missing library into your /usr/lib32 folder.
To uninstall type the following:
sudo apt-get remove wink
[T] Install Java in Ubuntu/ Kubuntu
Install Java in Ubuntu/ Kubuntu
Install a java environment that will allow you to run apps on your firefox/konqueror.
We will now install the following Java packages
sun-java6-bin - Contains the binaries
sun-java6-demo - Contains demos and examples
sun-java6-doc - Contains the documentation
sun-java6-fonts - Contains the Lucida TrueType fonts from the JRE
sun-java6-jdk - Contains the metapackage for the JDK
sun-java6-jre - Contains the metapackage for the JRE
sun-java6-plugin - Contains the plug-in for Mozilla-based browsers
sun-java6-source - Contains source files for the JDK
Installing the Java Runtime Environment
1. In terminal, enter the following command:
sudo apt-get install sun-java6-jre sun-java6-plugin sun-java6-fonts
2. Once it downloads the packages and begins the installation, you’ll get a screen that contains the Sun Operating System Distributor License for Java and hit Enter to continue. You’ll see a dialog that asks you if you agree with the DLJ license terms. Select Yes, and hit Enter; the JRE will finish installing.
Aftermath:
First, check that the JRE is properly installed by running the following command from a terminal.
java -version
You should get similar output
java version “1.6.0″
Java(TM) SE Runtime Environment (build 1.6.0-b105)
Java HotSpot(TM) Client VM (build 1.6.0-b105, mixed mode, sharing)
Making sure java works on Firefox:
Open Firefox and type
about:plugins
in the Konqueror top bar, go to
HTML Settings
& make sure the "Java" option is ticked.
Note: If it fails to work, You might need to make Sun Java the default by running the following command:
sudo update-alternatives --config java
and selecting Sun Java.
~
Install a java environment that will allow you to run apps on your firefox/konqueror.
We will now install the following Java packages
sun-java6-bin - Contains the binaries
sun-java6-demo - Contains demos and examples
sun-java6-doc - Contains the documentation
sun-java6-fonts - Contains the Lucida TrueType fonts from the JRE
sun-java6-jdk - Contains the metapackage for the JDK
sun-java6-jre - Contains the metapackage for the JRE
sun-java6-plugin - Contains the plug-in for Mozilla-based browsers
sun-java6-source - Contains source files for the JDK
Installing the Java Runtime Environment
1. In terminal, enter the following command:
sudo apt-get install sun-java6-jre sun-java6-plugin sun-java6-fonts
2. Once it downloads the packages and begins the installation, you’ll get a screen that contains the Sun Operating System Distributor License for Java and hit Enter to continue. You’ll see a dialog that asks you if you agree with the DLJ license terms. Select Yes, and hit Enter; the JRE will finish installing.
Aftermath:
First, check that the JRE is properly installed by running the following command from a terminal.
java -version
You should get similar output
java version “1.6.0″
Java(TM) SE Runtime Environment (build 1.6.0-b105)
Java HotSpot(TM) Client VM (build 1.6.0-b105, mixed mode, sharing)
Making sure java works on Firefox:
Open Firefox and type
about:plugins
in the Konqueror top bar, go to
HTML Settings
& make sure the "Java" option is ticked.
Note: If it fails to work, You might need to make Sun Java the default by running the following command:
sudo update-alternatives --config java
and selecting Sun Java.
~
[W] Clean all Unnecessary Junk files
Clean all Unnecessary Junk files
Getting rid of Residual Config packages - In Synaptic Package Manger, there is a built-in feature that gets rid of old Residual Config packages. Residual Config packages are usually dependency packages that are left behind after you uninstall a package from your machine. To use this feature, go to System > Administration > Synaptic Package Manager. On the bottom left hand corner of the window, click the Status button. In the list above the Sections, Status, Search, and Custom buttons, you should see the following text:
Installed
Installed (local or obsolete)
Not installed
Residual config
Click on the "Residual config" text. (If the "Residual config dialogue does not appear, that means you do not have any Residual Config packages on your machine and you can skip down to Tip #2.) Do you see the packages that popped up in the window on the right? Those are the Residual Config packages. To get rid of these pests, click on the box to the left of the package name and select "Mark for Complete Removal". After you have done that for all of the Residual Config packages, look at the top of the Synaptic Package Manger window. Do you see the green check mark with the text "Apply" right under it? Click that button, and you'll flush all those Residual Config packages
Getting rid of partial packages - This is yet another built-in feature, but this time it is not used in Synaptic Package Manager. It is used in the Terminal. To access the Terminal, go to Applications > Accessories > Terminal. Now, in the Terminal, key in the following command (or you can just copy and paste from here)
sudo apt-get autoclean
Enter your password when prompted and press Enter. See the package names that appeared in the Terminal? Those were partial packages that have just been deleted. This command deletes the not-so-fully-downloaded packages that you acquire when a package that is being downloaded is suddenly cancelled.
Getting rid of unnecessary locale data - For this tip, you need to download the "localepurge" package found in Synaptic Package Manager. "localepurge" is just a simple script to recover diskspace wasted for unneeded locale files and localized man pages. It will automagically be invoked upon completion of any apt installation run.
To open Synaptic Package Manager, follow the instructions in Tip #1. After opening up Synaptic Package Manager, click the Sections button on the bottom left hand corner of the window, if it is not already clicked. Next, at the top of the Synaptic Package Manager window, click the Search button. In the search window, key in the following text :
localepurge
Did the "localepurge" package popup in the package window? It probably did, unless you do not have the correct Repositories. Now, click on the box next to the "localepurge" package name. Click on Mark for Installation. Now click the Apply button at the top of the window and wait for the downloading and installing of the "localepurge" package to finish. Once it is done, a new window should popup that has a bunch of abbreviations on it. for example:
en
fr
po
sp
ka
etc...
Select en. Then click next.
Getting rid of "orphaned" packages - For this tip, you need to download the "deborphan" package found in Synaptic Package Manager. "deborphan" finds "orphaned" packages on your system. It determines which packages have no other packages depending on their installation, and shows you a list of these packages. It is most useful when finding libraries, but it can be used on packages in all sections.
To open Synaptic Package Manager, follow the instructions in Tip #1. After opening up Synaptic Package Manager, click the Sections button on the bottom left hand corner of the window, if it is not already clicked. Next, at the top of the Synaptic Package Manager window, click the Search button. In the search window, key in the following text :
deborphan
Did the "deborphan" package popup in the package window? It probably did, unless you do not have the correct Repositories. Now, click on the box next to the "deborphan" package name. Click on Mark for Installation. Now click the Apply button at the top of the window and wait for the downloading and installing of the "deborphan" package to finish. Once that is done, open up the Terminal. Instructions for doing that are located in Tip #2. After you have gotten the Terminal open, key in the following command (or copy and paste from here):
sudo deborphan | xargs sudo apt-get -y remove --purge
Enter your password when prompted and press Enter. See the package names that appeared in the Terminal? Those were orphaned packages that have just been deleted.
~
Getting rid of Residual Config packages - In Synaptic Package Manger, there is a built-in feature that gets rid of old Residual Config packages. Residual Config packages are usually dependency packages that are left behind after you uninstall a package from your machine. To use this feature, go to System > Administration > Synaptic Package Manager. On the bottom left hand corner of the window, click the Status button. In the list above the Sections, Status, Search, and Custom buttons, you should see the following text:
Installed
Installed (local or obsolete)
Not installed
Residual config
Click on the "Residual config" text. (If the "Residual config dialogue does not appear, that means you do not have any Residual Config packages on your machine and you can skip down to Tip #2.) Do you see the packages that popped up in the window on the right? Those are the Residual Config packages. To get rid of these pests, click on the box to the left of the package name and select "Mark for Complete Removal". After you have done that for all of the Residual Config packages, look at the top of the Synaptic Package Manger window. Do you see the green check mark with the text "Apply" right under it? Click that button, and you'll flush all those Residual Config packages
Getting rid of partial packages - This is yet another built-in feature, but this time it is not used in Synaptic Package Manager. It is used in the Terminal. To access the Terminal, go to Applications > Accessories > Terminal. Now, in the Terminal, key in the following command (or you can just copy and paste from here)
sudo apt-get autoclean
Enter your password when prompted and press Enter. See the package names that appeared in the Terminal? Those were partial packages that have just been deleted. This command deletes the not-so-fully-downloaded packages that you acquire when a package that is being downloaded is suddenly cancelled.
Getting rid of unnecessary locale data - For this tip, you need to download the "localepurge" package found in Synaptic Package Manager. "localepurge" is just a simple script to recover diskspace wasted for unneeded locale files and localized man pages. It will automagically be invoked upon completion of any apt installation run.
To open Synaptic Package Manager, follow the instructions in Tip #1. After opening up Synaptic Package Manager, click the Sections button on the bottom left hand corner of the window, if it is not already clicked. Next, at the top of the Synaptic Package Manager window, click the Search button. In the search window, key in the following text :
localepurge
Did the "localepurge" package popup in the package window? It probably did, unless you do not have the correct Repositories. Now, click on the box next to the "localepurge" package name. Click on Mark for Installation. Now click the Apply button at the top of the window and wait for the downloading and installing of the "localepurge" package to finish. Once it is done, a new window should popup that has a bunch of abbreviations on it. for example:
en
fr
po
sp
ka
etc...
Select en. Then click next.
Getting rid of "orphaned" packages - For this tip, you need to download the "deborphan" package found in Synaptic Package Manager. "deborphan" finds "orphaned" packages on your system. It determines which packages have no other packages depending on their installation, and shows you a list of these packages. It is most useful when finding libraries, but it can be used on packages in all sections.
To open Synaptic Package Manager, follow the instructions in Tip #1. After opening up Synaptic Package Manager, click the Sections button on the bottom left hand corner of the window, if it is not already clicked. Next, at the top of the Synaptic Package Manager window, click the Search button. In the search window, key in the following text :
deborphan
Did the "deborphan" package popup in the package window? It probably did, unless you do not have the correct Repositories. Now, click on the box next to the "deborphan" package name. Click on Mark for Installation. Now click the Apply button at the top of the window and wait for the downloading and installing of the "deborphan" package to finish. Once that is done, open up the Terminal. Instructions for doing that are located in Tip #2. After you have gotten the Terminal open, key in the following command (or copy and paste from here):
sudo deborphan | xargs sudo apt-get -y remove --purge
Enter your password when prompted and press Enter. See the package names that appeared in the Terminal? Those were orphaned packages that have just been deleted.
~
How to pick between Debian & Ubuntu
How to pick between Debian & Ubuntu
Many new folks wonder: Why would I pick Ubuntu over Debian, or the other way 'round?
Ubuntu is a Debian-based distribution. The two are very much alike, but their goals are not exactly the same. To understand the differences, you'll want to know the goals of each. And you'll want to know which part of Debian is used as the basis for Ubuntu, and therefore which part of Debian is most similar to Ubuntu.
Debian releases include:
-Unstable (a.k.a. Sid)
-Testing (currently a version called "Squeeze")
-Stable (currently a version called "Lenny")
Ubuntu releases include:
-non-LTS releases (based on Debian Unstable)
-LTS (Long Term Support)* releases (based on Debian Testing)
1. Debian Unstable can change substantially every week. Why not? Sometimes it just breaks, and it's intended for people who don't mind that the software is not ready to be put in a "reliable easy to use" setup. Many users of Unstable are software developers.
2. Ubuntu non-LTS releases take the collection of Debian Unstable software, every six months (except when there's an LTS release). They take the stuff, try to fix as many bugs as possible, and make it "reliable & easy for beginners to use" BUT still based on very up-to-date software.
3. Debian Testing releases take the most-desired software from Debian Unstable software collection once every couple of years, and they make it work pretty reliably for people who are not computer experts. It is also not hard to use, but if you wouldn't know a GNOME from a KDE* from a LXDE, and you don't have any idea how to answer the question "do you want OpenOffice* or Abiword or Crossover Office?" then Ubuntu will probably be easier for you to use. A Debian Testing release comes out at the same time as the most recent testing release becomes a Debian Stable release. This happens "when it's ready"... once every few years.
4. Ubuntu Long Term Support releases come out every two years, and use the collection of programs/software from Debian Testing. These releases are generally easy for beginners to use, and very reliable. Desktop software for these versions of Ubuntu is supported for three years. (that means they get security updates, and there are folks who can help fix software problems that come up).
5. Debian Stable releases do not come with brand-new software, and they are about as reliable and predictable as operating systems get. These releases might support every piece of software you want to use (word processing, web browsing, web-server type stuff) but if you want a lot of new software, Debian Stable probably isn't for you. Each time a release becomes the "Debian Stable release" it is likely to be supported for for three or more years after that.
~
Many new folks wonder: Why would I pick Ubuntu over Debian, or the other way 'round?
Ubuntu is a Debian-based distribution. The two are very much alike, but their goals are not exactly the same. To understand the differences, you'll want to know the goals of each. And you'll want to know which part of Debian is used as the basis for Ubuntu, and therefore which part of Debian is most similar to Ubuntu.
Debian releases include:
-Unstable (a.k.a. Sid)
-Testing (currently a version called "Squeeze")
-Stable (currently a version called "Lenny")
Ubuntu releases include:
-non-LTS releases (based on Debian Unstable)
-LTS (Long Term Support)* releases (based on Debian Testing)
1. Debian Unstable can change substantially every week. Why not? Sometimes it just breaks, and it's intended for people who don't mind that the software is not ready to be put in a "reliable easy to use" setup. Many users of Unstable are software developers.
2. Ubuntu non-LTS releases take the collection of Debian Unstable software, every six months (except when there's an LTS release). They take the stuff, try to fix as many bugs as possible, and make it "reliable & easy for beginners to use" BUT still based on very up-to-date software.
3. Debian Testing releases take the most-desired software from Debian Unstable software collection once every couple of years, and they make it work pretty reliably for people who are not computer experts. It is also not hard to use, but if you wouldn't know a GNOME from a KDE* from a LXDE, and you don't have any idea how to answer the question "do you want OpenOffice* or Abiword or Crossover Office?" then Ubuntu will probably be easier for you to use. A Debian Testing release comes out at the same time as the most recent testing release becomes a Debian Stable release. This happens "when it's ready"... once every few years.
4. Ubuntu Long Term Support releases come out every two years, and use the collection of programs/software from Debian Testing. These releases are generally easy for beginners to use, and very reliable. Desktop software for these versions of Ubuntu is supported for three years. (that means they get security updates, and there are folks who can help fix software problems that come up).
5. Debian Stable releases do not come with brand-new software, and they are about as reliable and predictable as operating systems get. These releases might support every piece of software you want to use (word processing, web browsing, web-server type stuff) but if you want a lot of new software, Debian Stable probably isn't for you. Each time a release becomes the "Debian Stable release" it is likely to be supported for for three or more years after that.
~
[W] Create a Passwordless / Guest Login
Create a Passwordless / Guest Login
Step 1:
Make sure you have created a user. For the sake of this example, let's say you called the account username guest. You can give it any temporary password you want. We're going to change that password shortly anyway. I'm assuming you know how to do this already. If you don't, I can assure you that this HowTo is not one you should be following, and you would be very likely to screw up the next step.
Step 2
Next, go to the terminal and type this command:
sudo nano -B /etc/shadow
This will open the /etc/shadow file (the one that contains all the passwords) in a text editor called Nano.
Once you have it open, find the appropriate line for the account in question. It'll look something like this:
guest:$1$2TUdk8Z0$tb2Fn6Idgo8dq9EgYv4xZ0:13721:0:99999:7:::
Change the second part (in bold here) to match this second part (also in bold):
guest:U6aMy0wojraho:13721:0:99999:7:::
Then save the file (Control-X, Y, Enter).
Now you should be able to log into the guest (or whatever you called it) account without entering a password.
Warning: Even though this method is simple (few steps), it is extremely dangerous if you don't know what you're doing. Do not attempt this if you are worried that you might mess up the /etc/shadow file, thus screwing up ur Ubuntu system.
~
Step 1:
Make sure you have created a user. For the sake of this example, let's say you called the account username guest. You can give it any temporary password you want. We're going to change that password shortly anyway. I'm assuming you know how to do this already. If you don't, I can assure you that this HowTo is not one you should be following, and you would be very likely to screw up the next step.
Step 2
Next, go to the terminal and type this command:
sudo nano -B /etc/shadow
This will open the /etc/shadow file (the one that contains all the passwords) in a text editor called Nano.
Once you have it open, find the appropriate line for the account in question. It'll look something like this:
guest:$1$2TUdk8Z0$tb2Fn6Idgo8dq9EgYv4xZ0:13721:0:99999:7:::
Change the second part (in bold here) to match this second part (also in bold):
guest:U6aMy0wojraho:13721:0:99999:7:::
Then save the file (Control-X, Y, Enter).
Now you should be able to log into the guest (or whatever you called it) account without entering a password.
Warning: Even though this method is simple (few steps), it is extremely dangerous if you don't know what you're doing. Do not attempt this if you are worried that you might mess up the /etc/shadow file, thus screwing up ur Ubuntu system.
~
Friday, December 18, 2009
25 Linux Commands
25 Linux Commands
1. Log Into a Linux Machine Without Knowing the Username or Password
If you come across a Linux machine that you need to gain access to but you don't know the username or password, you can gain access by following these steps:
Restart the system and press 'e' or F2 to enter GRUB menu. Choose 'ROOT' in the options. In the command line that appears, type 'tail /etc/passwd' and locate the username in the text that appears. Now that you have that username, type 'passwd USERNAME' and enter a new password. Once finished, type EXIT, select OK to exit recovery mode, and then login with the username and new password.
2. Combining TXT files
If you have two text files with lines that are identified as below, you can join them with the following three commands. Be sure the lines match, however, and put them in the order you want the files combined.
$ cat animals.txt
100 Dogs
200 Cats
300 Lions
$ cat actions.txt
100 bark
200 meow
300 roar
$ join animals.txt actions.txt
100 Dogs bark
200 Cats meow
300 Lions roar
3. Check Out How Many Hours a Computer Has Been On
Find a system's up-time with this piece of code. The numbers given will be listed as hours. So, for example, if it says 9.32, the system has been up for 9 hours and 32 minutes.
$ ac –d
4. View All Running Processes
Linux doesn't have a task manager like you find in Windows. While you can download various types online, the best way to view the current running processes on your system is to open the terminal and run:
$ ps aux | more
5. Check On Total Disc Space Usage of A Directory+ Its Subs
If you're low on disc space and you want to find out which of your directories are taking up the most space, then you can use the following command. Replace the home symbol ( ~ ) with whatever directory you want to check. For example, du -sh /etc.
# du -sh ~
6. View Active Network Connections with PID
Take a peek to see what connections are currently active on the network with this handy command.
# netstat -tap
7. Find All Files on a System Larger than X MB/GB
Say you just downloaded a 1GB+ ISO onto your system, you know it is around somewhere, but you just can't figure out where it was saved. This little bit of code is a nifty solution for locating the file.
# find / -type f -size +1000M
8. Locate and Identify Recently Altered Files
Do you want a nice list of files that have recently been altered on any given system? If so, enter this tidbit into the terminal:
# find . –mtime -2
9. Find a Past Date
Say you need to find out rather quickly what the date was 49 days ago. To find out, type:
$ date --date='49 days ago'
10. Find a Future Date
In the same vein as the previous example, say you need to find out what the date will be in 49. To find that out, type:
$ date --date='3 seconds'
Note that it's the same as the last bit, only without the word 'ago' added.
11. Locate Files with Specific Words in the Name
If you need to find a file on a system that has a specific name, such as 'passwords' or 'taxes', then you can search a directory with the following code:
# find ~ -name "*passwords*"
12. View Processes Run By Different Users
If you want to see what processes are running for different users that the one logged in, run this:
$ ps U oracle
13. View Items Inside Compressed (Archive) Folder
Have you ever downloaded an archive, only to discover junk inside it? The following command will reveal what is inside a zip folder before you open it.
# unzip -l var-name.zip
14: Eject Removable Media
Where it's an iPod or an SD card, you can eject onboard media by simply typing:
EJECT
15: Save the Active Window as a JPEG
If you need to save the active window on your desktop as a JPEG but don't want to download any special software or use PrntScrn and a photo editor, use this command:
import -window root MyTest.jpg
16: Bump User Off Network
Whether they're doing something that is going to contaminate the network, they're hogging resources, or you simply don't like them, you can log a user off their computer with this handy piece of code:
skill -kill -u username
17. Block a Computer's Access to Specific Websites
Say you're running a business that uses Linux machines, you notice that your employees are spending a ridiculous amount of time checking the weather. You can block their ability to access those sites by opening /etc/hosts with your text editor (sudo gedit /etc/hosts) and adding:
127.0.0.1 website.com
18. Schedule Midnight Downloads
This code is incredibly handy; it allows you to schedule the time for a download to happen--say, at 3PM while you're at work or midnight while you're sleeping.
echo 'wget website.com' | at 012:00
19. Using the Terminal As Root
Using the Terminal as root is sort of like right-clicking on an application in Vista and choosing 'run as Administrator'. It gives you the ability to do things you otherwise couldn't do (namely, run dangerous code). To use the terminal as root, type:
sudo su
20. Disabling Password Prompt When Using Sudo
Whenever you use the 'sudo' command in Linux, you're prompted to enter the user password before the command will go through. This gets annoying. The solution? Disable it. To do so, use the Terminal and type:
gedit sudo visudo
scroll down to the line that says: username ALL=(ALL) ALL
and change it to say: username ALL=(ALL) NOPASSWD: ALL
21. Change the Default Conky
If you're using a distro that includes Conky by default, such as Crunchbang, you might wander how you can edit its settings. To do this, enter this in the Terminal:
sudo gedit ~/.conkyrc
Of course, replace 'gedit' with the text editor of your choice, and sudo is Ubuntu specific.
22. Put a LiveCD on a USB
Say there's a machine you want to gain access to and copy files from, but you don't have access to the computer's login info. You can gain access with it using a LiveCD. The easiest way to do this is by using a USB thumb drive. You can do this by downloading a liveCD iso and then downloading UNETbootin.
Plug in your USB drive, run UNETbootin, and install the ISO with that.
23. Safely Restart Linux
Lets say you're duped into running a fork bomb, or you download a file that promises to be one thing, only to turn out to be a massive tarbomb. How do you safely restart the frozen system? By doing the following:
Press ALT + PrntScrn and then, while holding those, type the following letters in order: REISUB.
24. View All Files (Including the Hidden Ones)
If you need to view all the files within whatever directory you're in, including ones that are hidden, use the following bit of code:
ls -al
25: A Bonus Tip:
Never run the following:
:() { :|:& };:
...there's something about it that begs to be run; doing so, however, will initiate a forkbomb, which will cause your system to freeze.
~
1. Log Into a Linux Machine Without Knowing the Username or Password
If you come across a Linux machine that you need to gain access to but you don't know the username or password, you can gain access by following these steps:
Restart the system and press 'e' or F2 to enter GRUB menu. Choose 'ROOT' in the options. In the command line that appears, type 'tail /etc/passwd' and locate the username in the text that appears. Now that you have that username, type 'passwd USERNAME' and enter a new password. Once finished, type EXIT, select OK to exit recovery mode, and then login with the username and new password.
2. Combining TXT files
If you have two text files with lines that are identified as below, you can join them with the following three commands. Be sure the lines match, however, and put them in the order you want the files combined.
$ cat animals.txt
100 Dogs
200 Cats
300 Lions
$ cat actions.txt
100 bark
200 meow
300 roar
$ join animals.txt actions.txt
100 Dogs bark
200 Cats meow
300 Lions roar
3. Check Out How Many Hours a Computer Has Been On
Find a system's up-time with this piece of code. The numbers given will be listed as hours. So, for example, if it says 9.32, the system has been up for 9 hours and 32 minutes.
$ ac –d
4. View All Running Processes
Linux doesn't have a task manager like you find in Windows. While you can download various types online, the best way to view the current running processes on your system is to open the terminal and run:
$ ps aux | more
5. Check On Total Disc Space Usage of A Directory+ Its Subs
If you're low on disc space and you want to find out which of your directories are taking up the most space, then you can use the following command. Replace the home symbol ( ~ ) with whatever directory you want to check. For example, du -sh /etc.
# du -sh ~
6. View Active Network Connections with PID
Take a peek to see what connections are currently active on the network with this handy command.
# netstat -tap
7. Find All Files on a System Larger than X MB/GB
Say you just downloaded a 1GB+ ISO onto your system, you know it is around somewhere, but you just can't figure out where it was saved. This little bit of code is a nifty solution for locating the file.
# find / -type f -size +1000M
8. Locate and Identify Recently Altered Files
Do you want a nice list of files that have recently been altered on any given system? If so, enter this tidbit into the terminal:
# find . –mtime -2
9. Find a Past Date
Say you need to find out rather quickly what the date was 49 days ago. To find out, type:
$ date --date='49 days ago'
10. Find a Future Date
In the same vein as the previous example, say you need to find out what the date will be in 49. To find that out, type:
$ date --date='3 seconds'
Note that it's the same as the last bit, only without the word 'ago' added.
11. Locate Files with Specific Words in the Name
If you need to find a file on a system that has a specific name, such as 'passwords' or 'taxes', then you can search a directory with the following code:
# find ~ -name "*passwords*"
12. View Processes Run By Different Users
If you want to see what processes are running for different users that the one logged in, run this:
$ ps U oracle
13. View Items Inside Compressed (Archive) Folder
Have you ever downloaded an archive, only to discover junk inside it? The following command will reveal what is inside a zip folder before you open it.
# unzip -l var-name.zip
14: Eject Removable Media
Where it's an iPod or an SD card, you can eject onboard media by simply typing:
EJECT
15: Save the Active Window as a JPEG
If you need to save the active window on your desktop as a JPEG but don't want to download any special software or use PrntScrn and a photo editor, use this command:
import -window root MyTest.jpg
16: Bump User Off Network
Whether they're doing something that is going to contaminate the network, they're hogging resources, or you simply don't like them, you can log a user off their computer with this handy piece of code:
skill -kill -u username
17. Block a Computer's Access to Specific Websites
Say you're running a business that uses Linux machines, you notice that your employees are spending a ridiculous amount of time checking the weather. You can block their ability to access those sites by opening /etc/hosts with your text editor (sudo gedit /etc/hosts) and adding:
127.0.0.1 website.com
18. Schedule Midnight Downloads
This code is incredibly handy; it allows you to schedule the time for a download to happen--say, at 3PM while you're at work or midnight while you're sleeping.
echo 'wget website.com' | at 012:00
19. Using the Terminal As Root
Using the Terminal as root is sort of like right-clicking on an application in Vista and choosing 'run as Administrator'. It gives you the ability to do things you otherwise couldn't do (namely, run dangerous code). To use the terminal as root, type:
sudo su
20. Disabling Password Prompt When Using Sudo
Whenever you use the 'sudo' command in Linux, you're prompted to enter the user password before the command will go through. This gets annoying. The solution? Disable it. To do so, use the Terminal and type:
gedit sudo visudo
scroll down to the line that says: username ALL=(ALL) ALL
and change it to say: username ALL=(ALL) NOPASSWD: ALL
21. Change the Default Conky
If you're using a distro that includes Conky by default, such as Crunchbang, you might wander how you can edit its settings. To do this, enter this in the Terminal:
sudo gedit ~/.conkyrc
Of course, replace 'gedit' with the text editor of your choice, and sudo is Ubuntu specific.
22. Put a LiveCD on a USB
Say there's a machine you want to gain access to and copy files from, but you don't have access to the computer's login info. You can gain access with it using a LiveCD. The easiest way to do this is by using a USB thumb drive. You can do this by downloading a liveCD iso and then downloading UNETbootin.
Plug in your USB drive, run UNETbootin, and install the ISO with that.
23. Safely Restart Linux
Lets say you're duped into running a fork bomb, or you download a file that promises to be one thing, only to turn out to be a massive tarbomb. How do you safely restart the frozen system? By doing the following:
Press ALT + PrntScrn and then, while holding those, type the following letters in order: REISUB.
24. View All Files (Including the Hidden Ones)
If you need to view all the files within whatever directory you're in, including ones that are hidden, use the following bit of code:
ls -al
25: A Bonus Tip:
Never run the following:
:() { :|:& };:
...there's something about it that begs to be run; doing so, however, will initiate a forkbomb, which will cause your system to freeze.
~
Wednesday, December 2, 2009
20 Things to do after installing Ubuntu
20 Thngs to do after installing Ubuntu.
Generally, in any operating system when you first install it fresh, you don't get all the goodies. You have to install and download various applications and install them to make it suitable for your personal taste and requirement. Same is the case with Ubuntu as well. Unlike Windows, you have email client (Evolution) and an office suite (OpenOffice.org) by default loaded when you first install it. (Microsoft wants you to buy them separately and install it. But that's a different debatable topic.)
In fact you are better off with default Ubuntu installation without a need for further customization and installation. However if you are like me, you want even more, more and more...
So I have prepared a list of applications and plugins I need to install after I fresh install Ubuntu.
Tip: If you don't want to install every application you loaded on Ubuntu everytime you upgrade or reinstall Ubuntu, create a SEPARATE partition for HOME. Having a separate HOME partition makes your life lot easier going forward.
I have prepared the below list based on my personal choice and requirement, your taste and requirements might vary. But the below mentioned applications are Best in Class for Ubuntu Geeks. & you may at least want to try them once. Here is a step by step list for my Ubuntu customization:
Go to Applications -> Add/Remove Programs. From the drop down on right, select All available applications. Now select the following applications' checkbox from the list:
Advanced CCSM: To enable eyecandy effects such as shown below and much more than that. You will forget Vista I am sure once you use it. You may even get different wallpapers on different desktops. How to get different wallpapers on each workspace
Avant Windows Navigator (AWN): This will give you a dock same as in Mac. See the image with bottom deck of icons on desktop.
Gstreamer Extra Plugins: Gstreamer plugins are required for media playback and all. Because I am sure you would definitely have some mp3 and all. This is for providing the system rquired codecs.
Ubuntu Restricted Extras: These extras will provide you many plugins and add-ons required for Mozilla Firefox and other applications to run smoothly. Extras include Java, Flash player, Browser media plugins and lot of other things. Check description for complete list while installing.
MS Core fonts: You won't find Times New Roman and other Microsoft propreitary fonts in Ubuntu. So this plugin will install those fonts on your Ubuntu machine.
Mozilla Thunderbird: If you are a great fan of Thunderbird email client, then install this application for your email client. Else you can use Evolution -the default email client in Ubuntu.
Lightning: If you installed Thunderbird, then you will definitely need to install Lightning which adds a calendar to Thunderbird. (Thunderbird by itself lacks Calendar functionality.)
Firefox Add-on: I am sure you need to install lots of Firefox add-ons
gtkRecordMyDesktop: This one is good if you want to create a quick tutorial of some application or something else running on your machine. This application catures everything you are doing on your screen. It's a good application for bloggers like me.
Scribus: Scribus is good for those who want to create Newsletter, Magazine and similar looking material. It is a Desktop Publishing tool which has got a cool set of features.
Samba: If you have more than one computer in your house, you would definitely wanna make a Home network or at least wanna share files between the two. Samba enables you to do that easily.
Yahoo! Zimbra Desktop: Zimbra is a new one in the list of applications to be installed on Ubuntu. It is another email client which has got cool features and makes you able to read your Yahoo and other emails with ease. Zimbra has got everything you will need from a Desktop email client. For complete features, read this post.
Miro: Miro is a video player which can play any video file and best of all you can save Youtube videos. To install the latest Miro, follow the instructions mentioned on Miro webpage.
Quick tip:
Add "deb http://ftp.osuosl.org/pub/pculture.org/miro/linux/repositories/ubuntu hardy/" (without quotes) to the Third Party repositories. Reload and install miro by searching in Synaptic.
Wine: Wine enables you to run most of the Windows applications on Ubuntu. Install it as mentioned on WineHQ site.
Quick Tip:
Open Terminal-> Copy and paste "wget -q http://wine.budgetdedicated.com/apt/387EE263.gpg -O- | sudo apt-key add -" to add key.
Copy and paste "sudo wget http://wine.budgetdedicated.com/apt/sources.list.d/hardy.list -O /etc/apt/sources.list.d/winehq.list"
Type "sudo apt-get update".
Type "sudo aptitude install Wine"
Google Earth: You don't need any detail for it. Go and install Google earth
Skype: Download the latest Skype and install by double-clicking on it. Follow the prompts on screen.
Gizmo Project: If you don't like Skype, you might want to try Gizmo which is another application for internet based calls.
Linux Back-port Modules: This is for those having issues with Wi-fi LED light not lighting while Wi-fi is in use. Just search for Linux Back-port Modules and install it through Synaptic. After you restart your system, wi-fi LED will lit.
Songbird: Songbird is a open source alternative for iTunes and Windows Media Player with very cool features and customization possibilities. Install Songbird 0.7 as mentioned in my other post.
Go to System ->Preferences ->Appearance ->Visual Effects and select Extra. That will activate your Video card driver. In my case it is NVIDIA. The changes will take place after you restart.
Finally restart your machine just to make sure everything is working properly. BTW, if you happen to install any Linux kernel update, you will have to restart anyways. If you want you might want to remove the older kernels to save some space and some clutter from the booting menu.
~
Generally, in any operating system when you first install it fresh, you don't get all the goodies. You have to install and download various applications and install them to make it suitable for your personal taste and requirement. Same is the case with Ubuntu as well. Unlike Windows, you have email client (Evolution) and an office suite (OpenOffice.org) by default loaded when you first install it. (Microsoft wants you to buy them separately and install it. But that's a different debatable topic.)
In fact you are better off with default Ubuntu installation without a need for further customization and installation. However if you are like me, you want even more, more and more...
So I have prepared a list of applications and plugins I need to install after I fresh install Ubuntu.
Tip: If you don't want to install every application you loaded on Ubuntu everytime you upgrade or reinstall Ubuntu, create a SEPARATE partition for HOME. Having a separate HOME partition makes your life lot easier going forward.
I have prepared the below list based on my personal choice and requirement, your taste and requirements might vary. But the below mentioned applications are Best in Class for Ubuntu Geeks. & you may at least want to try them once. Here is a step by step list for my Ubuntu customization:
Go to Applications -> Add/Remove Programs. From the drop down on right, select All available applications. Now select the following applications' checkbox from the list:
Advanced CCSM: To enable eyecandy effects such as shown below and much more than that. You will forget Vista I am sure once you use it. You may even get different wallpapers on different desktops. How to get different wallpapers on each workspace
Avant Windows Navigator (AWN): This will give you a dock same as in Mac. See the image with bottom deck of icons on desktop.
Gstreamer Extra Plugins: Gstreamer plugins are required for media playback and all. Because I am sure you would definitely have some mp3 and all. This is for providing the system rquired codecs.
Ubuntu Restricted Extras: These extras will provide you many plugins and add-ons required for Mozilla Firefox and other applications to run smoothly. Extras include Java, Flash player, Browser media plugins and lot of other things. Check description for complete list while installing.
MS Core fonts: You won't find Times New Roman and other Microsoft propreitary fonts in Ubuntu. So this plugin will install those fonts on your Ubuntu machine.
Mozilla Thunderbird: If you are a great fan of Thunderbird email client, then install this application for your email client. Else you can use Evolution -the default email client in Ubuntu.
Lightning: If you installed Thunderbird, then you will definitely need to install Lightning which adds a calendar to Thunderbird. (Thunderbird by itself lacks Calendar functionality.)
Firefox Add-on: I am sure you need to install lots of Firefox add-ons
gtkRecordMyDesktop: This one is good if you want to create a quick tutorial of some application or something else running on your machine. This application catures everything you are doing on your screen. It's a good application for bloggers like me.
Scribus: Scribus is good for those who want to create Newsletter, Magazine and similar looking material. It is a Desktop Publishing tool which has got a cool set of features.
Samba: If you have more than one computer in your house, you would definitely wanna make a Home network or at least wanna share files between the two. Samba enables you to do that easily.
Yahoo! Zimbra Desktop: Zimbra is a new one in the list of applications to be installed on Ubuntu. It is another email client which has got cool features and makes you able to read your Yahoo and other emails with ease. Zimbra has got everything you will need from a Desktop email client. For complete features, read this post.
Miro: Miro is a video player which can play any video file and best of all you can save Youtube videos. To install the latest Miro, follow the instructions mentioned on Miro webpage.
Quick tip:
Add "deb http://ftp.osuosl.org/pub/pculture.org/miro/linux/repositories/ubuntu hardy/" (without quotes) to the Third Party repositories. Reload and install miro by searching in Synaptic.
Wine: Wine enables you to run most of the Windows applications on Ubuntu. Install it as mentioned on WineHQ site.
Quick Tip:
Open Terminal-> Copy and paste "wget -q http://wine.budgetdedicated.com/apt/387EE263.gpg -O- | sudo apt-key add -" to add key.
Copy and paste "sudo wget http://wine.budgetdedicated.com/apt/sources.list.d/hardy.list -O /etc/apt/sources.list.d/winehq.list"
Type "sudo apt-get update".
Type "sudo aptitude install Wine"
Google Earth: You don't need any detail for it. Go and install Google earth
Skype: Download the latest Skype and install by double-clicking on it. Follow the prompts on screen.
Gizmo Project: If you don't like Skype, you might want to try Gizmo which is another application for internet based calls.
Linux Back-port Modules: This is for those having issues with Wi-fi LED light not lighting while Wi-fi is in use. Just search for Linux Back-port Modules and install it through Synaptic. After you restart your system, wi-fi LED will lit.
Songbird: Songbird is a open source alternative for iTunes and Windows Media Player with very cool features and customization possibilities. Install Songbird 0.7 as mentioned in my other post.
Go to System ->Preferences ->Appearance ->Visual Effects and select Extra. That will activate your Video card driver. In my case it is NVIDIA. The changes will take place after you restart.
Finally restart your machine just to make sure everything is working properly. BTW, if you happen to install any Linux kernel update, you will have to restart anyways. If you want you might want to remove the older kernels to save some space and some clutter from the booting menu.
~
Subscribe to:
Posts (Atom)


