Tricking Notepad
Here's a really funny way to break Notepad.
This actually works. It will not crash your computer, it just breaks Notepad in that it causes it to display very oddly. No permnent damage comes of the following steps.
1. Open up Notepad (not Wordpad, not Word or any other word processor)
2. Type in this sentence exactly (without quotes): "this app can break"
3. Save the file to your hard drive.
4. Close Notepad
5. Open the saved file by double clicking it.
Instead of seeing your sentence, you should see a series of squares. For whatever reason, Notepad can't figure out what to do with that series of characters and breaks
Explanation: In notepad, any other 4-3-3-5 letter word combo will have the same results.
It is all to do with a limitation in Windows. Text files containing Unicode UTF-16-encoded Unicode are supposed to start with a "Byte-Order Mark" (BOM), which is a two-byte flag that tells a reader how the following UTF-16 data is encoded.
The reason this happens:
1) You are saving to 8-bit Extended ASCII (Look at the Save As / Encoding format)
2) You are reading from 16-bit UNICODE (You guessed it, look at the Save As / Encoding format)
This is why the 18 8-bit characters are being displayed as 9 (obviously not supported by your codepage) 16-bit UNICODE
~
Showing posts with label Windows Explorer. Show all posts
Showing posts with label Windows Explorer. Show all posts
Saturday, March 12, 2011

Wednesday, May 26, 2010
Copy a File’s Path to the Clipboard
Copy a File’s Path to the Clipboard without any Registry Hacks !
If you ever wanted to copy the full path of any file or folder to the clipboard but without installing any third-party utilities or making any changes to your Windows registry, here’s a tip for you.

Copy the File’s Location to the Clipboard
Open Windows Explorer and navigate to the file or folder whose path you want to copy to the clipboard. Once you are there, hold the “Shift” key and right click that file or folder’s icon.
Because the Shift key is down, the contextual menu will have a new item that says “Copy as Path” – select that and the full location of the file or the folder will get saved to your clipboard from where you can paste it anywhere including the DOS window.
You can use this tip to copy a file’s location from all places including those appearing in the desktop search results.
This trick works in Windows Vista and Windows 7 but not XP.
~
If you ever wanted to copy the full path of any file or folder to the clipboard but without installing any third-party utilities or making any changes to your Windows registry, here’s a tip for you.

Copy the File’s Location to the Clipboard
Open Windows Explorer and navigate to the file or folder whose path you want to copy to the clipboard. Once you are there, hold the “Shift” key and right click that file or folder’s icon.
Because the Shift key is down, the contextual menu will have a new item that says “Copy as Path” – select that and the full location of the file or the folder will get saved to your clipboard from where you can paste it anywhere including the DOS window.
You can use this tip to copy a file’s location from all places including those appearing in the desktop search results.
This trick works in Windows Vista and Windows 7 but not XP.
~
Tuesday, January 12, 2010
Shutdown your PC in a single Click
Creating Shutdown Icon or One Click Shutdown:
Create a new shortcut on Desktop.
You should now see a pop-up window instructing you to enter a command line path.
Use this path in "Type Location of the Item"
SHUTDOWN -s -t 01
Click the "Next" button. Name the shortcut and click the "Finish" button. Now whenever you want to shut down, just click on this shortcut and you're done.
~
Create a new shortcut on Desktop.
You should now see a pop-up window instructing you to enter a command line path.
Use this path in "Type Location of the Item"
SHUTDOWN -s -t 01
Click the "Next" button. Name the shortcut and click the "Finish" button. Now whenever you want to shut down, just click on this shortcut and you're done.
~
Wednesday, December 23, 2009
Set Processes Priority
Set Processes Priority
Follow this tip to increase the priority of active processes, this will result in prioritisation of processes using the CPU.
Press CTRL & SHIFT & ESC
1.Go to the second tab called Processes, right click on one of the active processes, you will see the Set Priority option
Tip: Set the higher Priority for CDwriter program. . & guess what ?
No crashed CD’s / DVD's
~
Follow this tip to increase the priority of active processes, this will result in prioritisation of processes using the CPU.
Press CTRL & SHIFT & ESC
1.Go to the second tab called Processes, right click on one of the active processes, you will see the Set Priority option
Tip: Set the higher Priority for CDwriter program. . & guess what ?
No crashed CD’s / DVD's
~
Friday, December 18, 2009
[W] Change 'My Pictures' Folder path
Change 'My Pictures' folder path
The folders you are referring to are called Shell Folders.
--> Navigate to HKEY_CURRENT_USER\Software\Microsoft\ Windows\CurrentVersion\Explorer\User Shell Folders
Then choose My Pictures:
--> Double click the “My Pictures” registry entry & enter new path you desire.
say "D:\honey\pics"
--> Reboot
~
The folders you are referring to are called Shell Folders.
--> Navigate to HKEY_CURRENT_USER\Software\Microsoft\ Windows\CurrentVersion\Explorer\User Shell Folders
Then choose My Pictures:
--> Double click the “My Pictures” registry entry & enter new path you desire.
say "D:\honey\pics"
--> Reboot
~
[W] "Open Containing Folder" Error
"Open Containing Folder" in Search for Files and Folders does not work
When you perform a file search, and then click the Open Containing Folder in the context menu of the Search Results window, instead of opening the parent folder of the selected file, the Open With dialog may pop up, asking you to choose a program.
To resolve the problem, use these steps:
Navigate to HKEY_CLASSES_ROOT\Directory\shell
In the right-pane, double-click the (default) entry
Type the word none and press Enter
Close Regedit.exe
Reboot
~
When you perform a file search, and then click the Open Containing Folder in the context menu of the Search Results window, instead of opening the parent folder of the selected file, the Open With dialog may pop up, asking you to choose a program.
To resolve the problem, use these steps:
Navigate to HKEY_CLASSES_ROOT\Directory\shell
In the right-pane, double-click the (default) entry
Type the word none and press Enter
Close Regedit.exe
Reboot
~
[W] Restore missing "Compressed (zipped) Folder" option to the Send To menu
Restore missing "Compressed (zipped) Folder" option to the Send To menu
Windows XP
To restore the missing Compressed (zipped) Folder entry to the "Send To" menu in Windows XP, use these steps:
Click Start, Run and type:
rundll32 zipfldr.dll,RegisterSendto
In the background, a 0 byte file named Compressed (zipped) Folder.ZFSendToTarget will automatically be created in the %Userprofile%\SendTo folder.
Windows Vista
The Compressed (zipped) Folder icon is present in each user profile and also in the Default user profile. Follow these steps to restore the icon to your user account:
1. Click Start, type the following and press Enter:
%systemdrive%\Users\Default\AppData\Roaming\Microsoft\Windows\SendTo
2. Right-click Compressed (zipped) Folder and choose Copy
3. Open the SendTo folder of your user profile. To do so, click Start, type the following and press Enter:
shell:sendto
4. Right-click an empty area in the folder, and choose Paste
~
Windows XP
To restore the missing Compressed (zipped) Folder entry to the "Send To" menu in Windows XP, use these steps:
Click Start, Run and type:
rundll32 zipfldr.dll,RegisterSendto
In the background, a 0 byte file named Compressed (zipped) Folder.ZFSendToTarget will automatically be created in the %Userprofile%\SendTo folder.
Windows Vista
The Compressed (zipped) Folder icon is present in each user profile and also in the Default user profile. Follow these steps to restore the icon to your user account:
1. Click Start, type the following and press Enter:
%systemdrive%\Users\Default\AppData\Roaming\Microsoft\Windows\SendTo
2. Right-click Compressed (zipped) Folder and choose Copy
3. Open the SendTo folder of your user profile. To do so, click Start, type the following and press Enter:
shell:sendto
4. Right-click an empty area in the folder, and choose Paste
~
Wednesday, December 16, 2009
Change DOS Background
CHANGING DOS BACKGROUND
The value DefaultColor controls the foreground and background colors used in command prompt windows. It has a default value of 0, for standard white text on a black background.
Navigate to HKEY_CURRENT_USER\Software\Microsoft\Command Processor
u'll find "DefaultColor"
You can replace it's value with a two-digit hexadecimal number, in which the first digit selects a background color and the second a foreground color. The hexadecimal codes are:
Hexadecimal value - Color
0 - Black
1 - Blue
2 - Green
3 - Aqua
4 - Red
5 - Purple
6 - Yellow
7 - White
8 - Gray
9 - Light Blue
A - Light Green
B - Light Aqua
C - Light Red
D - Light Purple
E - Light Yellow
F - Bright White
A value of F0, for example, would give black text on a white background, and 1E would yield yellow text on a blue background.
The change should take effect the next time you open a console window.
~
The value DefaultColor controls the foreground and background colors used in command prompt windows. It has a default value of 0, for standard white text on a black background.
Navigate to HKEY_CURRENT_USER\Software\Microsoft\Command Processor
u'll find "DefaultColor"
You can replace it's value with a two-digit hexadecimal number, in which the first digit selects a background color and the second a foreground color. The hexadecimal codes are:
Hexadecimal value - Color
0 - Black
1 - Blue
2 - Green
3 - Aqua
4 - Red
5 - Purple
6 - Yellow
7 - White
8 - Gray
9 - Light Blue
A - Light Green
B - Light Aqua
C - Light Red
D - Light Purple
E - Light Yellow
F - Bright White
A value of F0, for example, would give black text on a white background, and 1E would yield yellow text on a blue background.
The change should take effect the next time you open a console window.
~
Tuesday, December 8, 2009
[W] Add/Remove Windows Components Error
Error "Setup library comsetup.dll could not be loaded" while opening Add/Remove Windows Components
When you click the "Add/Remove Windows Components" button in Add or Remove Programs, the following error message is displayed:
Setup library comsetup.dll could not be loaded, or function OcEntry could not be found.
When you press OK, the following error is seen:
The application could not be initialized.
This error occurs if the file comsetup.dll is missing from the C:\Windows\system32\setup folder.
Method 1:
The DllCache folder maintains a copy of comsetup.dll file. So, you can copy the file to the following location:
C:\Windows\System32\setup
Note that the DLLCache folder is located at:
C:\Windows\system32\dllcache
Method 2:
Extract comsetup.dll from Windows XP CD
In the Command Prompt, type the following command:
expand X:\i386\comsetup.dl_ -r c:\windows\system\setup
Where X:\ is your CD-ROM drive letter. The above command assumes Windows is installed in C:\ drive. If not, change the drive letter accordingly.
Reboot
~
When you click the "Add/Remove Windows Components" button in Add or Remove Programs, the following error message is displayed:
Setup library comsetup.dll could not be loaded, or function OcEntry could not be found.
When you press OK, the following error is seen:
The application could not be initialized.
This error occurs if the file comsetup.dll is missing from the C:\Windows\system32\setup folder.
Method 1:
The DllCache folder maintains a copy of comsetup.dll file. So, you can copy the file to the following location:
C:\Windows\System32\setup
Note that the DLLCache folder is located at:
C:\Windows\system32\dllcache
Method 2:
Extract comsetup.dll from Windows XP CD
In the Command Prompt, type the following command:
expand X:\i386\comsetup.dl_ -r c:\windows\system\setup
Where X:\ is your CD-ROM drive letter. The above command assumes Windows is installed in C:\ drive. If not, change the drive letter accordingly.
Reboot
~
[W] Error Accessing Add or Remove Programs
Error Accessing Add or Remove Programs
When you attempt to open the Add or Remove Programs applet in the Control Panel, the following message may appear:
Add or Remove Programs has been restricted. Please check with your administrator.
This is due to one of the following Policy settings:
1. NoAddRemovePrograms
2. NoControlPanel
If your system is attached to a domain, your network administrator may have disabled the Add or Remove Programs applet. For standalone systems, follow the steps below to unlock the restrictions.
Navigate to the following branches one by one:
HKEY_CURRENT_USER \ Software \ Microsoft \ Windows \ CurrentVersion \ Policies \ Uninstall
HKEY_LOCAL_MACHINE \ Software \ Microsoft \ Windows \ CurrentVersion \ Policies \ Uninstall
Delete the NoAddRemovePrograms value if present in the above locations.
Then, navigate to following locations:
HKEY_CURRENT_USER \ Software \ Microsoft \ Windows \ CurrentVersion \ Policies \ Explorer
HKEY_LOCAL_MACHINE \ Software \ Microsoft \ Windows \ CurrentVersion \ Policies \ Explorer
Delete the NoControlPanel value in the above locations.
Reboot
~
When you attempt to open the Add or Remove Programs applet in the Control Panel, the following message may appear:
Add or Remove Programs has been restricted. Please check with your administrator.
This is due to one of the following Policy settings:
1. NoAddRemovePrograms
2. NoControlPanel
If your system is attached to a domain, your network administrator may have disabled the Add or Remove Programs applet. For standalone systems, follow the steps below to unlock the restrictions.
Navigate to the following branches one by one:
HKEY_CURRENT_USER \ Software \ Microsoft \ Windows \ CurrentVersion \ Policies \ Uninstall
HKEY_LOCAL_MACHINE \ Software \ Microsoft \ Windows \ CurrentVersion \ Policies \ Uninstall
Delete the NoAddRemovePrograms value if present in the above locations.
Then, navigate to following locations:
HKEY_CURRENT_USER \ Software \ Microsoft \ Windows \ CurrentVersion \ Policies \ Explorer
HKEY_LOCAL_MACHINE \ Software \ Microsoft \ Windows \ CurrentVersion \ Policies \ Explorer
Delete the NoControlPanel value in the above locations.
Reboot
~
[W] User Accounts Error
User Accounts applet is completely blank, or displays raw HTML code.
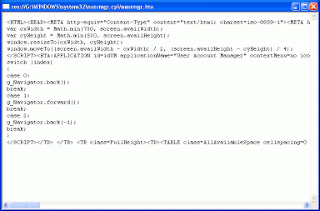
Whenever you attempt to open the User Accounts applet in the Control Panel, the User Accounts dialog pops up, but the page may be empty or filled with raw HTML code. Also, the normal menu options may be missing in the applet.
This may be due to Malware.
To get back the original applet, Paste the code below to a .vbs file & Ececute it.
~
Whenever you attempt to open the User Accounts applet in the Control Panel, the User Accounts dialog pops up, but the page may be empty or filled with raw HTML code. Also, the normal menu options may be missing in the applet.
This may be due to Malware.

To get back the original applet, Paste the code below to a .vbs file & Ececute it.
| Set WshShell = CreateObject("WScript.Shell") Dim htacommand htacommand = "%windir%\system32\mshta.exe " & chr(34) & "%1" & chr(34) & " %*" On Error resume Next WshShell.RegWrite "HKCR\.hta\", "htafile", "REG_SZ" WshShell.RegWrite "HKCR\.hta\PerceivedType", "text", "REG_SZ" WshShell.RegWrite "HKCR\.hta\Content Type", "application/hta", "REG_SZ" WshShell.RegWrite "HKCR\htafile\", "HTML Application", "REG_SZ" WshShell.RegWrite "HKCR\htafile\EditFlags", "1048576", "REG_DWORD" WshShell.RegWrite "HKCR\htafile\DefaultIcon\", "%windir%\system32\mshta.exe,1", "REG_EXPAND_SZ" WshShell.RegWrite "HKCR\htafile\Shell\Open\Command\", htacommand, "REG_EXPAND_SZ" 'Wshshell.RUN ("regsvr32.exe mshtml.dll -i -s") 'Wshshell.RUN ("regsvr32.exe shdocvw.dll -i -s") Wshshell.RUN ("regsvr32.exe jscript.dll -s") MsgUser = Msgbox ("Fixed the HTA settings.", 4160, "User accounts applet fix for Windows XP") Set WshShell = Nothing 'Copyright : © 2010 Cosmo Cyber |
~
[W] Blank Disk Defragmenter
The menu options and buttons appear blank in Disk Defragmenter
When you open Disk Defragmenter console, the menu options, column headers and the command buttons may appear blank with no text in them. Reinstalling Disk Defragmenter using the DFRG.INF file also may not help.
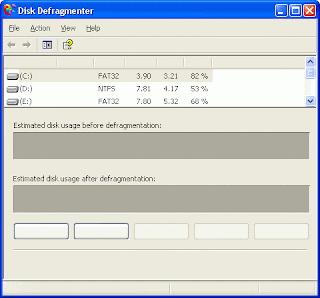
This happens if the Disk Defragmenter resource file is missing or corrupt. To resolve the problem, expand a copy of the file dfrgres.dll from the Windows XP CD-ROM or from an alternate source path. The file dfrgres.dll will be stored in a compressed form in your Windows XP CD, and its file name is dfrgres.dl_ (Note the underscore at the end)
* Insert the Windows XP CD into the drive
* In the Command Prompt, type this command:
expand H:\i386\dfrgres.dl_ -r %systemroot%\system32
* Type EXIT to quit the Command Prompt.
Note: In the above example, H:\ is your CD-ROM drive-letter. If different drive-letter is assigned to the CD drive in your system, change the drive-letter in the above command accordingly.
The file consists of the following information.
Dfrgres.dll - File information
CompanyName Microsoft Corp. and Executive Software International, Inc.
FileDescription Disk Defragmenter Resource Module
FileVersion 5.1.2600.0 (xpclient.010817-1148)
LegalCopyright ©2001 Microsoft Corp. and Executive Software Int'l, Inc.
ProductName Windows Disk Defragmenter
ProductVersion 5.1.2600.0
~
When you open Disk Defragmenter console, the menu options, column headers and the command buttons may appear blank with no text in them. Reinstalling Disk Defragmenter using the DFRG.INF file also may not help.

This happens if the Disk Defragmenter resource file is missing or corrupt. To resolve the problem, expand a copy of the file dfrgres.dll from the Windows XP CD-ROM or from an alternate source path. The file dfrgres.dll will be stored in a compressed form in your Windows XP CD, and its file name is dfrgres.dl_ (Note the underscore at the end)
* Insert the Windows XP CD into the drive
* In the Command Prompt, type this command:
expand H:\i386\dfrgres.dl_ -r %systemroot%\system32
* Type EXIT to quit the Command Prompt.
Note: In the above example, H:\ is your CD-ROM drive-letter. If different drive-letter is assigned to the CD drive in your system, change the drive-letter in the above command accordingly.
The file consists of the following information.
Dfrgres.dll - File information
CompanyName Microsoft Corp. and Executive Software International, Inc.
FileDescription Disk Defragmenter Resource Module
FileVersion 5.1.2600.0 (xpclient.010817-1148)
LegalCopyright ©2001 Microsoft Corp. and Executive Software Int'l, Inc.
ProductName Windows Disk Defragmenter
ProductVersion 5.1.2600.0
~
Monday, December 7, 2009
[W] Hidden Files Tweak
Unable to change settings for viewing hidden/system files ?
To correct this problem, Copy & paste the following contents into Notepad:
Save the file with .reg extension and double-click on it, click Yes.
~
To correct this problem, Copy & paste the following contents into Notepad:
| Windows Registry Editor Version 5.00 [HKEY_LOCAL_MACHINE\SOFTWARE\Microsoft\Windows\CurrentVersion\Explorer\Advanced\Folder\Hidden] "Text"="@shell32.dll,-30499" "Type"="group" "Bitmap"=hex(2):25,00,53,00,79,00,73,00,74,00,65,00,6d,00,52,00,6f,00,6f,00,74,\ 00,25,00,5c,00,73,00,79,00,73,00,74,00,65,00,6d,00,33,00,32,00,5c,00,53,00,\ 48,00,45,00,4c,00,4c,00,33,00,32,00,2e,00,64,00,6c,00,6c,00,2c,00,34,00,00,\ 00 "HelpID"="shell.hlp#51131" [HKEY_LOCAL_MACHINE\SOFTWARE\Microsoft\Windows\CurrentVersion\Explorer\Advanced\Folder\Hidden\NOHIDDEN] "RegPath"="Software\\Microsoft\\Windows\\CurrentVersion\\Explorer\\Advanced" "Text"="@shell32.dll,-30501" "Type"="radio" "CheckedValue"=dword:00000002 "ValueName"="Hidden" "DefaultValue"=dword:00000001 "HKeyRoot"=dword:80000001 "HelpID"="shell.hlp#51104" [HKEY_LOCAL_MACHINE\SOFTWARE\Microsoft\Windows\CurrentVersion\Explorer\Advanced\Folder\Hidden\SHOWALL] "RegPath"="Software\\Microsoft\\Windows\\CurrentVersion\\Explorer\\Advanced" "Text"="@shell32.dll,-30500" "Type"="radio" "CheckedValue"=dword:00000001 "ValueName"="Hidden" "DefaultValue"=dword:00000001 "HKeyRoot"=dword:80000001 "HelpID"="shell.hlp#51105" |
Save the file with .reg extension and double-click on it, click Yes.
~
[W] Enable Task Manager
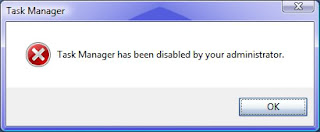
The easiest way to Enable 'Task Manager', when the windows shows the following alert.
This is the most common problem, usually occur due to Virus.
1.Navigate to gpedit.msc
2.select administrative templates user configuration
3.then select system
4.select ctrl+alt+del option
5.select remove tasmanager
6.then click on the option disable.
~
This is the most common problem, usually occur due to Virus.

1.Navigate to gpedit.msc
2.select administrative templates user configuration
3.then select system
4.select ctrl+alt+del option
5.select remove tasmanager
6.then click on the option disable.
~
[W] Fix Realtek HD Audio error: Error 0xE0000227
Fix Realtek HD Audio error: Error 0xE0000227

Open Device Manager
In the "View" menu manager, select "Devices by connection":
Disable and uninstall by right clicking on "Bus Driver for Microsoft UAA High Definition Audio",
You can now install the drivers normally and without error.
~

Open Device Manager
In the "View" menu manager, select "Devices by connection":
Disable and uninstall by right clicking on "Bus Driver for Microsoft UAA High Definition Audio",
You can now install the drivers normally and without error.
~
Sunday, December 6, 2009
Disable Automatic Restart
To disable automatic Restart after updates follow these steps:
In the command prompt type 'sc stop wuauserv'
~
In the command prompt type 'sc stop wuauserv'
~
Sunday, November 29, 2009
[W] `No to All’ During File Copy Operations in Windows
‘No to All’ During File Copy Operations in Windows
While copying or moving a large number of files from one location to another folder in Windows, you may often encounter errors or warning messages saying the file(s) you are trying to copy already exists in the target location.

Windows No to All – Keyboard Shortcut
If you are using a previous version of Windows (like XP or Windows 2000 but not Vista), the default error window will offer four choices – "Yes", "No", "Yes to All" and "Cancel".
There’s no "No to All" button in the File Replacement dialog but you can simply hold down the Shift Key before pressing the No button and Windows will automatically interpret this action as a "No to All" command.
This will be so useful when you are copying a large number of files and folders but don’t want to overwrite content that already exists at the target.

In case of Windows Vista, Microsoft designed a more intuitive warning message with a check box that lets you repeat the same operation on all upcoming conflicts.
~
While copying or moving a large number of files from one location to another folder in Windows, you may often encounter errors or warning messages saying the file(s) you are trying to copy already exists in the target location.

Windows No to All – Keyboard Shortcut
If you are using a previous version of Windows (like XP or Windows 2000 but not Vista), the default error window will offer four choices – "Yes", "No", "Yes to All" and "Cancel".
There’s no "No to All" button in the File Replacement dialog but you can simply hold down the Shift Key before pressing the No button and Windows will automatically interpret this action as a "No to All" command.
This will be so useful when you are copying a large number of files and folders but don’t want to overwrite content that already exists at the target.

In case of Windows Vista, Microsoft designed a more intuitive warning message with a check box that lets you repeat the same operation on all upcoming conflicts.
~
Monday, November 16, 2009
[W] MAC address of your computer in Windows XP
MAC address of your computer in Windows XP
A MAC address is usually your computers unique hardware number. You don’t have to use it on your own. When you are using a network connection an IP address is assigned to your MAC address in the router. It’s also sometimes called your Ethernet address. Your wireless Internet connection may get connected faster upon restart if you have manually entered your MAC address in the router configuration.
In Windows XP there are multiple ways you can find the MAC address of your computer. The simples method is:
* Click Start
* Clilck Run…
* Enter “cmd” (without quotes) and hit Enter
This opens the command prompt. Type ipconfig /all and this brings up such kind of information:

The physical Address is your MAC address.
If you are not comfortable using the command prompt, in Windows XP you can also find your MAC address in the following manner:
* On your Desktop, click Network Connections
* Right-click on the network connection you are currently using
* Click Status
* In the window that comes up click the Support tab
* Click the Details… button
The Physical address is the MAC address.

~
A MAC address is usually your computers unique hardware number. You don’t have to use it on your own. When you are using a network connection an IP address is assigned to your MAC address in the router. It’s also sometimes called your Ethernet address. Your wireless Internet connection may get connected faster upon restart if you have manually entered your MAC address in the router configuration.
In Windows XP there are multiple ways you can find the MAC address of your computer. The simples method is:
* Click Start
* Clilck Run…
* Enter “cmd” (without quotes) and hit Enter
This opens the command prompt. Type ipconfig /all and this brings up such kind of information:

The physical Address is your MAC address.
If you are not comfortable using the command prompt, in Windows XP you can also find your MAC address in the following manner:
* On your Desktop, click Network Connections
* Right-click on the network connection you are currently using
* Click Status
* In the window that comes up click the Support tab
* Click the Details… button
The Physical address is the MAC address.

~
Tuesday, November 10, 2009
Bye pass "Copy & Paste"
Bye pass "Copy & Paste"
Many a times we require a FOLDER . . . . too often, like to store our Multimedia files & all ! !
No need to access the folder and carry out the traditional COPY & PASTE !!!
Just add it too "SEND TO" !!!
Follow these steps:
** Open any FOLDER.
** Then, TOOLS >> Folder Options
** Click view TAB.
** In LIST of Advance Settings, click Show hidden files and folders !
** Now, go to C:\Documents and Settings
** Here, double click and open your (username) folder !
** Now, open SendTo folder.
** Here copy and paste the shortcut of your favorite folder.
That's Done !!!
Now, transfer files to your favorite folder :
** Right Click the file
** Then, Send To
** Click the folder name !
~
Many a times we require a FOLDER . . . . too often, like to store our Multimedia files & all ! !
No need to access the folder and carry out the traditional COPY & PASTE !!!
Just add it too "SEND TO" !!!
Follow these steps:
** Open any FOLDER.
** Then, TOOLS >> Folder Options
** Click view TAB.
** In LIST of Advance Settings, click Show hidden files and folders !
** Now, go to C:\Documents and Settings
** Here, double click and open your (username) folder !
** Now, open SendTo folder.
** Here copy and paste the shortcut of your favorite folder.
That's Done !!!
Now, transfer files to your favorite folder :
** Right Click the file
** Then, Send To
** Click the folder name !
~
Monday, November 9, 2009
[W] FAT to NTFS
Convert FAT to NTFS file system.
To convert a FAT partition to NTFS, perform the following steps.
Click Start, click Programs, and then click Command Prompt.
In Windows XP, click Start, click Run, type cmd and then click OK.
At the command prompt, type CONVERT [driveletter]: /FS:NTFS.
Convert.exe will attempt to convert the partition to NTFS.
NOTE: Although the chance of corruption or data loss during the conversion from FAT to NTFS is minimal, it is best to perform a full backup of the data on the drive that it is to be converted prior to executing the convert command. It is also recommended to verify the integrity of the backup before proceeding, as well as to run RDISK and update the emergency repair disk (ERD).
~
To convert a FAT partition to NTFS, perform the following steps.
Click Start, click Programs, and then click Command Prompt.
In Windows XP, click Start, click Run, type cmd and then click OK.
At the command prompt, type CONVERT [driveletter]: /FS:NTFS.
Convert.exe will attempt to convert the partition to NTFS.
NOTE: Although the chance of corruption or data loss during the conversion from FAT to NTFS is minimal, it is best to perform a full backup of the data on the drive that it is to be converted prior to executing the convert command. It is also recommended to verify the integrity of the backup before proceeding, as well as to run RDISK and update the emergency repair disk (ERD).
~
Subscribe to:
Posts (Atom)


