Hacking Yahoo Messenger & Getting IP
While you are chatting through yahoo messenger, Yahoo will hide the IP addresses of all the computers that are connected through the yahoo messenger application to the chat room.So it is not possible to directly find out the IP of the person you want to hack.
Then how to get the IP address?
Yes it is still possible to hack the IP address during the Yahoo messenger chat.
While you are chatting via yahoo messenger the communication between you and the person you want to hack, takes place indirectly via Yahoo server and not directly.It is not possible to hack Yahoo messenger directly to get the IP address. So to hack his IP, you must establish a direct communication with him/her.
So,how to do this ?
It’s easy.
Just start chatting with the person (Whom you want to Hack) via Yahoo messenger. During the process of chatting send him a big file. Now the file transfer takes place directly between your computer and the victim’s computer(via yahoo messenger application).
So now, you are ready to go. Here’s the step-by-step process to hack Yahoo messenger and get the IP address of the person.
Type netstat -n in Command Prompt.
The pic given below shows netstat results of my computer. {When I was not chatting}
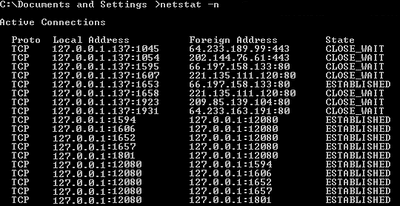
Here local address is your own IP and the foreign address is the IP address of the recipient with whom you are connected via yahoo messenger (There may be multiple recipients and hence multiple foreign addresses).
Now send him the file.
Check the output by typing the command netstat -n
Assume the output is something like this.
TCP 127.0.0.10:5101 124.55.23.11:1246 ESTABLISHED
Here 124.55.23.11 is the IP address of the person with whom you are chatting and 1246 is the port number where connection is established.That’s It! You have now hacked Yahoo messenger to get his IP address.
Once you hack Yahoo messenger and get his IP address you can use any of the Remote Administration tools or perform NETBIOS HACKING.
NOTE: Some times there are chances where in the file transfer gets encrypted (takes place via yahoo server itself).So in this case the above hack may fail to work.
~
Thursday, March 25, 2010
Saturday, March 20, 2010
View all Rapidshare folders
Use following keywords in Google to view all Rapidshare folders available on internet.
site:rapidshare.com inurl:users "*"
site:rapidshare.de inurl:users "*"
site:rapidshare.com inurl:files "*"
site:rapidshare.de inurl:files "*"
site:rapidshare.com inurl:users (pass|password)
site:rapidshare.de inurl:users (pass|password)
Suppose u need some info on Geography.
Then u can try following keywords to see all Rapidshare folders having any Geography related thing in it
site:rapidshare.com inurl:users "Geo"
site:rapidshare.com inurl:users "Geography"
~
See the translation of a word in Word 2007
By using the Translation ScreenTip you can see the translation of most words simply by moving the mouse over them !
Translation ScreenTip works for the following languages:
* Arabic (Saudi Arabia)
* English (United States)
* French (France)
* Spanish (Spain, International Sort)
To turn on Translation ScreenTip:
1) Make sure you are on the “Review” tab of the ribbon
2) Look for the “Proofing” group
3) Click on “Translation ScreenTip”
4) Select the language you want to see the translation for, or click on “Turn Off Translation ScreenTip” to turn the translation off.
~
Friday, March 12, 2010
Hack / Use a Vista Restore Point to Log On to a System
If you've recently set a new password and forgotten it, this is a quick way around the problem.
The only thing is that you must have had System Restore enabled and that you need to remember your previous password.
If this applies, then Insert your Vista installation DVD into your drive and reboot. Start the installation process and designate the system language, the time, and your keyboard format.
At this point the option Repair your PC will pop up, so select that and click Next.
Now select the System Restore option and again click Next. Select the restore point you'd like to use, confirm your selection, and click Finish, then Yes when it's time to restart.
Once the system restarts, close the System Restore process and log on using your older Password.
You may have lost a little bit of data, but the Hack works pretty well.
Note: You can even get the lost data, if your backup process runs often enough you should be able to restore that from your NAS or server.
~
Is Your PC Connecting To Websites Without Your Knowledge
If you are worried that some programs on your PC are secretly making connections to websites in the background, here's a quick tip that uses a simple DOS command to detect and prevent such suspicious activity:
1. Type cmd in your Windows Run box.
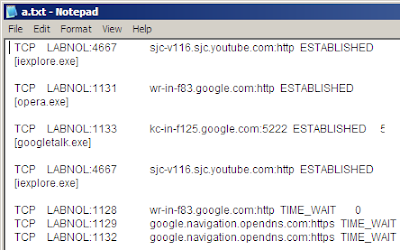
2. Type netstat -b 5 > activity.txt and press Enter. After 2 minutes, press Ctrl+C.
3. Type activity.txt on the command line to open the log file in Notepad.
The file activity.txt will have a log of all process that made a connection to the Internet in the last two minutes. It will also show which process connected to which website in this time. And not just the web browsers (like iexplore.exe or opera.exe), the log will also show your IM clients, download managers, email programs or any software that requires a net connection.
Scroll though the activity.txt file and look for any process names or website addresses that you are not aware of.
If you track one , go to the Task Manager (or Process Explorer) to find the location of the executable file on your computer and eliminate the threat.
~
MS Outlook 2007 "Color Code"
MS Outlook 2007 "Color Code to Identify Key Messages"
Often when you open your Outlook, your are lost in a zoo of emails while you need the most important one's immediately. What you got to do is color code the important messages so that you can identify the important emails from your seniors, clients, staff or other team members . This saves a lot of time and ensures that you don't overlook the key messages.
Follow the steps below to color code the emails in Outlook
1: Highlight a message from a contact.
2: Choose Tools, then go to Organize. This opens a new window at the top of your Inbox window.
3: Choose the option Using Colors (found at the left of the window).
4: Pick from option, Choose color for selected message and Apply Color.
5: Additionally, you can also pick Show messages sent only to me as a way to highlight messages that are not part of a group distribution.
6: Optionally, choose Automatic Formatting (upper-right corner of window) to view coloring choices or even to apply a different font.
7: Close the Organize window when you are done. All messages in your Inbox from the selected contact are now color coded.
~
Vista Health Report
Vista Health Report
People get physical checkups, and so do computers.
Vista can run a complete and well-organized diagnostic report highlighting potential problems.
In the Control Panel, click System and Maintenance | Performance Information and Tools. In the Tasks list along the left, click Advanced tools. The last item on the resulting list is Generate a system health report.
~
Thursday, March 11, 2010
Moving Outlook Accounts on XP to Thunderbird/Kmail/etc on Ubuntu
Use this for a perfect account-migration from XP to Ubuntu. You might be required to re-enter a users mail password for most programs, otherwise, all their messages/accounts/mailbox settings will be migrated.
1. Install Thunderbird on XP
2. Use the ThunderBird to import the Outlook profiles.
Thunderbird and most open-source mail applications use or recognise a standard arrangement of folder/files, importing to Thunderbird sets this up for you.
3. Copy all the files in %AppData%\Thunderbird\Profiles\xxxxxxxx.default\
Where %AppData% can be found by typing %AppData% into the windows command-line. Usually AppData can be found in the desired users "Documents and Settings" folder, then "Application Data" or "Roaming" folders. xxxxxxxxx is a string of random characters.
4. Paste these files into a removable drive, or somewhere you can find when you reboot into *buntu. Additionally, if you can find this folder in *buntu, then you don't need to copy it, just open it in *buntu.
5. Install Thunderbird in *buntu if not already installed.
6. Find the ~/.thunderbird/xxxxxxxx.default/ folder.
Where ~ is your own home folder, most file-managers such as Dolphin or Nautilus have dedicated home buttons. You might need to find the setting to show hidden files, as .thunderbird is hidden. You may also type it into the navigation bar. xxxxxxxxx is again, random characters.
7. Copy the folder, and paste it in the same folder, name the new folder xxxxxxxx.default.bk
This is just a backup folder, in case anything goes horribly wrong, just delete xxxxxxx.default and then remove the ".bk" from the folder you just made if things don't work.
8. Find the previous files you copied/located. Copy everything from the original xxxxxxx.default folder into the new xxxxxxx.default folder, if asked, overwrite everything.
9. Open Thunderbird, it should now have all your messages and account settings! You might be asked for your mail password when you first open Thunderbird.
10. If you prefer other programs, open the program you prefer to use, and find the import features to import your account settings (very much like we imported the outlook account into thunderbird); importing to Kmail is under the "Import Messages" option.
~
Wednesday, March 10, 2010
Bing Search Tricks
Bing Search Tricks
There are some lesser-known features in Bing that aren’t just useful, you won’t find them in any of the other popular search engines.
1. Watch Video Preview in Search Results
When you hover the mouse over any of the thumbnail images appearing in Bing Video Search, it will automatically play a short preview of the video so you have a good idea about the clip without visiting the target website where that video is hosted.
As you may have noticed in the screencast above, this video preview feature is available for all clip indexed by Live Search whether they are on YouTube, MySpace, CNN or ABC News.
2. Find Web Pages That Link to Documents, MP3s, Videos, ZIPs ..
The contains: operator is Bing Search lets you find web pages that link to other online documents and multimedia files like music and video. This is very different from Google’s filetype: search operator (also available in Live Search) which looks for content inside PDF and Office documents.
For example, if you are looking to download a Microsoft Word report from Gartner site that is about elearning, just type: “elearning site:gartner.com contains:doc”
Similarly, if you like to find all pages on Wikipedia that link to MP3 files, type “site:wikipedia.org contains:mp3″
Another example – to learn about software that you can download from the Google website, use “site:google.com contains:zip OR contains:exe”
3. Save Images & Pictures As Your Search the Web
Live Image Search includes something called a scratch pad that lets you save collection of images with a simple drag-n-drop. This comes very handy if you are searching for images using different keywords and need to shortlist only a few from that large collection.
Note: The image scratch pad feature is not part of Bing.
4. Get Live Search Results as RSS Feeds
While there are external services that let you subscribe to search results via RSS feeds, neither Yahoo! nor Google provide RSS feeds of their search results.
You can however subscribe to search pages from Bing as RSS feed via this undocumented hack. Open Bing Search, type your query and then on the results page, appened “&format=rss” to the URL. See example:
Search Page: http://bing.com/search?q=iphone
RSS Feed: http://bing.com/search?&format=rss
This parameter converts the Live Search page into an RSS feed that you can add to your news reader.
5. Limit Your Search to Website that offer RSS Feeds
Another interesting search operator in Bing Search is “hasfeed” – it lets you find only those web pages that link to RSS feeds. For instance, you could say “micheal phelps hasfeed:” to find web pages that are about “michael phelps” and also syndicate content as RSS feeds.
You can group hasfeed: with other search operators so if want to know about all pages related to movies on ABC website that have feeds, just type “movies site:abc.com hasfeed:”
6. Specify Weight (Preference) in the Search Query
Say you are planning for an upcoming vacation and need some advice related to holiday destinations. Now rather than searching for “holiday destinations” that will return very broad results, you could add the prefer: operator and specify places that you’re really keen to visit though you don’t mind other suggestions.
For e.g., says “holiday destinations prefer:japan”
~
Create Text/ HTML Signature in MS Outlook 2007
We all want to be unique in our own way. In other words, we all try to leave our signature in whatever there is as ours. Be it our writes or comments or e-mails a signature makes you stand apart because it has your speciality inscribed. There are many online signature making tools.
But how do we implement them ?
Here is a simple way to do it in Microsoft Office Outlook 2007.
1. From the main Microsoft Outlook window, on the Tools menu, click Options, and then click the Mail Format tab.
2. In the Compose in this message format list, click the message format that you want to use the signature with.
3. Under Signature, click Signatures, and then click New.
4. In the Enter a name for your new signature box, enter a name.
5. Under Choose how to create your signature, select the option you want.
6. Click Next.
7. In the Signature text box, type the text you want to include in the signature. You can also paste text to this box from another document.
8. To change the paragraph or font format, select the text, click Font or Paragraph, and then select the options you want. These options are not available if you use plain text as your message format.
9. To add an electronic business card — vCard — to the signature, under vCard options, select a vCard from the list, or click New vCard from Contact.
10. Click Finish when you are done editing the new signature.
~
Add a .swf file to a PowerPoint 2007 Presentation
1) Open PowerPoint 2007
2) Make sure you can see the Developer tab in the “Ribbon”. If you can’t, click on the Office menu (The circle button in the top left hand corner), then click on PowerPoint Options, and make sure that you check the Show Developer tab in the Ribbon box.
3) Go to the slide you want the .swf file to appear
4) Click on the Developer tab in the Ribbon
5) Look for the More Controls button in the controls group. It is the one with a spanner and a hammer with three dots underneath it. Once you find it – click on it
6) The More Controls box will appear. Scroll down until you find Shockwave Flash Object. Click on that, then click OK
7) You will notice your cursor is now a cross, and no longer an arrow. That means you can now draw where you want your Shockwave/Flash file to appear on your slide. Simply draw with your mouse, and use the adjustment handles on the box to make sure it is just the right size and position on your slide. When you are done you should see a wireframe box with a big “X” through the middle of it
8) Now we want to link your .swf file into your PowerPoint 2007 presentation. Click on the box you just drew, then right click, and select Properties
9) In the properties box that appears, look for the Movie property, and then add the location of your .swf file (for example c:\temp\test.swf)
10) Quickly run your presentation and watch in awe as your shockwave file hits the big screen in your PowerPoint 2007 presentation
Note: This only LINKS to the .swf file, so if you email or share the presentation with others, chances are the link will break and you will need to go through the above process again to re-link the PowerPoint deck to the .swf
~
Saturday, March 6, 2010
Autocorrect Options
Autocorrect Options
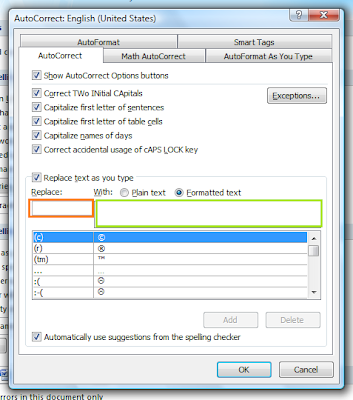
Autocorrect options allows Word 2007 users to control how their computer automatically inserts text into a document. Users can specify custom text replacment where a simple combination of character would insert a generic sentence into a document or comment box.
To use Autocorrect options: Click Office Button, then Word Options, select Proofing from the left side, then click Autocorrect Options
Once on the Autocorrect screen, there are two columns on the bottom, one for a string of text (orange box) and another with the text to replace (green box). In a document, when you type the the text in the orange box, it will be replaced with the text from the green box. When finished, make sure to click the Add button so your string is saved.
~
Subscribe to:
Posts (Atom)