Set Processes Priority
Follow this tip to increase the priority of active processes, this will result in prioritisation of processes using the CPU.
Press CTRL & SHIFT & ESC
1.Go to the second tab called Processes, right click on one of the active processes, you will see the Set Priority option
Tip: Set the higher Priority for CDwriter program. . & guess what ?
No crashed CD’s / DVD's
~
Wednesday, December 23, 2009
[W] Unlock the Windows 7 Hidden Themes
Unlock the Windows 7 Hidden Themes
The Windows 7 beta has a pack of hidden and locked themes. Let's see how you can unlock the hidden themes.
Step 1: Go to C:\Windows\winsxs
Step 2: Enter *.theme into the search field. Alternately you can use the * sign on the number block.
Step 3: You'll get the Click me prompt
Step 4: Then, Double-click the themes ZA, US, GB, CA, AU to install them.
Step 5: Reboot after Installation.
~
Monday, December 21, 2009
[W] Remove 'Send Feedback' link in Windows 7
Remove Send Feedback link in Windows 7
The bug that troubles the window in Windows 7 is the send feedback link. This is a simple fix to get rid of this pique.
--> Navigate to Key HKEY_CURRENT_USER/Control Panel/Desktop
--> Right-click on the white space in the In the pane to the right of the key hierarchy and select New > DWORD (32 bit) Value.
--> Now as the value appears name it FeedbackToolEnabled
--> Double-click the value that was created with FeedbackToolEnabled and enter 0 in the Value Data box, and then click OK.
--> Reboot
~
Friday, December 18, 2009
[W] Change 'My Pictures' Folder path
Change 'My Pictures' folder path
The folders you are referring to are called Shell Folders.
--> Navigate to HKEY_CURRENT_USER\Software\Microsoft\ Windows\CurrentVersion\Explorer\User Shell Folders
Then choose My Pictures:
--> Double click the “My Pictures” registry entry & enter new path you desire.
say "D:\honey\pics"
--> Reboot
~
[W] Find Updates for all Firefox Plug-ins
Find Updates for all your Firefox Plug-ins
This is about updating Firefox plug-ins, not Add-ons.
If you select Tools -> Add-ons from the Firefox menu bar, you’ll get a list of all extensions, themes and plug-ins that are currently installed in your copy of Firefox.
The same add-ons dialog has a “Find Updates” feature to help you figure out if you are running any out-dated extensions but that doesn’t work with your plug-ins. How do you then find out that you are running the latest versions of all plug-ins?
It’s simple now. You can open the Firefox browser and visit the Plugins Check page hosted on mozilla.org. This will create a list of all plug-ins that are installed on your system and will match that data with its own list to determine if you are running an older version that has been marked out-of-date.
In case this online check fails for a particular plugin, you can click the “Research” button to perform a search on Google using the plug-in name as the search query. This is not always accurate but you’ll at least reach the vendor’s website that is officially hosting the plug-in.
It makes sense to visit the plug-ins checker page occasionally because older plug-ins not just make your browser insecure but they also make it more unstable. David Tenser of Mozilla says 30% of the reported crashes are caused by old plugins.
Download the latest version of Firefox here.
~
This is about updating Firefox plug-ins, not Add-ons.
If you select Tools -> Add-ons from the Firefox menu bar, you’ll get a list of all extensions, themes and plug-ins that are currently installed in your copy of Firefox.
The same add-ons dialog has a “Find Updates” feature to help you figure out if you are running any out-dated extensions but that doesn’t work with your plug-ins. How do you then find out that you are running the latest versions of all plug-ins?

It’s simple now. You can open the Firefox browser and visit the Plugins Check page hosted on mozilla.org. This will create a list of all plug-ins that are installed on your system and will match that data with its own list to determine if you are running an older version that has been marked out-of-date.
In case this online check fails for a particular plugin, you can click the “Research” button to perform a search on Google using the plug-in name as the search query. This is not always accurate but you’ll at least reach the vendor’s website that is officially hosting the plug-in.
It makes sense to visit the plug-ins checker page occasionally because older plug-ins not just make your browser insecure but they also make it more unstable. David Tenser of Mozilla says 30% of the reported crashes are caused by old plugins.
Download the latest version of Firefox here.
~
[W] "Open Containing Folder" Error
"Open Containing Folder" in Search for Files and Folders does not work
When you perform a file search, and then click the Open Containing Folder in the context menu of the Search Results window, instead of opening the parent folder of the selected file, the Open With dialog may pop up, asking you to choose a program.
To resolve the problem, use these steps:
Navigate to HKEY_CLASSES_ROOT\Directory\shell
In the right-pane, double-click the (default) entry
Type the word none and press Enter
Close Regedit.exe
Reboot
~
[W] Restore missing "Compressed (zipped) Folder" option to the Send To menu
Restore missing "Compressed (zipped) Folder" option to the Send To menu
Windows XP
To restore the missing Compressed (zipped) Folder entry to the "Send To" menu in Windows XP, use these steps:
Click Start, Run and type:
rundll32 zipfldr.dll,RegisterSendto
In the background, a 0 byte file named Compressed (zipped) Folder.ZFSendToTarget will automatically be created in the %Userprofile%\SendTo folder.
Windows Vista
The Compressed (zipped) Folder icon is present in each user profile and also in the Default user profile. Follow these steps to restore the icon to your user account:
1. Click Start, type the following and press Enter:
%systemdrive%\Users\Default\AppData\Roaming\Microsoft\Windows\SendTo
2. Right-click Compressed (zipped) Folder and choose Copy
3. Open the SendTo folder of your user profile. To do so, click Start, type the following and press Enter:
shell:sendto
4. Right-click an empty area in the folder, and choose Paste
~
[W] Prevent User Installing Gadgets in Windows 7
Prevent User Installing Gadgets in Windows 7
Allow or prevent all users from being able to install a gadget or from adding a user installed gadget to the desktop in Windows 7. By default, user installed gadgets are allowed in Windows 7.
Steps:
1. Open the Local Group Policy Editor.
2. Click on to User Configuration, Administrative Templates, Windows Components, and Desktop Gadgets.
3. Now right click on Turn Off user-installed desktop gadgets and click on Edit.
4. To Allow User to Install Gadgets
* Select (dot) either Not Configured or Disabled.
* Go to step 6.
5. To Prevent User from Install Gadgets
* Select (dot) Enabled.
6. Click OK. And exit the Local Group Policy Editor window.
7. Reboot
~
25 Linux Commands
25 Linux Commands
1. Log Into a Linux Machine Without Knowing the Username or Password
If you come across a Linux machine that you need to gain access to but you don't know the username or password, you can gain access by following these steps:
Restart the system and press 'e' or F2 to enter GRUB menu. Choose 'ROOT' in the options. In the command line that appears, type 'tail /etc/passwd' and locate the username in the text that appears. Now that you have that username, type 'passwd USERNAME' and enter a new password. Once finished, type EXIT, select OK to exit recovery mode, and then login with the username and new password.
2. Combining TXT files
If you have two text files with lines that are identified as below, you can join them with the following three commands. Be sure the lines match, however, and put them in the order you want the files combined.
$ cat animals.txt
100 Dogs
200 Cats
300 Lions
$ cat actions.txt
100 bark
200 meow
300 roar
$ join animals.txt actions.txt
100 Dogs bark
200 Cats meow
300 Lions roar
3. Check Out How Many Hours a Computer Has Been On
Find a system's up-time with this piece of code. The numbers given will be listed as hours. So, for example, if it says 9.32, the system has been up for 9 hours and 32 minutes.
$ ac –d
4. View All Running Processes
Linux doesn't have a task manager like you find in Windows. While you can download various types online, the best way to view the current running processes on your system is to open the terminal and run:
$ ps aux | more
5. Check On Total Disc Space Usage of A Directory+ Its Subs
If you're low on disc space and you want to find out which of your directories are taking up the most space, then you can use the following command. Replace the home symbol ( ~ ) with whatever directory you want to check. For example, du -sh /etc.
# du -sh ~
6. View Active Network Connections with PID
Take a peek to see what connections are currently active on the network with this handy command.
# netstat -tap
7. Find All Files on a System Larger than X MB/GB
Say you just downloaded a 1GB+ ISO onto your system, you know it is around somewhere, but you just can't figure out where it was saved. This little bit of code is a nifty solution for locating the file.
# find / -type f -size +1000M
8. Locate and Identify Recently Altered Files
Do you want a nice list of files that have recently been altered on any given system? If so, enter this tidbit into the terminal:
# find . –mtime -2
9. Find a Past Date
Say you need to find out rather quickly what the date was 49 days ago. To find out, type:
$ date --date='49 days ago'
10. Find a Future Date
In the same vein as the previous example, say you need to find out what the date will be in 49. To find that out, type:
$ date --date='3 seconds'
Note that it's the same as the last bit, only without the word 'ago' added.
11. Locate Files with Specific Words in the Name
If you need to find a file on a system that has a specific name, such as 'passwords' or 'taxes', then you can search a directory with the following code:
# find ~ -name "*passwords*"
12. View Processes Run By Different Users
If you want to see what processes are running for different users that the one logged in, run this:
$ ps U oracle
13. View Items Inside Compressed (Archive) Folder
Have you ever downloaded an archive, only to discover junk inside it? The following command will reveal what is inside a zip folder before you open it.
# unzip -l var-name.zip
14: Eject Removable Media
Where it's an iPod or an SD card, you can eject onboard media by simply typing:
EJECT
15: Save the Active Window as a JPEG
If you need to save the active window on your desktop as a JPEG but don't want to download any special software or use PrntScrn and a photo editor, use this command:
import -window root MyTest.jpg
16: Bump User Off Network
Whether they're doing something that is going to contaminate the network, they're hogging resources, or you simply don't like them, you can log a user off their computer with this handy piece of code:
skill -kill -u username
17. Block a Computer's Access to Specific Websites
Say you're running a business that uses Linux machines, you notice that your employees are spending a ridiculous amount of time checking the weather. You can block their ability to access those sites by opening /etc/hosts with your text editor (sudo gedit /etc/hosts) and adding:
127.0.0.1 website.com
18. Schedule Midnight Downloads
This code is incredibly handy; it allows you to schedule the time for a download to happen--say, at 3PM while you're at work or midnight while you're sleeping.
echo 'wget website.com' | at 012:00
19. Using the Terminal As Root
Using the Terminal as root is sort of like right-clicking on an application in Vista and choosing 'run as Administrator'. It gives you the ability to do things you otherwise couldn't do (namely, run dangerous code). To use the terminal as root, type:
sudo su
20. Disabling Password Prompt When Using Sudo
Whenever you use the 'sudo' command in Linux, you're prompted to enter the user password before the command will go through. This gets annoying. The solution? Disable it. To do so, use the Terminal and type:
gedit sudo visudo
scroll down to the line that says: username ALL=(ALL) ALL
and change it to say: username ALL=(ALL) NOPASSWD: ALL
21. Change the Default Conky
If you're using a distro that includes Conky by default, such as Crunchbang, you might wander how you can edit its settings. To do this, enter this in the Terminal:
sudo gedit ~/.conkyrc
Of course, replace 'gedit' with the text editor of your choice, and sudo is Ubuntu specific.
22. Put a LiveCD on a USB
Say there's a machine you want to gain access to and copy files from, but you don't have access to the computer's login info. You can gain access with it using a LiveCD. The easiest way to do this is by using a USB thumb drive. You can do this by downloading a liveCD iso and then downloading UNETbootin.
Plug in your USB drive, run UNETbootin, and install the ISO with that.
23. Safely Restart Linux
Lets say you're duped into running a fork bomb, or you download a file that promises to be one thing, only to turn out to be a massive tarbomb. How do you safely restart the frozen system? By doing the following:
Press ALT + PrntScrn and then, while holding those, type the following letters in order: REISUB.
24. View All Files (Including the Hidden Ones)
If you need to view all the files within whatever directory you're in, including ones that are hidden, use the following bit of code:
ls -al
25: A Bonus Tip:
Never run the following:
:() { :|:& };:
...there's something about it that begs to be run; doing so, however, will initiate a forkbomb, which will cause your system to freeze.
~
[W] Whoz Hosting ?
Find the name of Web Hosting Company from the Site URL
Who Is Hosting This ? - Ever wondered who is hosting those high-traffic websites like BoingBoing, TechCrunch or the Drudge Report ? Enter a website address and this cool tool will return name of the web host provider that's hosting that website or blog.
The following Domain name and DNS information tools are also interesting :
Netcraft Web Server Query - Type a website URL and Netcraft will tell you the site's operating system, web server, and a graphical view of the time since last reboot for each of the computers serving the site.
DomJax - Checks domain name availability and also runs an automatic whois report for any domain that's taken - hover the mouse over the domain name and DomJax pops up a neat "thought bubble" which has all the information about that domain like who owns it, when it will expire and how to contact the owner.
AJAX DNS - An excellent set of common DNS commands and tools packed in a non-geeky interface. See all DNS records and Reverse DNS records for a domain, HTTP headers, ping a domain or view the whois details for a domain.
Download the latest version of Firefox here.
~
Who Is Hosting This ? - Ever wondered who is hosting those high-traffic websites like BoingBoing, TechCrunch or the Drudge Report ? Enter a website address and this cool tool will return name of the web host provider that's hosting that website or blog.

The following Domain name and DNS information tools are also interesting :
Netcraft Web Server Query - Type a website URL and Netcraft will tell you the site's operating system, web server, and a graphical view of the time since last reboot for each of the computers serving the site.
DomJax - Checks domain name availability and also runs an automatic whois report for any domain that's taken - hover the mouse over the domain name and DomJax pops up a neat "thought bubble" which has all the information about that domain like who owns it, when it will expire and how to contact the owner.
AJAX DNS - An excellent set of common DNS commands and tools packed in a non-geeky interface. See all DNS records and Reverse DNS records for a domain, HTTP headers, ping a domain or view the whois details for a domain.
Download the latest version of Firefox here.
~
Wednesday, December 16, 2009
[W] Enable the Windows Aero in Windows 7
Enable the Windows Aero in Windows 7
If you were looking for the best designed and most transparent Microsoft user interface then you can't escape Windows Aero. Here's a hack to enable Windows Aero in Windows 7. But before you proceed with the steps keep a backup of your registry.
--> Navigate to HKEY_CURRENT_USERSoftwareMicrosoftWindowsDWM
--> Look to the pane on the right of the key hierarchy. Right click on the white area and select New > DWORD (32 bit) Value.
--> As the value appears name it UseMachineCheck.
--> Repeat and create 2 more DWORD Values, Blur and Animations
--> First double-click the value just created with the UseMachineCheck and enter 0 in the Value Data box. Do the same for Values Blur and Animations. Then click OK.
--> Now close the Registry Editor.
--> In the Command Prompt, type the following commands
i) Net Stop uxsms – this command will stop the Desktop Windows Manager Session Manager
ii) Net Start uxsms – this command will restart it
--> Close the Command Prompt & Right click on the desktop and click on Personalize from the menu.
--> Click on the Window Color and Appearance in the Personalization Windows Aero the Color Scheme menu.
~
Change DOS Background
CHANGING DOS BACKGROUND
The value DefaultColor controls the foreground and background colors used in command prompt windows. It has a default value of 0, for standard white text on a black background.
Navigate to HKEY_CURRENT_USER\Software\Microsoft\Command Processor
u'll find "DefaultColor"
You can replace it's value with a two-digit hexadecimal number, in which the first digit selects a background color and the second a foreground color. The hexadecimal codes are:
Hexadecimal value - Color
0 - Black
1 - Blue
2 - Green
3 - Aqua
4 - Red
5 - Purple
6 - Yellow
7 - White
8 - Gray
9 - Light Blue
A - Light Green
B - Light Aqua
C - Light Red
D - Light Purple
E - Light Yellow
F - Bright White
A value of F0, for example, would give black text on a white background, and 1E would yield yellow text on a blue background.
The change should take effect the next time you open a console window.
~
Saturday, December 12, 2009
Type Web Addresses Quickly
The Best Keyboard Shortcut in Firefox – Type Web Addresses Quickly
If you haven’t upgrade to Firefox 3 yet, please do so. The new version is far more responsive and stable that its predecessors.
Another reason for loving Firefox 3 is the way it auto-completes web URLs – very intelligent and something you’ll miss in IE. Update: Firefox 2 users share that this works in the previous version as well.
To get started, press Alt+D or Ctrl+L to move the cursor to your Firefox browser address bar and then try some of these combinations:
To open Google Maps website, type "google/maps" in the Firefox address bar and press Ctrl+Enter.
Firefox will automatically surround the word(s) that are before the first slash with www. and .com. IE 7 and previous version of Firefox can’t do this.
And this URL auto-complete works even if you have several subdirectories in the URL. For instance, your Google Apps sign-in page will open correctly if you type "google/a/mysite.com" and press Ctrl+Enter.
If you want to open a .org site, you need to use Ctrl+Shift+Enter. Typing yahoo/forums followed by Ctrl+Shift+Enter would therefore open our support website at www.yahoo.org/forums.
And for .net websites, the shortcut key is Shift+Enter. So you can view the most popular PowerPoint presentations on Slideshare by typing slideshare/popular followed by Shift+Enter.
http://www.youtube.com/watch?v=-ZmFs0ws9CU&feature=player_embedded
For Geeks: If you like Firefox to add a different suffix other than .com, open your Firefox settings page at about:config and change the value of key browser.fixup.alternate.suffix to something else like .org, .net, etc.
Download the latest version of Firefox here.
~
[W] Keeping your GMail Inbox size under control
Keeping your GMail Inbox size under control
Google Gmail gives you more than 7.5 GB of Inbox space sufficient to store hundreds of thousands of email messages. But you can quickly run out of space even on GMail if your friends regularly email you PDF, video attachments, sound clips, large zipped files, or high-resolution photographs.

When you near the GMail storage limit, the quota indicator displayed at the bottom of your account (that says - You are currently using 59 MB (2%) of your 2720 MB) will change from green to red.

If you go over your storage limit, Gmail will hold your messages for a few days while you clear out some space. If you don't delete anything within that allotted time, you won't be able to receive new messages, and messages sent to your account will then be returned to sender.
Before your GMail Inbox space gets almost full, follow one of these tips:
» The query string "has:attachment" will list all messages that have an attachment. If you further refine the string to "has:attachment from:me label:sent" - it will show all messages with attachment in the Sent Mail folder that were sent by you. Deleting them can retrieve lot of important space.
» Queries like filename:pdf or filename:xls will show messages that have attachments of a specific type. Combine them with a label:sent to display all the PDF files that you have you sent in the past.
» You can set GMail to display upto 100 messages per page. This setting is useful while deleting a more number of messages in one go.
» A query of the form "before:2009/01/01 label:sent" will retrieve all message sent by your before January 1, 2009 - You might want to clear your old sent items using this technique.
» If you have subscribed to tons of mailing lists, now is a good time to get rid of them - you will probably never read them and they are anyway available on the group website. Open a list message, view the header and copy the email address mentioned in the from field. Run a query like from:mail-address@list.com - Choose select all and press delete.
» If GMail search operators tend to confuse you, download your GMail messages to a local mail client like Outlook or Thunderbird that supports POP3 access.
» GMail won't allow you to search or sort emails by the size of attachments. However, your offline client will definitely have this feature. Find messages with the bulkiest attachments in Outlook, then search for the same message in GMail and delete it.
» Don't use the GMail drives that promise to convert your GMail inbox into a virtual hard disk. You may have to wait a little but both Google and Microsoft are about to launch file storage services. Read more about Google GDrive and Windows Live Drive.
Download the latest version of Firefox here.
~
Google Gmail gives you more than 7.5 GB of Inbox space sufficient to store hundreds of thousands of email messages. But you can quickly run out of space even on GMail if your friends regularly email you PDF, video attachments, sound clips, large zipped files, or high-resolution photographs.

When you near the GMail storage limit, the quota indicator displayed at the bottom of your account (that says - You are currently using 59 MB (2%) of your 2720 MB) will change from green to red.

If you go over your storage limit, Gmail will hold your messages for a few days while you clear out some space. If you don't delete anything within that allotted time, you won't be able to receive new messages, and messages sent to your account will then be returned to sender.
Before your GMail Inbox space gets almost full, follow one of these tips:
» The query string "has:attachment" will list all messages that have an attachment. If you further refine the string to "has:attachment from:me label:sent" - it will show all messages with attachment in the Sent Mail folder that were sent by you. Deleting them can retrieve lot of important space.
» Queries like filename:pdf or filename:xls will show messages that have attachments of a specific type. Combine them with a label:sent to display all the PDF files that you have you sent in the past.
» You can set GMail to display upto 100 messages per page. This setting is useful while deleting a more number of messages in one go.

» A query of the form "before:2009/01/01 label:sent" will retrieve all message sent by your before January 1, 2009 - You might want to clear your old sent items using this technique.
» If you have subscribed to tons of mailing lists, now is a good time to get rid of them - you will probably never read them and they are anyway available on the group website. Open a list message, view the header and copy the email address mentioned in the from field. Run a query like from:mail-address@list.com - Choose select all and press delete.
» If GMail search operators tend to confuse you, download your GMail messages to a local mail client like Outlook or Thunderbird that supports POP3 access.
» GMail won't allow you to search or sort emails by the size of attachments. However, your offline client will definitely have this feature. Find messages with the bulkiest attachments in Outlook, then search for the same message in GMail and delete it.
» Don't use the GMail drives that promise to convert your GMail inbox into a virtual hard disk. You may have to wait a little but both Google and Microsoft are about to launch file storage services. Read more about Google GDrive and Windows Live Drive.
Download the latest version of Firefox here.
~
[W] Running out of space on Gmail ?
Running out of space on Gmail ? Get It Back in few minutes.
While Google does offer around 7.5 GB of free storage space on Gmail, you can quickly exhaust that limit if you are not regular about deleting email messages that include large attachments.

When you exhaust the allocated storage limit on your Gmail account, you won’t be able to compose and send new emails from Gmail unless you clear out some space by deleting old mails. Going forward, all incoming messages will also get returned to the sender thus breaking your contact with the outside world.
Never Exceed your Mail Quota Again
Once you run out of storage space on Gmail, there are two options – either purchase storage (at around $20 per 10 GB) or reclaim space on the Gmail hard drive by deleting large (and useless) emails. Let’s go with the latter approach since it’s both free and easy.
Step 1: Enable IMAP in your Gmail account (from Settings –> Forwarding and POP/IMAP) and then configure Outlook (or any mail client like Thunderbird, Live Mail, etc.) to download only your Gmail message headers. There’s no need to download the full message body as it may take days (if not weeks) to download 7 GB of mails on a slow web connection.
Step 2: Press Alt+Ctrl+S in Outlook to access your Send-Receive settings page. Subscribe to the "All Mail" folder of Gmail and choose “Download Headers” only. Make sure no other Gmail folder label is selected in Outlook.
Step 3: Now sync your Microsoft Outlook folder with that of Gmail by hitting F9 or the Send/Receive button in your email client. I had about 5,000 messages in my Gmail account and it took only a couple of minutes to download them all locally (headers only).
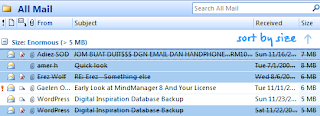
Step 4: Expand the All Mail folder under Gmail in Outlook and sort the email messages by size. Select the messages you want to delete (use the control key to select non-consecutive mail) and drag them in the Trash sub-folder of Gmail under Outlook. Press F9 to re-sync Gmail and Outlook.
Now login to your Gmail (or Google Apps for Gmail) account via the web browser and just empty the trash.
Backup Attachments before Moving to Trash
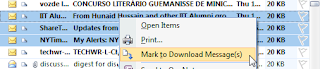
*If you like to backup Gmail messages before deleting them permanently, just right click the corresponding messages in Outlook and select "Mark to Download Messages" – Outlook will download the full message body along with file attachments during the next sync and you may drag them out on the desktop or just move to another local folder in Outlook.
Download the latest version of Firefox here.
~
While Google does offer around 7.5 GB of free storage space on Gmail, you can quickly exhaust that limit if you are not regular about deleting email messages that include large attachments.

When you exhaust the allocated storage limit on your Gmail account, you won’t be able to compose and send new emails from Gmail unless you clear out some space by deleting old mails. Going forward, all incoming messages will also get returned to the sender thus breaking your contact with the outside world.
Never Exceed your Mail Quota Again
Once you run out of storage space on Gmail, there are two options – either purchase storage (at around $20 per 10 GB) or reclaim space on the Gmail hard drive by deleting large (and useless) emails. Let’s go with the latter approach since it’s both free and easy.
Step 1: Enable IMAP in your Gmail account (from Settings –> Forwarding and POP/IMAP) and then configure Outlook (or any mail client like Thunderbird, Live Mail, etc.) to download only your Gmail message headers. There’s no need to download the full message body as it may take days (if not weeks) to download 7 GB of mails on a slow web connection.

Step 2: Press Alt+Ctrl+S in Outlook to access your Send-Receive settings page. Subscribe to the "All Mail" folder of Gmail and choose “Download Headers” only. Make sure no other Gmail folder label is selected in Outlook.
Step 3: Now sync your Microsoft Outlook folder with that of Gmail by hitting F9 or the Send/Receive button in your email client. I had about 5,000 messages in my Gmail account and it took only a couple of minutes to download them all locally (headers only).

Step 4: Expand the All Mail folder under Gmail in Outlook and sort the email messages by size. Select the messages you want to delete (use the control key to select non-consecutive mail) and drag them in the Trash sub-folder of Gmail under Outlook. Press F9 to re-sync Gmail and Outlook.
Now login to your Gmail (or Google Apps for Gmail) account via the web browser and just empty the trash.
Backup Attachments before Moving to Trash

*If you like to backup Gmail messages before deleting them permanently, just right click the corresponding messages in Outlook and select "Mark to Download Messages" – Outlook will download the full message body along with file attachments during the next sync and you may drag them out on the desktop or just move to another local folder in Outlook.
Download the latest version of Firefox here.
~
Wednesday, December 9, 2009
[W] Vista consumes there considerable disk space ?
Why Vista consumes there considerable disk space ?
This is due to several reasons. Here a few:
* The cache thumbnails
* The cache updates
* Shadow (the first part of the trick is sufficient)
* Cache installing service pack 1
* Places where it eats:
o Restore points intensified
o Manage Restore Points
o Modify required disk space for System Restore
* Give the file a name that ends with. Bat
* Confirm and close.
To run the file, you have to right click on it> Run as administrator.
~
This is due to several reasons. Here a few:
* The cache thumbnails
* The cache updates
* Shadow (the first part of the trick is sufficient)
* Cache installing service pack 1
* Places where it eats:
o Restore points intensified
o Manage Restore Points
o Modify required disk space for System Restore
| CD \ CD% APPDATA% CD .. CD LOCAL \ MICROSOFT \ WINDOWS \ EXPLORER DEL *. db CD \ CD% Windir% CD SoftwareDistribution DEL / F / S / Q Download vsp1cln / quiet / verbose vssadmin resize shadowstorage / On = C: / For = C: / maxsize = 3GB reg add HKLM \ SYSTEM \ CurrentControlSet \ Services \ VSS / v Start / t REG_DWORD / d 3 / f reg add HKLM \ SOFTWARE \ Microsoft \ Windows NT \ CurrentVersion \ SystemRestore \ cfg / v DiskPercent / t REG_DWORD / d 5 / f |
* Give the file a name that ends with. Bat
* Confirm and close.
To run the file, you have to right click on it> Run as administrator.
~
Tuesday, December 8, 2009
Windows Desktop Search - Error "Setup has failed"
Error "Setup has failed" when installing Windows Desktop Search
When you attempt to install Windows Desktop Search 3.0, the following error may occur and the setup fails:
Setup has failed. Make sure Terminal Services are enabled before re-running setup.
To resolve the problem, make sure that Terminal Services are started and running. Follow these steps:
* Type Services.msc in Run
* Double-click Terminal Services
* Make sure that its Startup type is set to Manual
* Close Services MMC
* Restart Windows and try installing Windows Desktop Search now.
Note:
1. If the Terminal Services entry is missing in the Services MMC listing, download termservice.reg file. Save the file to Desktop, right-click on the file and choose Merge. Restart Windows for the changes to take effect. (Request for da file link in Comments Section)
2. If Terminal Services startup type is already set to Manual and if remains in a stopped state, try starting the service by clicking the Start button. Note down the error messages if any.
~
[W] Troubleshooter Error
Error "An ActiveX control on this page is not safe" occurs while attempting to run a troubleshooter in Help and Support Center in XP.
When you attempt to run a troubleshooter in Help and Support Center to fix a specific problem, the following error message may appear:
An ActiveX control on this page is not safe.
Your current security settings prohibit running unsafe controls on this page.
As a result, this page may not display as intended.
The above error may occur when you run one of the troubleshooters contained in the List of troubleshooters topic in Help and Support Center.
Before running the Troubleshooter, temporarily relax the Internet Zone security setting. Use the following steps:
Type INETCPL.CPL in Run
Click the Security tab
In the Internet Zone, click the Custom Level button
Set Initialize and script ActiveX controls not marked as safe to Allow
~
[W] Add/Remove Windows Components Error
Error "Setup library comsetup.dll could not be loaded" while opening Add/Remove Windows Components
When you click the "Add/Remove Windows Components" button in Add or Remove Programs, the following error message is displayed:
Setup library comsetup.dll could not be loaded, or function OcEntry could not be found.
When you press OK, the following error is seen:
The application could not be initialized.
This error occurs if the file comsetup.dll is missing from the C:\Windows\system32\setup folder.
Method 1:
The DllCache folder maintains a copy of comsetup.dll file. So, you can copy the file to the following location:
C:\Windows\System32\setup
Note that the DLLCache folder is located at:
C:\Windows\system32\dllcache
Method 2:
Extract comsetup.dll from Windows XP CD
In the Command Prompt, type the following command:
expand X:\i386\comsetup.dl_ -r c:\windows\system\setup
Where X:\ is your CD-ROM drive letter. The above command assumes Windows is installed in C:\ drive. If not, change the drive letter accordingly.
Reboot
~
[W] Error Accessing Add or Remove Programs
Error Accessing Add or Remove Programs
When you attempt to open the Add or Remove Programs applet in the Control Panel, the following message may appear:
Add or Remove Programs has been restricted. Please check with your administrator.
This is due to one of the following Policy settings:
1. NoAddRemovePrograms
2. NoControlPanel
If your system is attached to a domain, your network administrator may have disabled the Add or Remove Programs applet. For standalone systems, follow the steps below to unlock the restrictions.
Navigate to the following branches one by one:
HKEY_CURRENT_USER \ Software \ Microsoft \ Windows \ CurrentVersion \ Policies \ Uninstall
HKEY_LOCAL_MACHINE \ Software \ Microsoft \ Windows \ CurrentVersion \ Policies \ Uninstall
Delete the NoAddRemovePrograms value if present in the above locations.
Then, navigate to following locations:
HKEY_CURRENT_USER \ Software \ Microsoft \ Windows \ CurrentVersion \ Policies \ Explorer
HKEY_LOCAL_MACHINE \ Software \ Microsoft \ Windows \ CurrentVersion \ Policies \ Explorer
Delete the NoControlPanel value in the above locations.
Reboot
~
[W] User Accounts Error
User Accounts applet is completely blank, or displays raw HTML code.
Whenever you attempt to open the User Accounts applet in the Control Panel, the User Accounts dialog pops up, but the page may be empty or filled with raw HTML code. Also, the normal menu options may be missing in the applet.
This may be due to Malware.
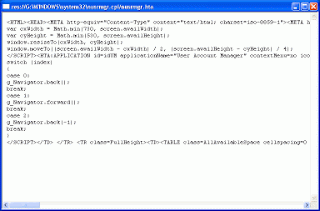
To get back the original applet, Paste the code below to a .vbs file & Ececute it.
~
Whenever you attempt to open the User Accounts applet in the Control Panel, the User Accounts dialog pops up, but the page may be empty or filled with raw HTML code. Also, the normal menu options may be missing in the applet.
This may be due to Malware.

To get back the original applet, Paste the code below to a .vbs file & Ececute it.
| Set WshShell = CreateObject("WScript.Shell") Dim htacommand htacommand = "%windir%\system32\mshta.exe " & chr(34) & "%1" & chr(34) & " %*" On Error resume Next WshShell.RegWrite "HKCR\.hta\", "htafile", "REG_SZ" WshShell.RegWrite "HKCR\.hta\PerceivedType", "text", "REG_SZ" WshShell.RegWrite "HKCR\.hta\Content Type", "application/hta", "REG_SZ" WshShell.RegWrite "HKCR\htafile\", "HTML Application", "REG_SZ" WshShell.RegWrite "HKCR\htafile\EditFlags", "1048576", "REG_DWORD" WshShell.RegWrite "HKCR\htafile\DefaultIcon\", "%windir%\system32\mshta.exe,1", "REG_EXPAND_SZ" WshShell.RegWrite "HKCR\htafile\Shell\Open\Command\", htacommand, "REG_EXPAND_SZ" 'Wshshell.RUN ("regsvr32.exe mshtml.dll -i -s") 'Wshshell.RUN ("regsvr32.exe shdocvw.dll -i -s") Wshshell.RUN ("regsvr32.exe jscript.dll -s") MsgUser = Msgbox ("Fixed the HTA settings.", 4160, "User accounts applet fix for Windows XP") Set WshShell = Nothing 'Copyright : © 2010 Cosmo Cyber |
~
[W] Disable Notification Balloons
How to disable Notification Balloons in windows XP
Disable balloon tips in the notification area, follow these steps:
Navigate to HKEY_CURRENT_USER\Software\Microsoft\Windows\CurrentVersion\Explorer\Advanced
1. Right-click the right side pane
2. Create a new DWORD value, and then name it EnableBalloonTips.
3. Double-click EnableBalloonTips, and then give it a value of 0.
4. Close Registry Editor.
5. Restart your system.
~
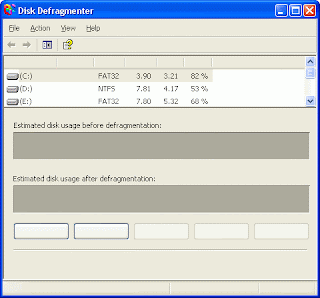
[W] Blank Disk Defragmenter
The menu options and buttons appear blank in Disk Defragmenter
When you open Disk Defragmenter console, the menu options, column headers and the command buttons may appear blank with no text in them. Reinstalling Disk Defragmenter using the DFRG.INF file also may not help.
This happens if the Disk Defragmenter resource file is missing or corrupt. To resolve the problem, expand a copy of the file dfrgres.dll from the Windows XP CD-ROM or from an alternate source path. The file dfrgres.dll will be stored in a compressed form in your Windows XP CD, and its file name is dfrgres.dl_ (Note the underscore at the end)
* Insert the Windows XP CD into the drive
* In the Command Prompt, type this command:
expand H:\i386\dfrgres.dl_ -r %systemroot%\system32
* Type EXIT to quit the Command Prompt.
Note: In the above example, H:\ is your CD-ROM drive-letter. If different drive-letter is assigned to the CD drive in your system, change the drive-letter in the above command accordingly.
The file consists of the following information.
Dfrgres.dll - File information
CompanyName Microsoft Corp. and Executive Software International, Inc.
FileDescription Disk Defragmenter Resource Module
FileVersion 5.1.2600.0 (xpclient.010817-1148)
LegalCopyright ©2001 Microsoft Corp. and Executive Software Int'l, Inc.
ProductName Windows Disk Defragmenter
ProductVersion 5.1.2600.0
~
Monday, December 7, 2009
[W] Faster copying in vista
Faster copying in vista
Quick Copy
It would still prevent a file or folder must be copied to a folder or other location on your computer. Now there is a tweak in order to facilitate this. This tweak in the menu you get when you Right click a file, a new value called: Copy To Folder. This registry tweak you can still faster and more convenient folders and files.
1. Navigate to HKEY_CLASSES_ROOT/AllFilesystemObjects/Shellex/ then Context Menu Handlers
2. In Context Menu Handlers right-click and select New & Key.
3. The name of the key changes in Copy To
4. Then double click on "standard" which you find in the right screen.
5. You fill the following information there: (C2FBB630-2971-11D1-A18C-00C04FD75D13)
6. Finally close the registry editor.
If you are on a folder or file and right click with you in the context menu an extra line shows "Copy To". Now you can copy a file or folder to the place of your choice in a, easy and faster way.
~
[W] Hidden Files Tweak
Unable to change settings for viewing hidden/system files ?
To correct this problem, Copy & paste the following contents into Notepad:
Save the file with .reg extension and double-click on it, click Yes.
~
To correct this problem, Copy & paste the following contents into Notepad:
| Windows Registry Editor Version 5.00 [HKEY_LOCAL_MACHINE\SOFTWARE\Microsoft\Windows\CurrentVersion\Explorer\Advanced\Folder\Hidden] "Text"="@shell32.dll,-30499" "Type"="group" "Bitmap"=hex(2):25,00,53,00,79,00,73,00,74,00,65,00,6d,00,52,00,6f,00,6f,00,74,\ 00,25,00,5c,00,73,00,79,00,73,00,74,00,65,00,6d,00,33,00,32,00,5c,00,53,00,\ 48,00,45,00,4c,00,4c,00,33,00,32,00,2e,00,64,00,6c,00,6c,00,2c,00,34,00,00,\ 00 "HelpID"="shell.hlp#51131" [HKEY_LOCAL_MACHINE\SOFTWARE\Microsoft\Windows\CurrentVersion\Explorer\Advanced\Folder\Hidden\NOHIDDEN] "RegPath"="Software\\Microsoft\\Windows\\CurrentVersion\\Explorer\\Advanced" "Text"="@shell32.dll,-30501" "Type"="radio" "CheckedValue"=dword:00000002 "ValueName"="Hidden" "DefaultValue"=dword:00000001 "HKeyRoot"=dword:80000001 "HelpID"="shell.hlp#51104" [HKEY_LOCAL_MACHINE\SOFTWARE\Microsoft\Windows\CurrentVersion\Explorer\Advanced\Folder\Hidden\SHOWALL] "RegPath"="Software\\Microsoft\\Windows\\CurrentVersion\\Explorer\\Advanced" "Text"="@shell32.dll,-30500" "Type"="radio" "CheckedValue"=dword:00000001 "ValueName"="Hidden" "DefaultValue"=dword:00000001 "HKeyRoot"=dword:80000001 "HelpID"="shell.hlp#51105" |
Save the file with .reg extension and double-click on it, click Yes.
~
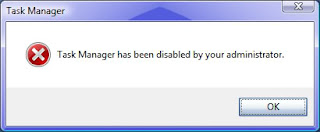
[W] Enable Task Manager
The easiest way to Enable 'Task Manager', when the windows shows the following alert.
This is the most common problem, usually occur due to Virus.
1.Navigate to gpedit.msc
2.select administrative templates user configuration
3.then select system
4.select ctrl+alt+del option
5.select remove tasmanager
6.then click on the option disable.
~
This is the most common problem, usually occur due to Virus.

1.Navigate to gpedit.msc
2.select administrative templates user configuration
3.then select system
4.select ctrl+alt+del option
5.select remove tasmanager
6.then click on the option disable.
~
[W] Vista SP1 to save upto 2GB storage
Vista SP1 to save upto 2GB storage
User who wanna go with Vista Sp1 can now save upto 2 Gb of storage with a simple trick. to do so, here is the tip to follow after a clean installation of Windows Vista:-
* Disable System Restore for C:\ where you installed Windows Vista (System Restore will guide you by flagging the drive where you installed Windows).
* Install Windows Vista SP1.
* After installation, start CMD by administrative privileges and type: "vsp1cln.exe" without quotes.This tool will allow you to cleanup Vista SP1 installation files and save 2 GB of storage
* Click Yes.
~
[W] Registry tweak to remove arrows Shortcuts
Registry tweak to remove arrows Shortcuts in Windows Vista
When creating a shortcut, you will notice that there is an arrow appeared on top of it. In fact this shortcut arrow is an overlay, which is stored in the master icon file named as shell32.dll located at C:\Windows\System32. If you don’t like this arrow to be shown on the shortcut, there is a way for you to create a shortcut without showing the arrow key.
Each of icons created has a shortcut number associated with it, which is 29. In order to remove the arrow from the shortcut, we will redirect number 29 to a different master icon file through simple registry
hack:
1. Navigate to HKEY_LOCAL_MACHINE\SOFTWARE\Microsoft\Windows\Curr entVersion\explorer.
2. Right click on Explorer, choose New -> Key, and name the new key as Shell Icons.
4. Right click on Shell Icons, choose New -> String Value, then name it as 29.
5. On the right panel, double click on 29 and assign it with the value as %SystemRoot%\\noarrow.ico,0.
6. Download noarrow.ico, save it to root directory, C:\Windows\.
7. In order to make it effective of the registry changes, logoff from the computer
and login again.
Once above steps are done, you will notice that all shortcuts created previously or any newly created shortcuts no longer have arrow attached to it.
~
Download Rapidshare files without waiting
Download Rapidshare files without waiting.
Download Greasemonkey, it allows you to download rapidshare files without waiting. Greasemonkey is a very useful extension for Firefox. It is used to check if the rapidshare links are operational''Alive''or 'Dead''. The interest of this extension is that it detects when the page download is complete, if the link is rapidshare ''Alive''or''Dead''. In addition, it works inside your browser without any intervention on your part. But most of the time, that advantage is available only to people with the programming skills to make the changes they want. Its a free plug-in for Firefox, it simplifies tweaking the browser. For those who enjoy Firefox, you can install either because it is totally free. For those who enjoy Firefox, you can install either because it is free.
How to use:
1. Click on the rapidshare link with the middle button to appear in the background (Maybe not working well in some versions)
2. Continue surfing. (You can see the timer on the download in the title of the tab on the web rapidshare)
3. After a while the window appears to download, then save the file and close the tab that says "Done".
There is also an other add-on called Rapidshare Downloader 0.5.9, which helps to download Rapidshare continuously. When entering any page that links from Rapidshare, etc, will check them AUTOMATICALLY them. It works great the best downloader I have found thus far it has also been able to bypass the downloadable amount from rapid share per day.
Note: Use these 3rd party tools @ ur own risk.
~
[W] Fix Realtek HD Audio error: Error 0xE0000227
Fix Realtek HD Audio error: Error 0xE0000227

Open Device Manager
In the "View" menu manager, select "Devices by connection":
Disable and uninstall by right clicking on "Bus Driver for Microsoft UAA High Definition Audio",
You can now install the drivers normally and without error.
~
Open Device Manager
In the "View" menu manager, select "Devices by connection":
Disable and uninstall by right clicking on "Bus Driver for Microsoft UAA High Definition Audio",
You can now install the drivers normally and without error.
~
Login with multiple Ids
Login with multiple Ids at the same time in Orkut , Gmail , Yahoo !.
Step 1:
Create a new Environment variable.
variable name: moz_no_remote
variable value: 1
Click Ok to close all windows.
step 2:
open Firefox icon's properties(from desktop & quick launch).
add extension -p to command line
(Ex: "c:\program files\mozillafirefox\firefox.exe" -p).
While starting Firefox u have to create two separate profiles of Firefox so that u can login to 2 accounts of any ( Orkut, Yahoo, Rediff or anything else).......
For three logins create three profiles of firefox.........
~
[W] Remove quick-heal entry from registry
Remove quick-heal entry from registry
After using Quick-Heal Antivirus for 30 days trial version it expires & U need to install again. So, to reinstall it you have to clean it from the Registry. It can be done without formatting the Windows Operating system.
Click here for the detailed steps to Remove quick-heal entry from registry.
~
After using Quick-Heal Antivirus for 30 days trial version it expires & U need to install again. So, to reinstall it you have to clean it from the Registry. It can be done without formatting the Windows Operating system.
Click here for the detailed steps to Remove quick-heal entry from registry.
~
[W] Fix 'Recycle Bin' Icon Not Refreshing When Emptied
Fix 'Recycle Bin' Icon Not Refreshing When Emptied
In windows vista, when you empty recycle bin, Recycle Bin icon on desktop doesn't refresh automatically. This is very common problem in Windows Vista. It will show the "Full Recycle Bin" icon. Temporarily you can change the icon refreshing the desktop. It happens when you restore the deleted recycle bin icon. To change the icon, you can manually reset it by following methods:
Method 1:
1. Right-click on the blank area on Desktop and select Personalize
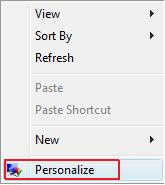
2. In the Tasks pane, click Change desktop icons
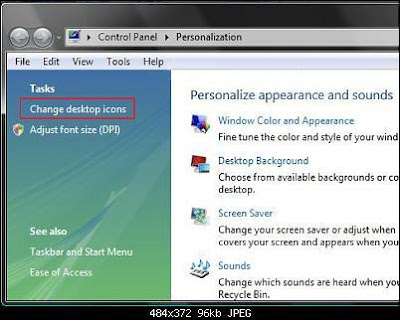
3. Select the Recycle Bin (full) icon and then click Change Icon
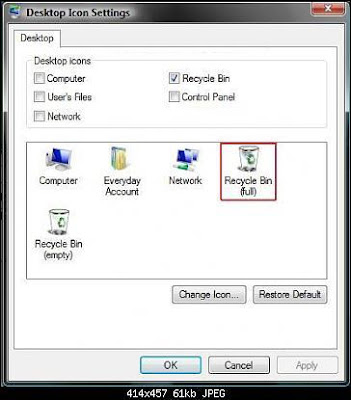
4. In the Change Icon dialog box, select the full Recycle Bin icon
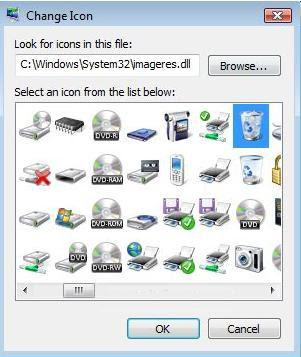
5. Click OK to close the Change Icon dialog box
6. Select the Recycle Bin (empty) icon and then click Change Icon
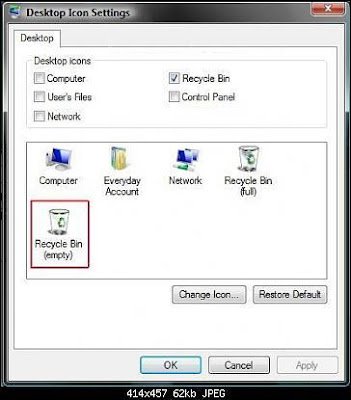
7. In the Change Icon dialog box, select the empty Recycle Bin icon
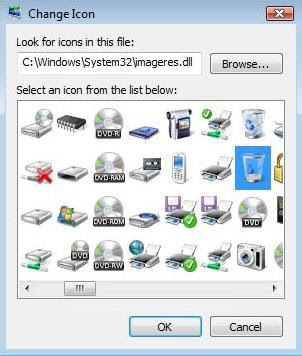
8. Click OK to close the Change Icon dialog box
9. Click Apply, and then click OK
Method 2:
Go to C:\Usersname\AppData\Local\IconCache.db and delete 'IconCache.db' file. And reboot the system. You will see the new one after restart.
Note: This might not work i9n some Systems.
Method 3:
Click on this link to fix this problem automatically. This is free application from Microsoft to fix such errors. Download and Run the application. Follow the steps given in the wizard.
~
In windows vista, when you empty recycle bin, Recycle Bin icon on desktop doesn't refresh automatically. This is very common problem in Windows Vista. It will show the "Full Recycle Bin" icon. Temporarily you can change the icon refreshing the desktop. It happens when you restore the deleted recycle bin icon. To change the icon, you can manually reset it by following methods:
Method 1:
1. Right-click on the blank area on Desktop and select Personalize

2. In the Tasks pane, click Change desktop icons

3. Select the Recycle Bin (full) icon and then click Change Icon

4. In the Change Icon dialog box, select the full Recycle Bin icon
5. Click OK to close the Change Icon dialog box
6. Select the Recycle Bin (empty) icon and then click Change Icon
7. In the Change Icon dialog box, select the empty Recycle Bin icon
8. Click OK to close the Change Icon dialog box
9. Click Apply, and then click OK
Method 2:
Go to C:\Usersname\AppData\Local\IconCache.db and delete 'IconCache.db' file. And reboot the system. You will see the new one after restart.
Note: This might not work i9n some Systems.
Method 3:
Click on this link to fix this problem automatically. This is free application from Microsoft to fix such errors. Download and Run the application. Follow the steps given in the wizard.
~
[W] Format your Flash drive with NTFS
Format your Flash drive with NTFS file system when there is no option for it

Right-Click on My Computer > Properties
Click on Hardware Tab > Device Manager
Locate your Usb Drive > Right-Click > Properties
Click on Policies Tab > Optimize for performance
Click OK
Close all windows
Now format your Drive; NTFS option will be now available
Note: NTFS file system is very delicate on flash drives. With NTFS you absolutely MUST use "Safely remove" option every time, unless you want to corrupt your data.
~
Sunday, December 6, 2009
[W] Make IE8 Run Faster
Make IE8 Run Faster
Microsoft has recently released the new browser Internet Explorer version 8 and IE 8 has won the hearts of many people with its new features. I must admit I also have been using Firefox before that primarily because of all the features were better in Firefox along with its addons.
Internet Explorer 8 has good list of features as mentioned earlier and also has more speed than its earlier version IE7. IE8 is facing stiff competition with other browsers like Mozilla Firefox.But Microsoft has taken tremendous amount of effort to bring the standards in IE8 as they have been trying with Windows 7 also.
IE8 is indeed faster than Firefox but its too hard to notice the difference. So the browsing speed of IE8 has undergone some major changes and yet with a simple changes you can increase the speed even better.
So, to increase your IE8 speed much more:-
1. Go to Start > Run
2. Open the command prompt with admin rights (type cmd in Run).
Type the following command
regsvr32 actxprxy.dll
The following message will come up:
Now just restart your system and see the difference..
Microsoft has recently released the new browser Internet Explorer version 8 and IE 8 has won the hearts of many people with its new features. I must admit I also have been using Firefox before that primarily because of all the features were better in Firefox along with its addons.
Internet Explorer 8 has good list of features as mentioned earlier and also has more speed than its earlier version IE7. IE8 is facing stiff competition with other browsers like Mozilla Firefox.But Microsoft has taken tremendous amount of effort to bring the standards in IE8 as they have been trying with Windows 7 also.
IE8 is indeed faster than Firefox but its too hard to notice the difference. So the browsing speed of IE8 has undergone some major changes and yet with a simple changes you can increase the speed even better.
So, to increase your IE8 speed much more:-
1. Go to Start > Run
2. Open the command prompt with admin rights (type cmd in Run).
Type the following command
regsvr32 actxprxy.dll
The following message will come up:

Now just restart your system and see the difference..
Recover data from infected Pen Drive
Recover data from infected Pen Drive
I am know that nowadays many people have some major issue with viruses which cause various troubles on your computer.Now you would be thinking how can you back up data from a virus infected pen drive. If you insert you pen drive on your computer it may infect your computer also.
I have found a solution for you need to follow few simple steps for that which is as follows:-
1. Open My Computer and Right click on the Removable pen drive.
2. Select Properties and then Tools.
3. Click on Back Up.
4. Now choose the file to back up from your removable pen drive.
5. Finally choose the Destination path where you want to store your back up files.
6. Extract them in other drive.
~
Hide the delete option of Recycle bin
Hide the Delete option of Recycle bin
There is way to hide the delete button from Recycle bin menu in window vista. Just follow the steps below :
Click and download the file Vista_recyclebin_hidedelete.reg.
Save the file on the Desktop. Then right click on the file Vista_recyclebin_hidedelete.reg and choose the option of Merge
Click on Yes. And now if you right click on the recycle bin the delete option is disappeared.
If you want to restore the delete option back do the following.
Click and download the file Vista_recyclebin_showdelete.reg
Save the file on the Desktop. Run the file and your setting will he restored.
~
Disable Automatic Restart
To disable automatic Restart after updates follow these steps:
In the command prompt type 'sc stop wuauserv'
~
In the command prompt type 'sc stop wuauserv'
~
[W] Resize Partition under Windows 7
Resize Partition under Windows 7
Steps:
1. First click on Start and goto Control panel and type partition or hard drive.
2. Then a link would get open as Create and Format Hard Disk Partitions under administrative tools.Click on that link an disk management utility will get open for Windows 7.
3. Now right click on the volume and select the Shrink Volume. Over here you need to specify the amount of space which you want to shrink.
4. Now if you wan to extend any volume in Windows 7,then right click on the drive to be extended and select Extend Volume.
5. Now enter how much space do you wan to extend it.
~
[W] Boost up Windows 7
Speed Up Windows 7 and Windows Vista Boot Up Process by Increasing Processor
There are many ways to decrease booting time and speed up start, such as using third party programs such as Startup Manager to manage programs running automatically. Windows 7 and Windows Vista users running dual-core, quad-core or other multi-core or multi-processors computer can try the following trick to make Windows boots faster.
Once enabled, Windows operating system will use all available (or selected number of) processor cores to run the boot up algorithms, and this potentially make the startup speedier and faster, with less waiting time on black screen and logon screen.
If your system has a Dual Core or a Quad Core CPU and you are using Windows Vista, you can speed up the boot process of Windows. A very simple tweak that allows your PC to boot faster then before.
But first you should figure out what’s the current boot up time of your system. For that purpose I've created a simple script in VB.
Here's the script:
Save the above in *.vbs file. & Execute it to know the time taken by your system to boot up, before applying the tweak.
A dialog box will appear giving you warning that the file you are about to run is an executable and it may contain viruses. Now clicking on Ok will reboot your system.
After the reboot you'll see a dialog box which will be displaying the time taken by your system during reboot. Note this time.
To apply go to 'msconfig'
Click on Boot tab given in the upper side of the dialog box and click Advanced Options button. Here click the check box for Number of Processors. This will activate the drop down menu given just below it.
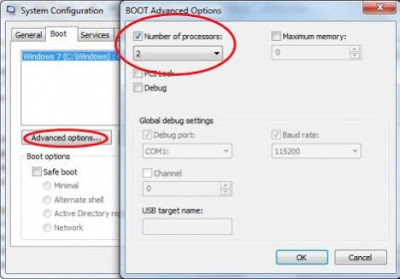
If you have a Dual Core CPU select 2 or if you have a Quad Core CPU select 4. Press OK and Apply. Windows will now ask for your confirmation for the changes that you've made in the boot settings. Click Yes and press Restart button in the following dialog box.
After coming back to windows you'll have to restart your system again by clicking on that Vista Reboot.vbs file (like you did b4) becoz it will give us the time taken by the system to boot up.
When you get back to windows you'll see the same dialog box displaying the time in seconds.
Compare it & U will find da difference.
Note: Please donot try if you are not an system expert. Doing so, unknowingly might Make your Processor malfunction permanently.
Code & Trick credit goes to CosmoCyber Admin.
~
There are many ways to decrease booting time and speed up start, such as using third party programs such as Startup Manager to manage programs running automatically. Windows 7 and Windows Vista users running dual-core, quad-core or other multi-core or multi-processors computer can try the following trick to make Windows boots faster.
Once enabled, Windows operating system will use all available (or selected number of) processor cores to run the boot up algorithms, and this potentially make the startup speedier and faster, with less waiting time on black screen and logon screen.
If your system has a Dual Core or a Quad Core CPU and you are using Windows Vista, you can speed up the boot process of Windows. A very simple tweak that allows your PC to boot faster then before.
But first you should figure out what’s the current boot up time of your system. For that purpose I've created a simple script in VB.
Here's the script:
| Option Explicit On Error Resume Next Dim Wsh, Time1, Time2, Result, PathFile, MsgResult, MsgA, AppName, KeyA, KeyB, TimeDiff MsgA = "Warning! Close all running programs and click on OK." KeyA = "HKEY_CURRENT_USER\Software\RestartTime\" KeyB = "HKEY_CURRENT_USER\Software\Microsoft\Windows\Curr e ntVersion\Run\RestartTime" AppName = "Boot Up Time" Set Wsh = CreateObject("WScript.Shell") PathFile = """" & WScript.ScriptFullName & """" Result = wsh.RegRead(KeyA & "Times") if Result = "" then MsgResult = Msgbox (MsgA, vbOKCancel, AppName) If MsgResult = vbcancel then WScript.Quit Wsh.RegWrite KeyA & "Times", left(Time,8), "REG_SZ" Wsh.RegWrite KeyB, PathFile, "REG_SZ" Wsh.Run "cmd /c Shutdown -r -t 00", false, 0 else Wsh.RegDelete KeyA & "Times" Wsh.RegDelete KeyA Wsh.RegDelete KeyB TimeDiff = DateDiff("s",Result,left(Time,8)) MsgBox "Your system reboots in " & TimeDiff & " seconds", VbInformation, AppName end if wscript.Quit |
Save the above in *.vbs file. & Execute it to know the time taken by your system to boot up, before applying the tweak.
A dialog box will appear giving you warning that the file you are about to run is an executable and it may contain viruses. Now clicking on Ok will reboot your system.
After the reboot you'll see a dialog box which will be displaying the time taken by your system during reboot. Note this time.
To apply go to 'msconfig'
Click on Boot tab given in the upper side of the dialog box and click Advanced Options button. Here click the check box for Number of Processors. This will activate the drop down menu given just below it.

If you have a Dual Core CPU select 2 or if you have a Quad Core CPU select 4. Press OK and Apply. Windows will now ask for your confirmation for the changes that you've made in the boot settings. Click Yes and press Restart button in the following dialog box.
After coming back to windows you'll have to restart your system again by clicking on that Vista Reboot.vbs file (like you did b4) becoz it will give us the time taken by the system to boot up.
When you get back to windows you'll see the same dialog box displaying the time in seconds.
Compare it & U will find da difference.
Note: Please donot try if you are not an system expert. Doing so, unknowingly might Make your Processor malfunction permanently.
Code & Trick credit goes to CosmoCyber Admin.
~
[W] Permanently Delete Sensitive Files in Ubuntu
Permanently Delete Sensitive Files in Ubuntu
When you delete a file, the data are not destroyed your hard drive. They can easily be recovered with the right tools. To delete sensitive data you can use the Shred of Ubuntu that allows you to write random data several times on the files are deleted to make sure that they will never be restored. To use it easily, you can add to the menu that appears after right clicking on a file.
1. Open a Terminal window by clicking on the Applications menu, click Accessories then click Terminal.
2. Enter the command sudo apt-get install nautilus-actions. Press Enter. Enter your password and click OK.
3. Once the package installed, close the Terminal window.
4. Click the System menu, then click on System Preferences actions Nautilus.
5. Click the Add button.
# Enter the Delete command in the final wording.
# Then gtk-dialog-warning icon in the field.
# In the Path field, enter the command shred.
# In the Settings field, enter the command-f-u-v-z% M.
# Open the tab Conditions.
# Select both and check the box Appears if selection contains multiple files or folders.
# Finally, click the OK button and then click Close.
# Open a Terminal window and enter the command nautilus-q. Confirm and enter the command to restart the nautilus file manager.
# Now when you click the right mouse button on a file or folder in the file browser, you can use the delete command from the menu that appears to remove it safely.
Shred Commands
Shred is a shell command that allows you to securely erase any files. It overwrites the specified file(s) repeatedly, in order to make it harder for even very expensive hardware probing to recover the data.
Shred is included in many Linux distributions, thus you can use it immediately, without any further installation.
To shred a file,
shred -f -v -z -u file.txt
where
-f: change permissions to allow writing if necessary
-v: verbose, to display the progress
-z: add a final overwrite with zeros to hide shredding
-u: truncate and remove file after overwriting
[W] Clone ur Computer on a USB Drive
Clone Your Computer on a USB Drive – Why Carry That Heavy Laptop
If you are working across multiple computers that are not connected to each other, you probably use the good old USB drive (or external hard drive) to store and carry your Office documents, Photoshop drawings, personal pictures and other multimedia files.
Perfect. Now imagine a situation where you have all required data on the USB drive but the computer you are currently working on (say in the cyber café or a friend’s place) doesn’t have the necessary software programs that are required to view or edit those files.
That computer neither has Microsoft Office for creating PowerPoint presentations or Excel sheets, nor Photoshop and AutoCAD for you to edit those important CAD drawings. Even the media player is missing so you cannot watch your personal video and music collection that you have been carrying in the pocket.
What if you could carry all your favorite software applications (and their settings), Office files, emails and everything else with you on a portable drive? You just plug-in that drive into the USB port of any computer and start working as if that was your own PC.
Well, your dreams can come true with Mojopac from Ringcube – an absolutely brilliant tool that very-easily clones your existing computing environment onto any USB Drive. And if you have an iPod or a USB based cell phone or Digital Camera, Mojopac will work just fine so you have one less device to carry.
To get started, you connect the USB drive to the main computer (that has the stuff you need most) and install the free Mojopac software. What you then see is a fresh Windows XP environment without any software. Now install all the applications (and even games) that you want to carry around– they are not installed on your computer but on the USB drive.
Once you are done, eject the USB drive and plug into any Windows computer. All those programs and documents can now run off the USB drive. Mojopac will also save your application settings and software preferences as you move around computers.
Mojopac uses the resources of the host computer but runs entirely on the USB drive without modifying anything on the host. Once you eject the USB device out of the friend’s computer, there are no traces left – not even your web browsing history.
~
If you are working across multiple computers that are not connected to each other, you probably use the good old USB drive (or external hard drive) to store and carry your Office documents, Photoshop drawings, personal pictures and other multimedia files.

Perfect. Now imagine a situation where you have all required data on the USB drive but the computer you are currently working on (say in the cyber café or a friend’s place) doesn’t have the necessary software programs that are required to view or edit those files.
That computer neither has Microsoft Office for creating PowerPoint presentations or Excel sheets, nor Photoshop and AutoCAD for you to edit those important CAD drawings. Even the media player is missing so you cannot watch your personal video and music collection that you have been carrying in the pocket.
What if you could carry all your favorite software applications (and their settings), Office files, emails and everything else with you on a portable drive? You just plug-in that drive into the USB port of any computer and start working as if that was your own PC.
Well, your dreams can come true with Mojopac from Ringcube – an absolutely brilliant tool that very-easily clones your existing computing environment onto any USB Drive. And if you have an iPod or a USB based cell phone or Digital Camera, Mojopac will work just fine so you have one less device to carry.
To get started, you connect the USB drive to the main computer (that has the stuff you need most) and install the free Mojopac software. What you then see is a fresh Windows XP environment without any software. Now install all the applications (and even games) that you want to carry around– they are not installed on your computer but on the USB drive.
Once you are done, eject the USB drive and plug into any Windows computer. All those programs and documents can now run off the USB drive. Mojopac will also save your application settings and software preferences as you move around computers.
Mojopac uses the resources of the host computer but runs entirely on the USB drive without modifying anything on the host. Once you eject the USB device out of the friend’s computer, there are no traces left – not even your web browsing history.
~
Saturday, December 5, 2009
[W] Connect Two Computers Without a Router
How to Connect Two Computers Without a Router
Let’s assume you have two computers at home and you want to connect them together so that you can easily share an internet connection between the two machines or transfer photos, music and other files from one computer to another.
Connect Two Computers Directly
There are two options – you can either buy a router or, if you are looking for something more simple and don’t want to spend money on new networking hardware, you can connect the two computers using a commonly-available cable. The latter method doesn’t involve any complicated network settings and you will still be able to share files, internet connection, and even printers between computers.
Things you need :
To set up this basic wired home network, all you need is an inexpensive Ethernet crossover cable and the other requirement is that network cards* (also known as LAN or Ethernet cards) should be installed on each of you computers.
[*] This should not be an issue because network cards are available on most newer machines by default but if you are working with a very old computer, you can either attach an internal LAN card to your computer’s motherboard or go for a USB Network adapter that will turn a USB port into an Ethernet (RJ45) port.
An Ethernet crossover cable looks like a standard Ethernet cable but the internal wiring is a little different. You can purchase crossover cables at from your local computer store. If you have trouble finding them, you can purchase an inexpensive Crossover adapter and that will let you use any standard Ethernet cable as a c=Crossover cable.
Connect Computers with an Ethernet Crossover Cable
Before connecting the two computers with a physical cable, make sure that both machine are using the same Workgroup. Here is step-by-step guide that explains how you can change the Workgroup of your computers.
Changing Workgroup in Windows XP – From the Start menu, right-click “My Computer.” Select Properties in the drop-down menu, and then select the second tab that says “Computer Name” from the System Properties window. Now click the “Change…” button, enter a unique Workgroup name and reboot your computer.
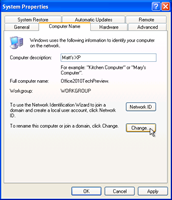
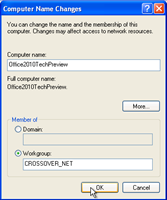
Changing Workgroup in Windows 7 or Vista – Open the Control Panel, type “Workgroup” in the search box, and select the entry that says “Change Workgroup Name.” Click the “Change…” button, enter a Workgroup name and restart the computer. Windows 7 users can skip one step; simply type “Workgroup” in the search box in the start menu, and select the first entry, then proceed as above.
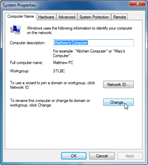
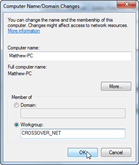
Now that the Workgroups are same for both computers, connect the two computers together using the Ethernet crossover cable. Simply plug-in one end of the crossover cable into the network adapter of Computer A and connect the other end of the cable to the network adapter of Computer B.
Windows will automatically recognize the new network, and you can now easily view files and folder that the other computer has shared. Simply open Networks from the Start Menu (or the Control Panel), and you should see the other computer by its name. You can then browse any shared files on the other computer, and can even utilize shared printers.
Troubleshooting – If you do not see the other computer under Networks, you probably have a prompt at the top of your Network window saying that Network discovery is turned off (screenshots below). Select “Turn on Network Discovery and File Sharing.” In the next prompt, select “No, make the network I am connected to a private network.” Now you should see the other computer on the home network.
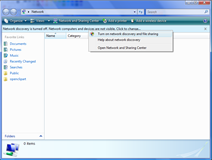
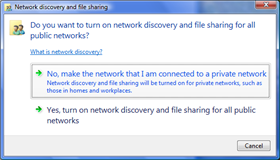
[*] While it is possible to share files between two computers connected with a crossover cable without making them part of the same workgroup, the method will only work if both computers have this network set as a private network, and may still cause problems. It is therefore advisable to have both computers on the same workgroup before sharing files and printers.
Share an Internet Connection Between Two Computers
There are scenarios where you may want to share the same internet connection between two computers. For instance:
Situation A - You have setup a Wi-Fi network at home but your old desktop computer doesn’t have a wireless network card. In that case, you can use the laptop to connect to the internet wirelessly and then share that same connection with the desktop over a crossover Ethernet cable.
Situation B – You have a netbook with a built-in cellular data connection. You can share that connection with any another computer at home through the crossover Ethernet cable.
Situation C – You use a (slow) Wireless USB modem with your laptop computer while your desktop is connected to an ADSL Broadband line and there’s no router at home. For any bandwidth intensive tasks, like when you want to backup photos from your laptop to an online service, you can connect the laptop to the desktop and things will happen much faster.
Steps for sharing an Internet connection :
First, if you only wish to share internet connection and not files, both computers need not belong to the same workgroup. All you need to do is to connect the two computers with the Ethernet crossover cable, and then turn on Internet connection sharing in the computer that already has an Internet connection. The instructions vary for different versions of Windows:
For Windows XP – Select “Network and Internet Connections” from the Control Panel and click “Network Connections.”
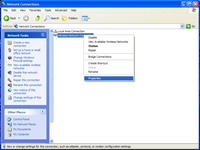
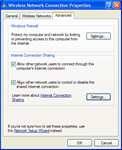
Right-click on the network connection you wish to share (the one connected to the internet), select Properties, click on the “Advanced” tab, and then check the box that says “Allow other network users to connect through this computer’s Internet connection.” Click OK, and the second computer that you have connected to this computer with the Crossover Cable should have internet access now.
For Windows 7 and Vista – Open Control Panel, enter “network connections” in the search box on the top right and select “View Network Connections.”
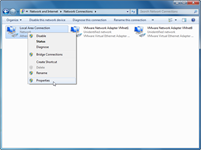
Right-click on the network connection you wish to share (this must be the one connected to the internet) and select Properties. Select the "Sharing" tab and then check the option that says “Allow other network users to connect through this computer’s Internet connection.” Click OK, and the other computer you have connected to this Windows 7 or Vista computer should have internet access now.
~
Let’s assume you have two computers at home and you want to connect them together so that you can easily share an internet connection between the two machines or transfer photos, music and other files from one computer to another.
Connect Two Computers Directly
There are two options – you can either buy a router or, if you are looking for something more simple and don’t want to spend money on new networking hardware, you can connect the two computers using a commonly-available cable. The latter method doesn’t involve any complicated network settings and you will still be able to share files, internet connection, and even printers between computers.
Things you need :
To set up this basic wired home network, all you need is an inexpensive Ethernet crossover cable and the other requirement is that network cards* (also known as LAN or Ethernet cards) should be installed on each of you computers.
[*] This should not be an issue because network cards are available on most newer machines by default but if you are working with a very old computer, you can either attach an internal LAN card to your computer’s motherboard or go for a USB Network adapter that will turn a USB port into an Ethernet (RJ45) port.

An Ethernet crossover cable looks like a standard Ethernet cable but the internal wiring is a little different. You can purchase crossover cables at from your local computer store. If you have trouble finding them, you can purchase an inexpensive Crossover adapter and that will let you use any standard Ethernet cable as a c=Crossover cable.
Connect Computers with an Ethernet Crossover Cable
Before connecting the two computers with a physical cable, make sure that both machine are using the same Workgroup. Here is step-by-step guide that explains how you can change the Workgroup of your computers.
Changing Workgroup in Windows XP – From the Start menu, right-click “My Computer.” Select Properties in the drop-down menu, and then select the second tab that says “Computer Name” from the System Properties window. Now click the “Change…” button, enter a unique Workgroup name and reboot your computer.


Changing Workgroup in Windows 7 or Vista – Open the Control Panel, type “Workgroup” in the search box, and select the entry that says “Change Workgroup Name.” Click the “Change…” button, enter a Workgroup name and restart the computer. Windows 7 users can skip one step; simply type “Workgroup” in the search box in the start menu, and select the first entry, then proceed as above.


Now that the Workgroups are same for both computers, connect the two computers together using the Ethernet crossover cable. Simply plug-in one end of the crossover cable into the network adapter of Computer A and connect the other end of the cable to the network adapter of Computer B.
Windows will automatically recognize the new network, and you can now easily view files and folder that the other computer has shared. Simply open Networks from the Start Menu (or the Control Panel), and you should see the other computer by its name. You can then browse any shared files on the other computer, and can even utilize shared printers.
Troubleshooting – If you do not see the other computer under Networks, you probably have a prompt at the top of your Network window saying that Network discovery is turned off (screenshots below). Select “Turn on Network Discovery and File Sharing.” In the next prompt, select “No, make the network I am connected to a private network.” Now you should see the other computer on the home network.


[*] While it is possible to share files between two computers connected with a crossover cable without making them part of the same workgroup, the method will only work if both computers have this network set as a private network, and may still cause problems. It is therefore advisable to have both computers on the same workgroup before sharing files and printers.
Share an Internet Connection Between Two Computers
There are scenarios where you may want to share the same internet connection between two computers. For instance:
Situation A - You have setup a Wi-Fi network at home but your old desktop computer doesn’t have a wireless network card. In that case, you can use the laptop to connect to the internet wirelessly and then share that same connection with the desktop over a crossover Ethernet cable.
Situation B – You have a netbook with a built-in cellular data connection. You can share that connection with any another computer at home through the crossover Ethernet cable.
Situation C – You use a (slow) Wireless USB modem with your laptop computer while your desktop is connected to an ADSL Broadband line and there’s no router at home. For any bandwidth intensive tasks, like when you want to backup photos from your laptop to an online service, you can connect the laptop to the desktop and things will happen much faster.
Steps for sharing an Internet connection :
First, if you only wish to share internet connection and not files, both computers need not belong to the same workgroup. All you need to do is to connect the two computers with the Ethernet crossover cable, and then turn on Internet connection sharing in the computer that already has an Internet connection. The instructions vary for different versions of Windows:
For Windows XP – Select “Network and Internet Connections” from the Control Panel and click “Network Connections.”


Right-click on the network connection you wish to share (the one connected to the internet), select Properties, click on the “Advanced” tab, and then check the box that says “Allow other network users to connect through this computer’s Internet connection.” Click OK, and the second computer that you have connected to this computer with the Crossover Cable should have internet access now.
For Windows 7 and Vista – Open Control Panel, enter “network connections” in the search box on the top right and select “View Network Connections.”


Right-click on the network connection you wish to share (this must be the one connected to the internet) and select Properties. Select the "Sharing" tab and then check the option that says “Allow other network users to connect through this computer’s Internet connection.” Click OK, and the other computer you have connected to this Windows 7 or Vista computer should have internet access now.
~
Subscribe to:
Posts (Atom)


