Techie Weblog for Geeks
Welcome Cosmo Cyber Check out Weblinks Page for Great stuff

Tuesday, September 14, 2010

Don’t Add Your Gmail Inbox to Public Bookmarks

Don’t Add Your Gmail Inbox to Public Bookmarks

If you have added the web address (URL) of your Gmail inbox to your browser bookmarks, make sure that the bookmarks are not getting synched with a public service like Delicious or Google Bookmarks.


That’s because when you bookmark your Inbox or any other folder in Gmail, your email address is added to the title of the bookmark. When this bookmark becomes public, your email address automatically gets exposed to spam bots.

This may sound like an obvious thing but just search for “mail.google.com” or “Gmail Inbox” on Delicous, Xmarks or even Google Bookmarks and you’ll tons of “working” email addresses in the title of the bookmarks.


~

Sunday, September 12, 2010

Google Realtime


Google Realtime Homepage

Google Realtime Search was only a section of Google's search sidebar that allows you to restrict the results to Twitter, Facebook, Google Buzz and other sites where you can post public updates. Now it's a full-fledged service that has a homepage, a logo and a name.


Watch "How to use Realtime Search" Video here.

Even if Google Realtime's homepage is at google.com/realtime, you'll miss two important new features if you don't go to this special URL: filtering results by location and showing the context of a message using a conversation view.

Restrict search results to a location to find out what people from a certain place think about a topic. "You can use geographic refinements to find updates and news near you, or in a region you specify. So if you're traveling to 'Moscow' this summer, you can check out tweets from 'Muscovites' to get ideas for activities happening right where you are," suggests Google.


If one of the search results is part of a conversation, Google shows a link to the full conversation. "Often a single tweet sparks a larger conversation of re-tweets and other replies, but to put it together you have to click through a bunch of links and figure it out yourself. With the new full conversation feature, you can browse the entire conversation in a single glance."


Google also added a new feature to Google Alerts: updates, which is another name for realtime results. It's not a good idea to choose the "as-it-happens" option because you'll receive a lot of email alerts.


~

Friday, September 10, 2010

Undo Send

Undo “Send” in Gmail

Note: The feature is hidden from most users who don’t know where to look, so here’s a quick guide to avoiding social and workplace faux pas with the click of a button. Be aware that the feature is part of Gmail Labs, though. That means it’s still in testing and it might not always work as intended - CosmoCyber

Since the Undo Send feature is part of Gmail Labs, you’ll have to navigate to the Gmail Labs page to activate it. Load up Gmail (Gmail) and look in the top-right corner of the page. Between your e-mail address and Settings you’ll see the green Labs icon.


Find "Undo Send" among the list. (Picture Below)


Customize Undo Send’s Duration


By default, Gmail gives you a 10-second window of time in which you may undo a sent e-mail. You can change that to five, 20 or 30 seconds by going to Settings.


How it Works ?

Write and Send Your E-mail


Now you have either five, 10, 20 or 30 seconds to undo your sent e-mail, depending on what you selected under Settings.

As soon as you hit Send, a subtle line of text will appear above your Inbox saying “Your message has been sent.” It will be accompanied by a few extra options. Among them is “Undo.” Click that within the allotted time and your faux pas will be prevented.

Click the “Undo” Button After You Send


“Sending Has Been Undone”
You’ll immediately be taken back to the e-mail composition page, and your e-mail will be in draft form, unsent and ready for further editing.


~

Wednesday, September 8, 2010

Priority Inbox

Priority Inbox

Gmail has always had an excellent spam filter that keeps junk messages out of your Inbox. Google added a reverse feature that is quite unique to Gmail – it’s called the Priority Inbox.

Priority Inbox is like having a personal secretary whose job is to sort your incoming mail based on importance. She knows about your friends, your colleagues and other people with whom you interact regularly and can therefore categorize your email accordingly.


Priority Inbox is something similar – it’s an intelligent, self-learning filter that automatically puts your most important email messages at the top of your Inbox so that you may deal with them first. The feature is now live for both Gmail and Google Apps email accounts.


Priority Inbox splits your inbox into three sections: Important and unread, Starred, and Everything else. Messages are automatically categorized as they arrive in your inbox. Gmail uses a variety of signals to predict which messages are important, including the people you email most and which messages you open and reply to. Google takes into account implicit signals like: the messages from people you frequently email are important, if a message includes words frequently used in other messages you usually read then it's probably important, the messages you star are probably more important than the messages you archive without opening.


Note: Gmail uses the "important" label to classify messages, so that's the reason why you can't create a label named "important".


~

Monday, September 6, 2010

Manage EXIF Data of your Images

Manage EXIF Data of your Images

Most digital camera record and save EXIF data with every photograph. Learn about tools that can help you view and edit Exif tags of your photographs.


The information that is recorded by the camera into the photograph may include details about the camera model itself, the lens that was used, shutter speed, aperture, focal length and so on. Some modern digital cameras and camera phones are GPS enabled and they can therefore save even the location co-ordinates (latitude and longitude) with the photographs.

All this “metadata” is embedded into photographs using the standard Exif format that can easily be read by most image editing programs as well as online photo sharing websites like Flickr and Picasa Web Albums.


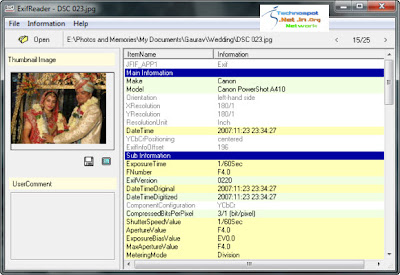
View Exif Data of Images

If you are impressed by a photograph and would like to know more about the camera make and the lens settings that were used when capturing that picture, here’s what you can do do.

Go to Jeffrey’s Exif Viewer and upload the photograph (or if you found the picture on the web, simply copy-paste the image URL). The tool will create a nice summary of all the meta data stored in that photograph along with the location information (see example).

Alternatively, you may use Google’s Picasa, Windows Live Photo Gallery, or any other photo viewer programs to display Exif data from photographs on your desktop.


Edit Exif Data in Photographs

If the internal date of your camera was incorrect and therefore all the pictures were captured with a wrong timestamp. Or you want to add your name to the photograph’s metadata so that people immediately know who the owner is. WIth an Exif editor, you can also geo-tag your photographs manually even if your camera doesn’t have GPS.

You may be a bit surprised but Windows Explorer is actually a wonderful Exif editor. Just right click any image file, choose Properties and click the Details tab. You can now edit a wide range of metadata associated with that image from the camera model to the shooting date to copyright information and more.

Windows Explorer won’t let you edit GPS related information of photographs but Google’s Picasa software is a good choice for doing that.

Finally, if you want to change the Exif data in tons of photographs, you can edit them all in one go using a dedicated Exif editors like Geosetter or Microsoft Pro Photo. Geosetter can pull Exif tags from one photograph and apply them to all your other photos while Pro Photo is more suited for geo-tagging pictures.

Similar stuff can also be done with the help of command like utilities like jHead and ExifTool – these are very powerful tools but implementation is obviously a bit geeky.


Remove Metadata from Photographs

Sometimes the Exif data of your photographs may reveal more than what you would expect. It may therefore sometimes sense to strip your images of all the meta information before uploading them to the web.

To remove all the metadata from a photograph, just right-click the files inside Windows Explorer and choose Properties. Now click the Details tab and select the option that says “Remove Properties and Personal Information.”

Choose “Remove the follow properties from this file” followed by “Select All” and click OK. All the private metadata tags are now erased from the photograph.


~