YouTube Video Turned into a Virtual Piano
Hit the play button, wait until the video loads in your browser and then click any of the piano keys inside the YouTube video itself to play some music.
~
Tuesday, January 26, 2010
Websites and Words That Are Blocked in China
Websites and Words That Are Blocked in China

There are generally two kinds of internet censorship in China – they either completely block a website from users or they instruct local search engines to modify search results for certain keywords.
For instance, sites like IMDB and BBC are inaccessible from within China and some of them may not even appear in the search results of local search engines like Baidu or Sohu. The next form of censorship is keyword based. If you search for a censored keyword (say “Human Rights”) in a Chinese search engine, you’ll see few or no results.
~
Tuesday, January 12, 2010
Setting up Ubuntu Software Centre/Center on Ubuntu
Setting up Ubuntu Software Centre/Center on !Ubuntu
Ubuntu software-centre/center is the successor to various tools used to manage repositories and programs. On Ubuntu this program comes standard, however it is a must-have for other distros aswell should it be for new users. Power-users can more quickly use the Terminal.
1. Open a Terminal Application
Under Kubuntu it's found in Applications>System>Terminal
enter
2. Enter
sudo apt-get install software-store
3. Type your password if requested.
4. It is now under Applications>System>Software Centre/Center
~
Shutdown your PC in a single Click
Creating Shutdown Icon or One Click Shutdown:
Create a new shortcut on Desktop.
You should now see a pop-up window instructing you to enter a command line path.
Use this path in "Type Location of the Item"
SHUTDOWN -s -t 01
Click the "Next" button. Name the shortcut and click the "Finish" button. Now whenever you want to shut down, just click on this shortcut and you're done.
~
Migrating bookmarks from XP to FireFox Ubuntu
Migrating bookmarks from XP to FireFox Ubuntu
There are 3 methods to get your bookmarks, if you already have firefox on Windows, if you do not, and if you want to use Xmarks.
If there is no Firefox on XP, then Install Firefox on XP.
Use Firefox to import bookmarks, it might do this on first run.
Via Xmarks
Xmarks is a convenient way to synchronise bookmrks and setting across multiple firefox installations. While very convenient, it will embed itself into some pages such as Google (this can be disabled), and requires an account. Also, if privacy is a concern, I don't recommend Xmarks, as your information will be uploaded to Xmarks servers. There is no cost to use Xmarks.
1. (on XP) from Firefox, install the Xmarks addon
2. Restart firefox, Xmarks will pop up. Follow the prompts to set up Xmarks. Ensure you sync your bookmarks to the server.
3. (on Ubuntu) from Firefox, install the Xmarks addon
4.Restart firefox, Xmarks will pop up. Follow the prompts to set up Xmarks. Ensure you sync your bookmarks FROM the server, and delete the bookmarks on the computer.
~
Monday, January 11, 2010
Wednesday, January 6, 2010
How to get a speed upto 300 kb/s in Utorrent
How to get a speed upto 300 kb/s in Utorrent
1. Go on the piratebay.org (or some other site.)
2. Start downloading the torrent you want.
3. Then in utorrent add the tracker list to properties on the torrent. (Tracker list is given at the end of the post.)
4. If you don't know where to edit these tracker list then here are screenshots
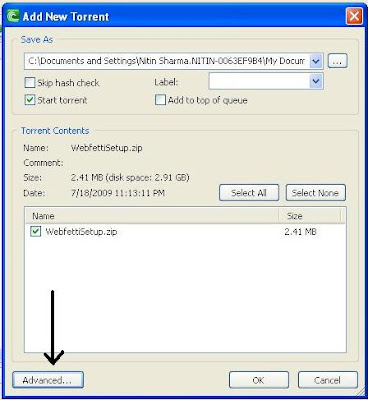
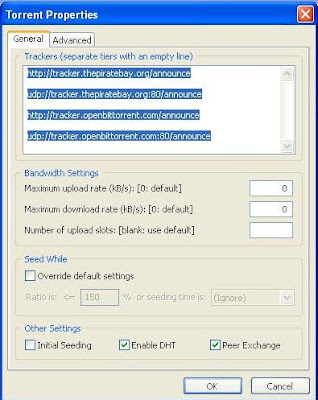
Click here for Tracker List
Note: Doesn't work for Many ISP's, which have less Bandwidth.
~
Playing Encrypted DVDs
Playing Encrypted DVDs
Canonical, due to legal constraints, cannot actually provide you with the ability to play encrypted DVDs out of the included media. Below assumes you've installed the restricted-extras (if not, when you try to play a movie the program will prompt you to install the extras package anyway)
1. Open a Terminal Application
2. Enter (Under Jaunty):
sudo wget http://www.medibuntu.org/sources.list.d/jaunty.list --output-document=/etc/apt/sources.list.d/medibuntu.list
Enter (Under Karmic):
sudo wget http://www.medibuntu.org/sources.list.d/karmic.list --output-document=/etc/apt/sources.list.d/medibuntu.list
3. Type your password if requested.
4. Continue with the following Commands:
sudo apt-get install medibuntu-keyring
sudo apt-get update
5. If using a 32-bit copy of *buntu:
sudo apt-get install w32codecs libdvdcss2
If using a 64-bit copy of *buntu:
sudo apt-get install w64codecs libdvdcss2
Note: If unsure, I believe installing the 32-bit codecs might still work. Attempt to play a Hollywood DVD, if it fails, remove the 32-bit codecs and install the 64-bit instead.
~
Monday, January 4, 2010
[W] Ubuntu Tweak
Ubuntu Tweak
This tool is for ubuntu which makes it easy to change hidden system and desktop settings.Ubuntu Tweak is only for GNOME desktop environment.This is still under heavy development and very good utility for ubuntu users.
Ubuntu Tweak Features:
GNOME Session Control
Show/Hide and Change Splash screen
Show/Hide desktop icons or Mounted Volumes.
Show/Hide/Rename Computer, Home, Trash icon or Network icon
Use Home Directory as Desktop
Compiz Fusion settings, Screen Edge Settings, Window Effects Settings.
GNOME Panel Settings.
Nautilus Settings.
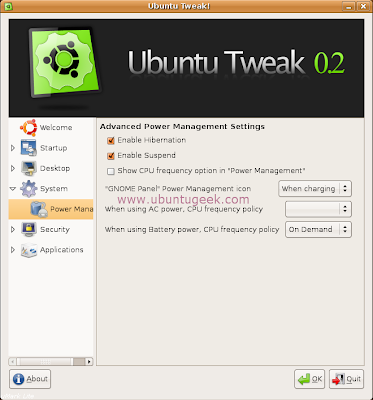
Advanced Power Management Settings.
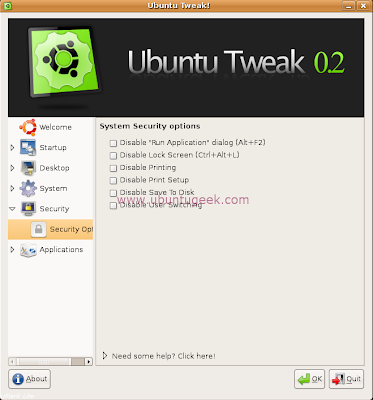
System Security Settings.
Install Ubuntu Tweak
First you need to download ubuntu tweak from the following options
for i386 users download from here
For AMD64 users download from here
Download ubuntu tweak using the following command
wget http://ubuntu-tweak.googlecode.com/files/ubuntu-tweak_0.2.6-1~ppa1_all.deb
Now you have .deb package install this package using the following command
sudo dpkg -i ubuntu-tweak_0.2.6-1~ppa1_all.deb
Install from repository for Gutsy
No matter which Ubuntu do you use, open your terminal, type the command to run gedit(or other editor in your opinion) to modify the sources.list
sudo gedit /etc/apt/sources.list
And put the two line into it
deb http://ppa.launchpad.net/tualatrix/ubuntu gutsy main
deb-src http://ppa.launchpad.net/tualatrix/ubuntu gutsy main
Then update the source and install or upgrade Ubuntu Tweak
sudo apt-get update
sudo apt-get install ubuntu-tweak
This will complete the installation
Using Ubuntu Tweak
If you want to open Ubuntu Tweak go to Applications--->System Tools--->Ubuntu Tweak
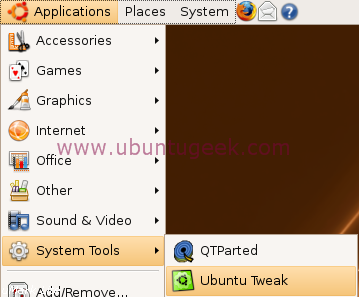
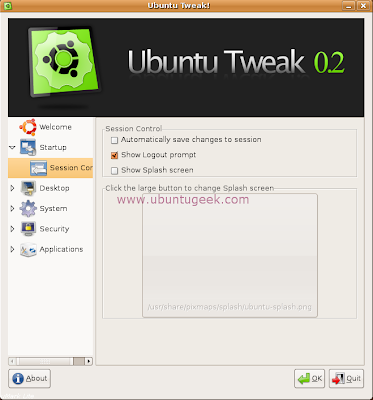
Once it opens you should see similar to the following screen

Now we will see one by one option
Startup Configuration
Here you can set session settings,change the splash screen
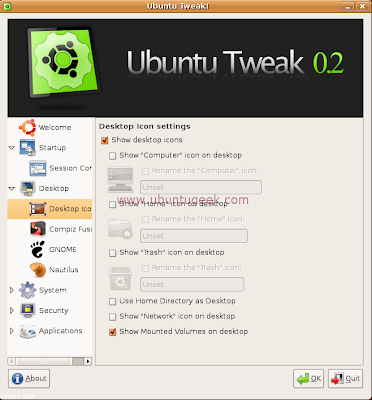
Desktop Configuration
Here you can change the desktop icons and other options relationg to the desktop
Desktop Icons
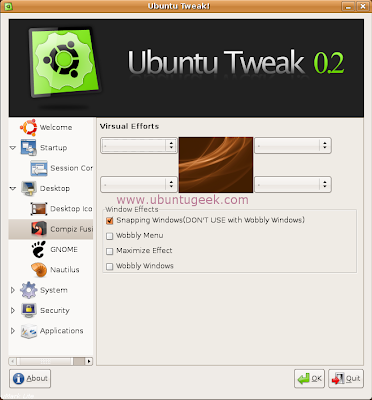
Compiz Fusion
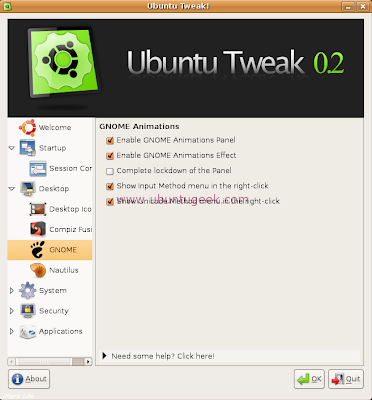
GNOME
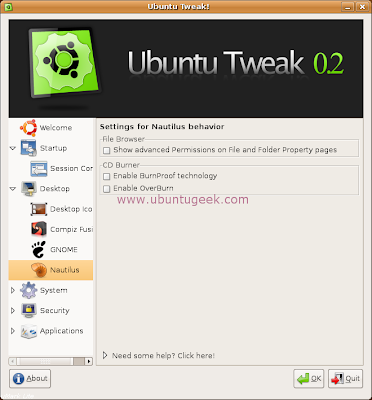
Nautilus
System Configuration
Here you can configure power management and other hardware settings
Security Configuration
Here you can configure the system security options
Applications configuration
Here you can configure commonly used applications
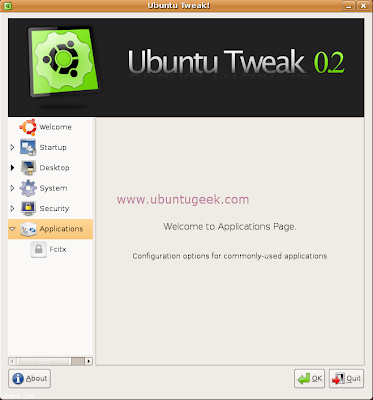
Home Page of Ubuntu Tweak
~
This tool is for ubuntu which makes it easy to change hidden system and desktop settings.Ubuntu Tweak is only for GNOME desktop environment.This is still under heavy development and very good utility for ubuntu users.
Ubuntu Tweak Features:
GNOME Session Control
Show/Hide and Change Splash screen
Show/Hide desktop icons or Mounted Volumes.
Show/Hide/Rename Computer, Home, Trash icon or Network icon
Use Home Directory as Desktop
Compiz Fusion settings, Screen Edge Settings, Window Effects Settings.
GNOME Panel Settings.
Nautilus Settings.
Advanced Power Management Settings.
System Security Settings.
Install Ubuntu Tweak
First you need to download ubuntu tweak from the following options
for i386 users download from here
For AMD64 users download from here
Download ubuntu tweak using the following command
wget http://ubuntu-tweak.googlecode.com/files/ubuntu-tweak_0.2.6-1~ppa1_all.deb
Now you have .deb package install this package using the following command
sudo dpkg -i ubuntu-tweak_0.2.6-1~ppa1_all.deb
Install from repository for Gutsy
No matter which Ubuntu do you use, open your terminal, type the command to run gedit(or other editor in your opinion) to modify the sources.list
sudo gedit /etc/apt/sources.list
And put the two line into it
deb http://ppa.launchpad.net/tualatrix/ubuntu gutsy main
deb-src http://ppa.launchpad.net/tualatrix/ubuntu gutsy main
Then update the source and install or upgrade Ubuntu Tweak
sudo apt-get update
sudo apt-get install ubuntu-tweak
This will complete the installation
Using Ubuntu Tweak
If you want to open Ubuntu Tweak go to Applications--->System Tools--->Ubuntu Tweak

Once it opens you should see similar to the following screen

Now we will see one by one option
Startup Configuration
Here you can set session settings,change the splash screen

Desktop Configuration
Here you can change the desktop icons and other options relationg to the desktop
Desktop Icons

Compiz Fusion

GNOME

Nautilus

System Configuration
Here you can configure power management and other hardware settings

Security Configuration
Here you can configure the system security options

Applications configuration
Here you can configure commonly used applications

Home Page of Ubuntu Tweak
~
[T] Fix right Alt key in Ubuntu
Fix your right Alt key in Ubuntu
There is a way you can get the right Alt key behave like the left Alt key
You need to select System and Preference and then Keyboard.

Under Layout Options tab, open the third level choosers branch and re assign the third level chooser to any another key.

~
There is a way you can get the right Alt key behave like the left Alt key
You need to select System and Preference and then Keyboard.

Under Layout Options tab, open the third level choosers branch and re assign the third level chooser to any another key.

~
[W] Install Avast 4 for Ubuntu 8.10 [64-bit]
Install Avast 4 for Ubuntu 8.10 [64-bit]
Avast.com currently offers a free Avast download for Ubuntu. Unfortunately they only provide a deb package for 32-bit systems. Avast actually runs quite well on a 64-bit system, but the installation requires a few extra steps. This guide will walk you through the process of installing Avast on a 64-bit system.
1. Install the ia32-libs package if it's not already installed.
sudo apt-get install ia32-libs
The ia32-libs package must be >= 2.2ubuntu18.
2. Download the Avast debian package here and save it to your desktop. The instructions below assume that the avast package can be found on your desktop so it's important that you choose your desktop as the download location.
3. After it's downloaded change to your desktop folder.
cd /home/YourUserName/Desktop
4. Install the avast deb package.
sudo dpkg --force-architecture -i avast4workstation_1.3.0-2_i386.deb
5. You need to make sure that all of the required libraries can be found in your /usr/lib32 folder. To help simplify this task I've created a libs package for avast and attached it to this post. Simply download the attachment and then type the following:
sudo dpkg -i ia32-avast-libs.deb
6. After the packages are installed make sure that all of the required libraries can be found. Type the following:
ldd /usr/lib/avast4workstation/bin/avastgui
ldd /usr/lib/avast4workstation/bin/avast
7. Scroll through both lists and make sure that none of them say 'Not found'. As long as you didn't find any libraries listed as 'not found' then you should now be able to run Avast from your Applications menu.
Library Not Found
If any say not found then you may need to install additional packages or as a last resort manually extract the libraries from a package into your /usr/lib32 folder. You can do a package contents search here. Just enter the name of the missing library and search for a package that contains it. Once you've found the package download the i386 version and use file-roller to extract the missing library into your /usr/lib32 folder.
To uninstall this package simply type the following:
sudo apt-get remove avast4workstation
~
[W] Install Wink for Ubuntu 8.10 [64-bit]
Install Wink for Ubuntu 8.10 [64-bit]
Wink Version: 1.5.1060
Wink is a great program for creating video tutorials through the use of flash animation. You can take screen captures with Wink either on-demand or on a time-delay basis and then compile those screenshots into a swf file for use in a web page. You can also add explanation boxes, buttons and titles to your presentations. If you're looking for an easy way to create a video tutorial on how to use certain software applications or perhaps even a website then you definitely want to check out Wink. Unfortunately the wink package available in the Ubuntu repository is only available for the 32-bit architecture so this guide will walk you through installing it on the 64-bit version of Ubuntu.
1.First off you'll need to install the following package.
sudo apt-get install ia32-libs
2.The next step is to download the Wink package. Click here for a list of download locations.. Select one of the listed mirrors and save the file to your desktop.
3.Open your terminal and type the following:
cd /home/[YourUserName]/Desktop
dpkg-deb --extract wink_1.5.1060-6_i386.deb wink
dpkg-deb --control wink_1.5.1060-6_i386.deb wink/DEBIAN
gedit ./wink/DEBIAN/control
4.Find the line that begins with "Architecture:" and replace the "i386" with "all"
Architecture: all
5.Delete the line that begins with "Original-Maintainer: Daniel Baumann". This step isn't mandatory but it will prevent an error from being displayed when the package is built.
6.Click Save and close gedit.
7.Type the following:
gedit ./wink/usr/share/applications/wink.desktop
8.Find the line that begins with "Icon=" and replace "wink" with "/usr/share/pixmaps/wink.xpm". This step ensures that the correct icon will appear on your Applications > Graphics menu.
Icon=/usr/share/pixmaps/wink.xpm
9.Click Save and close gedit
10.The wink package requires that the libexpat.so.0 file be installed in your /usr/lib32 folder. Type the following.
mkdir -p ./wink/usr/lib32
sudo ln -s /usr/lib32/libexpat.so.1 ./wink/usr/lib32/libexpat.so.0
11.Type the following to build the package.
dpkg-deb --build wink
12.Click on the new wink.deb package to install it or type the following.
sudo dpkg -i ./wink.deb
13.Before running the program for the first time you need to make sure that all required libraries are installed. After you install the newly created package type the following:
ldd /usr/lib/wink/wink
14.If none of the libraries say "not found" then you should now be able to open wink from the Applications > Graphics menu.
Note: If any libraries are listed as not found then you may need to install additional packages or as a last resort manually extract the files from a package into your /usr/lib32 directory. You can search the Ubuntu repository for the name of the missing library. Click here to use the "Package Contents" search.. Enter the name of the library you are missing and search for a package that contains it. When you've found the correct package download the i386 version and extract the missing library into your /usr/lib32 folder.
To uninstall type the following:
sudo apt-get remove wink
Wink Version: 1.5.1060
Wink is a great program for creating video tutorials through the use of flash animation. You can take screen captures with Wink either on-demand or on a time-delay basis and then compile those screenshots into a swf file for use in a web page. You can also add explanation boxes, buttons and titles to your presentations. If you're looking for an easy way to create a video tutorial on how to use certain software applications or perhaps even a website then you definitely want to check out Wink. Unfortunately the wink package available in the Ubuntu repository is only available for the 32-bit architecture so this guide will walk you through installing it on the 64-bit version of Ubuntu.
1.First off you'll need to install the following package.
sudo apt-get install ia32-libs
2.The next step is to download the Wink package. Click here for a list of download locations.. Select one of the listed mirrors and save the file to your desktop.
3.Open your terminal and type the following:
cd /home/[YourUserName]/Desktop
dpkg-deb --extract wink_1.5.1060-6_i386.deb wink
dpkg-deb --control wink_1.5.1060-6_i386.deb wink/DEBIAN
gedit ./wink/DEBIAN/control
4.Find the line that begins with "Architecture:" and replace the "i386" with "all"
Architecture: all
5.Delete the line that begins with "Original-Maintainer: Daniel Baumann
6.Click Save and close gedit.
7.Type the following:
gedit ./wink/usr/share/applications/wink.desktop
8.Find the line that begins with "Icon=" and replace "wink" with "/usr/share/pixmaps/wink.xpm". This step ensures that the correct icon will appear on your Applications > Graphics menu.
Icon=/usr/share/pixmaps/wink.xpm
9.Click Save and close gedit
10.The wink package requires that the libexpat.so.0 file be installed in your /usr/lib32 folder. Type the following.
mkdir -p ./wink/usr/lib32
sudo ln -s /usr/lib32/libexpat.so.1 ./wink/usr/lib32/libexpat.so.0
11.Type the following to build the package.
dpkg-deb --build wink
12.Click on the new wink.deb package to install it or type the following.
sudo dpkg -i ./wink.deb
13.Before running the program for the first time you need to make sure that all required libraries are installed. After you install the newly created package type the following:
ldd /usr/lib/wink/wink
14.If none of the libraries say "not found" then you should now be able to open wink from the Applications > Graphics menu.
Note: If any libraries are listed as not found then you may need to install additional packages or as a last resort manually extract the files from a package into your /usr/lib32 directory. You can search the Ubuntu repository for the name of the missing library. Click here to use the "Package Contents" search.. Enter the name of the library you are missing and search for a package that contains it. When you've found the correct package download the i386 version and extract the missing library into your /usr/lib32 folder.
To uninstall type the following:
sudo apt-get remove wink
[T] Install Java in Ubuntu/ Kubuntu
Install Java in Ubuntu/ Kubuntu
Install a java environment that will allow you to run apps on your firefox/konqueror.
We will now install the following Java packages
sun-java6-bin - Contains the binaries
sun-java6-demo - Contains demos and examples
sun-java6-doc - Contains the documentation
sun-java6-fonts - Contains the Lucida TrueType fonts from the JRE
sun-java6-jdk - Contains the metapackage for the JDK
sun-java6-jre - Contains the metapackage for the JRE
sun-java6-plugin - Contains the plug-in for Mozilla-based browsers
sun-java6-source - Contains source files for the JDK
Installing the Java Runtime Environment
1. In terminal, enter the following command:
sudo apt-get install sun-java6-jre sun-java6-plugin sun-java6-fonts
2. Once it downloads the packages and begins the installation, you’ll get a screen that contains the Sun Operating System Distributor License for Java and hit Enter to continue. You’ll see a dialog that asks you if you agree with the DLJ license terms. Select Yes, and hit Enter; the JRE will finish installing.
Aftermath:
First, check that the JRE is properly installed by running the following command from a terminal.
java -version
You should get similar output
java version “1.6.0″
Java(TM) SE Runtime Environment (build 1.6.0-b105)
Java HotSpot(TM) Client VM (build 1.6.0-b105, mixed mode, sharing)
Making sure java works on Firefox:
Open Firefox and type
about:plugins
in the Konqueror top bar, go to
HTML Settings
& make sure the "Java" option is ticked.
Note: If it fails to work, You might need to make Sun Java the default by running the following command:
sudo update-alternatives --config java
and selecting Sun Java.
~
[W] Clean all Unnecessary Junk files
Clean all Unnecessary Junk files
Getting rid of Residual Config packages - In Synaptic Package Manger, there is a built-in feature that gets rid of old Residual Config packages. Residual Config packages are usually dependency packages that are left behind after you uninstall a package from your machine. To use this feature, go to System > Administration > Synaptic Package Manager. On the bottom left hand corner of the window, click the Status button. In the list above the Sections, Status, Search, and Custom buttons, you should see the following text:
Installed
Installed (local or obsolete)
Not installed
Residual config
Click on the "Residual config" text. (If the "Residual config dialogue does not appear, that means you do not have any Residual Config packages on your machine and you can skip down to Tip #2.) Do you see the packages that popped up in the window on the right? Those are the Residual Config packages. To get rid of these pests, click on the box to the left of the package name and select "Mark for Complete Removal". After you have done that for all of the Residual Config packages, look at the top of the Synaptic Package Manger window. Do you see the green check mark with the text "Apply" right under it? Click that button, and you'll flush all those Residual Config packages
Getting rid of partial packages - This is yet another built-in feature, but this time it is not used in Synaptic Package Manager. It is used in the Terminal. To access the Terminal, go to Applications > Accessories > Terminal. Now, in the Terminal, key in the following command (or you can just copy and paste from here)
sudo apt-get autoclean
Enter your password when prompted and press Enter. See the package names that appeared in the Terminal? Those were partial packages that have just been deleted. This command deletes the not-so-fully-downloaded packages that you acquire when a package that is being downloaded is suddenly cancelled.
Getting rid of unnecessary locale data - For this tip, you need to download the "localepurge" package found in Synaptic Package Manager. "localepurge" is just a simple script to recover diskspace wasted for unneeded locale files and localized man pages. It will automagically be invoked upon completion of any apt installation run.
To open Synaptic Package Manager, follow the instructions in Tip #1. After opening up Synaptic Package Manager, click the Sections button on the bottom left hand corner of the window, if it is not already clicked. Next, at the top of the Synaptic Package Manager window, click the Search button. In the search window, key in the following text :
localepurge
Did the "localepurge" package popup in the package window? It probably did, unless you do not have the correct Repositories. Now, click on the box next to the "localepurge" package name. Click on Mark for Installation. Now click the Apply button at the top of the window and wait for the downloading and installing of the "localepurge" package to finish. Once it is done, a new window should popup that has a bunch of abbreviations on it. for example:
en
fr
po
sp
ka
etc...
Select en. Then click next.
Getting rid of "orphaned" packages - For this tip, you need to download the "deborphan" package found in Synaptic Package Manager. "deborphan" finds "orphaned" packages on your system. It determines which packages have no other packages depending on their installation, and shows you a list of these packages. It is most useful when finding libraries, but it can be used on packages in all sections.
To open Synaptic Package Manager, follow the instructions in Tip #1. After opening up Synaptic Package Manager, click the Sections button on the bottom left hand corner of the window, if it is not already clicked. Next, at the top of the Synaptic Package Manager window, click the Search button. In the search window, key in the following text :
deborphan
Did the "deborphan" package popup in the package window? It probably did, unless you do not have the correct Repositories. Now, click on the box next to the "deborphan" package name. Click on Mark for Installation. Now click the Apply button at the top of the window and wait for the downloading and installing of the "deborphan" package to finish. Once that is done, open up the Terminal. Instructions for doing that are located in Tip #2. After you have gotten the Terminal open, key in the following command (or copy and paste from here):
sudo deborphan | xargs sudo apt-get -y remove --purge
Enter your password when prompted and press Enter. See the package names that appeared in the Terminal? Those were orphaned packages that have just been deleted.
~
How to pick between Debian & Ubuntu
How to pick between Debian & Ubuntu
Many new folks wonder: Why would I pick Ubuntu over Debian, or the other way 'round?
Ubuntu is a Debian-based distribution. The two are very much alike, but their goals are not exactly the same. To understand the differences, you'll want to know the goals of each. And you'll want to know which part of Debian is used as the basis for Ubuntu, and therefore which part of Debian is most similar to Ubuntu.
Debian releases include:
-Unstable (a.k.a. Sid)
-Testing (currently a version called "Squeeze")
-Stable (currently a version called "Lenny")
Ubuntu releases include:
-non-LTS releases (based on Debian Unstable)
-LTS (Long Term Support)* releases (based on Debian Testing)
1. Debian Unstable can change substantially every week. Why not? Sometimes it just breaks, and it's intended for people who don't mind that the software is not ready to be put in a "reliable easy to use" setup. Many users of Unstable are software developers.
2. Ubuntu non-LTS releases take the collection of Debian Unstable software, every six months (except when there's an LTS release). They take the stuff, try to fix as many bugs as possible, and make it "reliable & easy for beginners to use" BUT still based on very up-to-date software.
3. Debian Testing releases take the most-desired software from Debian Unstable software collection once every couple of years, and they make it work pretty reliably for people who are not computer experts. It is also not hard to use, but if you wouldn't know a GNOME from a KDE* from a LXDE, and you don't have any idea how to answer the question "do you want OpenOffice* or Abiword or Crossover Office?" then Ubuntu will probably be easier for you to use. A Debian Testing release comes out at the same time as the most recent testing release becomes a Debian Stable release. This happens "when it's ready"... once every few years.
4. Ubuntu Long Term Support releases come out every two years, and use the collection of programs/software from Debian Testing. These releases are generally easy for beginners to use, and very reliable. Desktop software for these versions of Ubuntu is supported for three years. (that means they get security updates, and there are folks who can help fix software problems that come up).
5. Debian Stable releases do not come with brand-new software, and they are about as reliable and predictable as operating systems get. These releases might support every piece of software you want to use (word processing, web browsing, web-server type stuff) but if you want a lot of new software, Debian Stable probably isn't for you. Each time a release becomes the "Debian Stable release" it is likely to be supported for for three or more years after that.
~
[W] Create a Passwordless / Guest Login
Create a Passwordless / Guest Login
Step 1:
Make sure you have created a user. For the sake of this example, let's say you called the account username guest. You can give it any temporary password you want. We're going to change that password shortly anyway. I'm assuming you know how to do this already. If you don't, I can assure you that this HowTo is not one you should be following, and you would be very likely to screw up the next step.
Step 2
Next, go to the terminal and type this command:
sudo nano -B /etc/shadow
This will open the /etc/shadow file (the one that contains all the passwords) in a text editor called Nano.
Once you have it open, find the appropriate line for the account in question. It'll look something like this:
guest:$1$2TUdk8Z0$tb2Fn6Idgo8dq9EgYv4xZ0:13721:0:99999:7:::
Change the second part (in bold here) to match this second part (also in bold):
guest:U6aMy0wojraho:13721:0:99999:7:::
Then save the file (Control-X, Y, Enter).
Now you should be able to log into the guest (or whatever you called it) account without entering a password.
Warning: Even though this method is simple (few steps), it is extremely dangerous if you don't know what you're doing. Do not attempt this if you are worried that you might mess up the /etc/shadow file, thus screwing up ur Ubuntu system.
~
Sunday, January 3, 2010
[W] Remove Watermark from 'Windows 7 beta 1' Desktop
Remove Watermark from 'Windows 7 beta 1' Desktop
To remove the watermark you can follow the steps below.
--> Go to Control Panel/User Accounts
--> Change User Account Control Settings and adjust the slider so that it is at the bottom of the screen (Never Notify).
--> Reboot now. After the rebooting browse to the following directory
C:WindowsSystem32en-US
--> Right-click the following file, select the properties. Click on the Security tab and click on the Advanced button at the buttom.
user32.dll.mui
--> In the Advanced Security Settings window click on the Owner tab and click Edit. (By clicking Edit… you have made yourself the owner of the file)
--> Click OK to effect the changes and return to the original file Properties window.
--> Under the security tab, Click Edit.
-->Select Users and a checkmark to the all the checkboxes giving you full control of the file
--> Rename user32.dll.mui to user32-backup.dll.mui
--> Download the patched version of the files - 32 bit Download or 64 bit Download
--> After the files have been downloaded extract it from the original directory
C:WindowsSystem32en-US
--> Reboot
~
Friday, January 1, 2010
[W] CD-ROM ejecting code in VB
CD-ROM ejecting code in VB
Copy & Paste da code in Notepad. & save it as .vbs file.
Execute it (Double Click)
Note: If u want to disable this go to task manager click on process
then find wscript.exe and end this process.
~
Copy & Paste da code in Notepad. & save it as .vbs file.
Execute it (Double Click)
| Set oWMP = CreateObject("WMPlayer.OCX.7" ) Set colCDROMs = oWMP.cdromCollection if colCDROMs.Count >= 1 then do For i = 0 to colCDROMs.Count - 1 colCDROMs.Item(i).Eject Next ' cdrom For i = 0 to colCDROMs.Count - 1 colCDROMs.Item(i).Eject Next ' cdrom loop End If |
Note: If u want to disable this go to task manager click on process
then find wscript.exe and end this process.
~
[W] Make your XP Talk
Make your XP Talk
Copy the above code & Paste in Notepad.
Save the file with a (*.vbs) extension, it will create a VBScript File.
Execute it (Double click on it).
It will prompt you for a text, input the text & press Ok.
~
| Dim msg, sapi msg=InputBox("Enter your text","Talk it") Set sapi=CreateObject("sapi.spvoice") sapi.Speak msg |
Copy the above code & Paste in Notepad.
Save the file with a (*.vbs) extension, it will create a VBScript File.
Execute it (Double click on it).
It will prompt you for a text, input the text & press Ok.
~
Subscribe to:
Posts (Atom)


